
Related Manuals for aldes NANO AIR 50


Summary of Contents for aldes NANO AIR 50
- Page 1 Notice d’installation Assembly instructions Montagehandleiding NANO AIR 50 Istruzioni di montaggio www.aldes.com...
-
Page 2: Table Of Contents
Aussenabmessungen der Nano Air 50, mm Dimensioni di ingombro, mm ......................8 5. VUE DU NANO AIR 50 • NANO AIR 50 DESIGN • AUFBAU DER NANO AIR 50 • COMPONENTI NANO AIR 50 ......................10 5.1. Modes de fonctionnement du Nano Air 50... - Page 3 Collegamento di più di 10 Nano Air 50 in serie ................24 8. COMMANDE DU NANO AIR 50 • NANO AIR 50 CONTROL • STEUERUNG DER NANO AIR 50 • CONTROLLO NANO AIR 50 ..........26 8.1. Boutons de commande sur le caisson du Nano Air 50 Control buttons on the Nano Air 50 casing Steuertasten auf dem gehäuse...
-
Page 4: Introduction • Introduction • Einführung • Introduzione
Ce manuel d’utilisation contient la description technique, les instructions d’utilisation, d’installation et de montage et les données techniques du Nano Air 50 à récupération d’énergie. This user’s manual includes technical description, operation, installation and mounting guidelines, technical data for the energy regeneration Nano Air 50. -
Page 5: Informazioni Generali
We would like to thank you for choosing an ALDES product. We recommend that you read this manual and follow the instructions carefully in order to ensure that your unit works correctly. As the manufacturering quality we will not be responsible for any improper use, poor maintenance or lack of maintenance of the unit, nor in the event of incorrect installation. -
Page 6: Utilisation Et Entretien
- La rimozione di qualsiasi coperchio vi espone al pericolo di scariche elettriche. - Interrompere immediatamente la corrente elettrica in caso di rumori anomali, odori o presenza di fumo e contattare il centro assistenza Aldes. - Prima di pulire la centrale togliere l’alimentazione elettrica. -
Page 7: Contenu Du Colis • Delivery Set • Lieferumfang
3. CONTENU DU COLIS • DELIVERY SET • LIEFERUMFANG • PRODOTTI FORNITI Unité ventilation 1 unité Jeu d’éléments de fixation 1 unité Télécommande 1 unité Manuel d’utilisation 1 unité Carton d’emballage 1 unité Ventilation unit 1 item Fastening set 1 item Remote control 1 item User’s manual... -
Page 8: Principaux Paramètres Techniques • Main Technical Parameters
Nano Air 50 standby and prevent air back draft. The ventilation hood must be installed on outer side of the wall to prevent ingress of water and other objects to the Nano Air 50. Die Nano Air 50 besteht aus dem längenverstellbaren Teleskopgehäuse, das sich von der Position des Innenteils im Aussenteil regulieren lässt, der Nano Air 50 einheit und der Außenlüftungshaube. - Page 9 Il Nano Air 50 deve essere installato sul lato interno della parete. E’ presente una griglia di ventilazione automatica che chiude il canale quando il Nano Air 50 si spegne per evitare l’ingresso dell’aria.
-
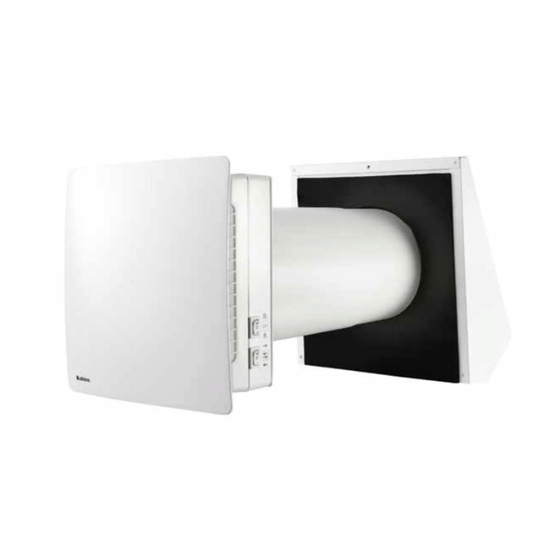
Page 10: Vue Du Nano Air 50 • Nano Air 50 Design • Aufbau Der Nano Air
4 – Unité de ventilation Permet au Nano Air 50 de générer un fl ux d’air. La grille décorative protège le Nano Air 50 contre la pénétration de corps étrangers. L’unité de ventilation est équipée de volets automatiques qui s’ouvrent quand le Nano Air 50 est en marche et se ferment quand il est à... - Page 11 Is used to generate air flow by the fan. The decorative grille protects the fan against foreign objects ingress from the premises. The ventilation unit is equipped with automatic shutters opening when the Nano Air 50 is on and closing when it is off, thus preventing back air flow.
- Page 12 Utilizzato come supporto per il filtri ed il recuperatore nel condotto interno. 7 – Filtri Progettati in modo da purificare il flusso di aria in ingresso ed evitare che polvere ed oggetti estranei entrino nel Nano Air 50. Evitano l’intasamento del recuperatore.
-
Page 13: Modes De Fonctionnement Du Nano Air
• Supply - the Nano Air 50 supplies fresh air to the premise no matter of CN7 jumper position. • Ventilation - the Nano Air 50 operates in permanent supply or extract mode at set speed depending on CN7 jumper position. -
Page 14: Montage Et Paramétrage • Mounting And Set-Up
• MONTAGE UND BETRIEBSVORBEREITUNG • MONTAGGIO E SET-UP ATTENTION! Le Nano Air 50 doit être installé de manière à ce que le conduit d’air ne soit pas obstrué par des volets, rideaux, voilages ou autres, afin de prévenir l’accumulation de poussière dans la pièce. Les rideaux peuvent par ailleurs affecter le flux normal de l’air dans la pièce, rendant la ventilation inefficace. - Page 15 Une fois la traversée percée, découper un renfoncement de 25 mm de profondeur pour le passage des câbles et des prises de contact raccordées à la plaque de montage. Si le montage de plusieurs Nano Air 50 en série est prévu, prévoir un renfonce- ment pour le passage des câbles lors du perçage de la traversée afin de permettre le raccordement desdits Nano Air 50.
- Page 16 Raccorder la plaque de montage. Percer quatre trous de fixation et fixer la plaque de montage au mur à l’aide de 4 vis 4x40 et de chevilles 6x40 (fournies). Aligner le conduit télescopique sur la plaque de montage, puis combler les espaces entre le mur et le conduit à...
- Page 17 Install the ventilation unit on the mounting plate. The ventilation unit is fi xed with magnets. Die Nano Air 50 einheit auf der Aufbauplatte installieren. Die Nano Air 50 einheit wird mit Magneten fi xiert. Instellare l’unità di ventilazione sulla piastra di montaggio. L’unità è fi ssata con dei magneti.
-
Page 18: Montage De La Grille Extérieure
6.2. Montage de la grille extérieure • Ventilation hood mounting • Montage der lüftungshaube • Montaggio controvento esterno Marquer les trous de fixation de la grille extérieure, puis percer les trous destinés à recevoir les chevilles 6x40. Pour simplifier le marquage, utiliser la partie arrière de la grille. - Page 19 Démonter la grille extérieure afin d’accéder aux trous de fixation. Disassemble the outer ventilation hood to enable access to the fastening holes. Take off the upper part of the outer ventilation hood. Die Lüftungshaube ausbauen um einen Zugang an die Befestigungslöcher zu ermöglichen. Smontare il controvento esterno per consentire l’accesso ai fori di fissaggio.
- Page 20 Monter la partie supérieure de la grille extérieure. Mount the upper part of the ventilation hood. Den Vorderteil der Lüftungshaube aufsetzen. Montare la parte superiore del controvento esterno.
-
Page 21: Raccordement Au Secteur • Connection To Power Mains
The Nano Air 50 is rated for connection to single-phase 230 V power mains. For wireworks facilitation, the Nano Air 50 is supplied with a pre-wired power cord and a plug. Connect the Nano Air 50 to power mains through the automatic circuit breaker with magnetic trip integrated into the fixed wiring system. - Page 22 Input contact socket of the second Nano Air 50 mounting plate. Connect the second Nano Air 50 with the third Nano Air 50 in the same way, etc. Up to 10 Nano Air 50 may be connected in series. For easy electric installations use a five-wire cable (not included into the delivery set) with the cable cross section not below 0.5 The cable must be rated for operation in an alternating current power supply with the country-specific mains voltage.
-
Page 23: Raccordement De Plusieurs Nano Air 50 En Série
Nano Air 50 les contacts 1 et 2, les Nano Air 50 fonctionnent dans des sens opposés en mode Récupération. The fi rst Nano Air 50 controls all the connected Nano Air 50. The jumper between the contacts 1 and 2 or 2 and 3 of CN7 socket connector determines a fl ow direction in Ventilation mode. -
Page 24: Raccordement De Plus De 10 Nano Air 50 En Série
Cioè, se il ponte del primo Nano Air 50 si trova tra i contatti 2 e 3 e nel secondo Nano Air 50 si trova tra i contatti 1 e 2, allora in fase di Recupero i Nano Air 50 funzionano in fase opposta. -
Page 25: Hintereinanderschaltung Von Mehr Als 10 Nano Air
Raccordement en série de plus de 10 Nano Air 50 • Connection in series of above 10 Nano Air 50 • Hintereinanderschaltung von mehr als 10 Nano Air 50 • Connessione in serie di più di 10 Nano Air 50... -
Page 26: Commande Du Nano Air 50 • Nano Air 50 Control
The Nano Air 50 is operated with a remote control or the buttons on the Nano Air 50 casing. The operation buttons on the Nano Air 50 casing have limited functionality and include activating the second and third speed and setting three of four ventilation modes. - Page 27 The Nano Air 50 operates with 50% air flow. 4 – Ventilation mode All the connected in series Nano Air 50 operate either in extract or supply mode according to the CN7 jumper position. By default the jumper is set to extract mode.
-
Page 28: Télécommande Remote Control Fernbedienung Telecomando
Le Nano Air 50 fonctionne en mode Extraction ou Alimentation à la vitesse sélectionnée, selon la position du cavalier CN7. 6 – Alimentation d’air Le Nano Air 50 insuffle en continu de l’air neuf dans la pièce, quelle que soit la position du cavalier CN7. 7 – Récupération Le Nano Air 50 alterne toutes les 70 secondes entre les modes Alimentation et Extraction avec récupération de chaleur. -
Page 29: Commande Par Les Boutons Sur Le Caisson Du Nano Air
Jumpers CN7. 6 – Zuluftbetrieb Die Nano Air 50 liefert ständig die frische Luft in den Raum unabhängig von der Position des Jumpers CN7. 7 – Regeneration Die Nano Air 50 funktioniert 70 Sekunden in Zuluftbetrieb und dann 70 Sekunden in Abluftbetrieb. Dabei wird die Wärmeenergie zurückgewonnen. -
Page 30: Télécommande Remote Control Fernsteuerung Telecomando
Marche/arrêt ON/OFF Si le mode Nuit est activé, le Nano Air 50 passe en première vitesse If Night mode is activated, the Nano Air 50 switches to the fi rst pendant la nuit, en l’absence de lumière. L’activation du mode nuit est speed in the night, when the light is turned off. - Page 31 Acceso/Spento Wenn der Nachtbetrieb aktiv ist, schaltet die Nano Air 50 in die Se è attivata la modalità Notte, in assenza di luce il Nano Air 50 erste Geschwindigkeit in der nacht, wenn das Licht ausgeschaltet passa automaticamente alla velocità 1. L’attivazione della modalità...
-
Page 32: Entretien • Maintenance • Wartung • Manutenzione
CAUTION! Disconnect the Nano Air 50 from power supply prior to any maintenance operations. Maintenance of the Nano Air 50 means regular cleaning of the Nano Air 50 surfaces of dust and cleaning or replacement of the fi lters. - Page 33 Nettoyer les pales. Pour éliminer la poussière, utiliser une brosse douce, un chiffon ou un aspirateur. Ne pas utiliser d’eau, de détergents abrasifs, de solvants ou d’objets pointus. Les pales doivent être nettoyées une fois par an. Clean the impeller blades. To remove dust use a soft brush, clo- th or a vacuum cleaner.
- Page 34 Après 90 jours de service, le ventilateur émet un signal sonore rappelant de remplacer ou de nettoyer le filtre. Ce signal est répété toutes les 5 minutes jusqu’à ce que l’entretien du filtre ait été réalisé. Nettoyer les filtres, les laisser sécher puis les installer à...
- Page 35 3. Entretien de la grille extérieure (une fois par an) • Ventilation hood maintenance (once per year) • Pflege def luftungshaube (jährlich) • Manutenzione controvento esterno di ventilazione (una volta l’anno) La grille extérieure peut être obstruée par des feuilles ou d’autres corps étrangers, ce qui risque d’impacter les performances de l’unité.
-
Page 36: Tableau De Dépannage • Troubleshooting • Fehlerbehebung
Redémarrer le Nano Air 50. Déclenchement automatique de l’interrupteur Surtension causée par un court-circuit du Mettre le Nano Air 50 hors tension. Contacter dès la mise en service du Nano Air 50. circuit électrique. un installateur. Le ventilateur est en vitesse basse. - Page 37 Fehler Mögliche Gründe Abhilfe Überprüfen, dass die Stromversorgung Keine Stromversorgung. richtig angeschlossen ist, ansonsten einen Anschlussfehler beseitigen. Der Ventilator startet beim Einschalten der Die Lüftungsanlage ausschalten. Die Lüftungsanlage nicht. Blockierter Motor, verschmutzte Blockierung des Motors abstellen. Die Flü- Flüfelradschaufeln. gelradschaufeln reinigen. Die Lüftungsanlage neu starten.
-
Page 38: Règles De Stockage Et De Transport • Storage And Transportation Rules
Nano Air 50. Respecter les exigences de manutention applicables à ce type de colis. Le transport est autorisé dans tout type de véhicule, à... - Page 40 www.aldes.com...
Need help?
Do you have a question about the NANO AIR 50 and is the answer not in the manual?
Questions and answers