Advertisement
6
Tel: +44 (0)1908-611-211 Fax: +44 (0)1908-611-363 www.legendbrandseurope.com
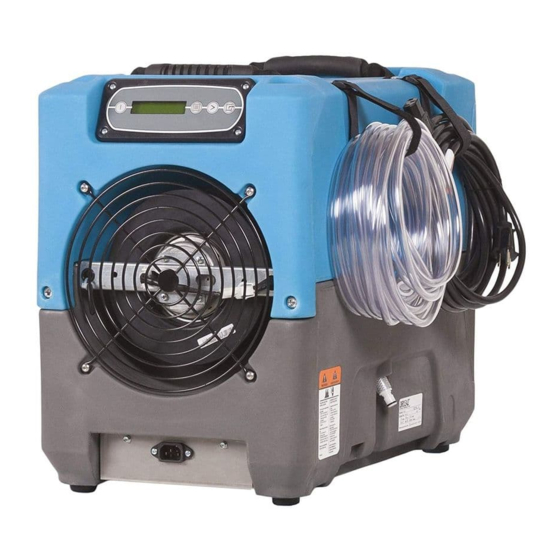
The Dri-Eaz
®
Revolution LGR Dehumidifier reduces humidity in enclosed environments by removing wa-
ter vapor from the air. The Revolution is ideal for water damage restoration, structural drying, construc-
tion, and many other applications requiring temporary, high-performance dehumidification.
WARNING
WARNING! Do not alter or modify your dehumidifier
in any way. Use only replacement parts authorized
by Dri-Eaz Products, Inc. Modifications or use of
unapproved parts could create a hazard and will
void your warranty. Contact your authorized
distributor for assistance.
WARNING! Electric shock hazard, rotating fan haz-
ard and hot surface hazards.
• Inspect the power cord before use. If cord is dam-
aged, do not use. Always grasp the plug (not the
cord) to unplug.
• Must be earthed. Insert three-prong plug on power
cord into a matching electrically earthed outlet. Do
not use adapter. Never cut off third prong. Do not
use an extension cord.
• The unit must be operated on a 230V/50 Hz circuit
protected by a Residual Current Device (RCD) de-
vice.
• Keep motor and wiring dry.
• Always unplug unit before cleaning or servicing.
• Do not attempt to repair the unit. For service, contact
your local distributor.
FIRE HAZARD
• Keep away from open flames and heat sources.
• Do not use or store where vapors from gasoline, sol-
vents, thinners or other flammable materials may be
present.
07-01899G F413-230V EU/UK
Owner's Manual
Revolution LGR Dehumidifier
Model F413-230V EU/UK
LEGEND BRANDS HOLDINGS LTD.
22 Plover Close, Interchange Park, Newport Pagnell, MK16 9PS
Patents: http://www.LBpatents.com
O R I G I N A L I N S T R U C T I O N S
BEFORE YOU BEGIN
Warranty registration
Warranty registration procedures vary by country/mar-
ket. Contact your local distributor for assistance. Regis-
tration allows us to better assist you with using, main-
taining or servicing your equipment and to contact you in
case we have important safety information concerning
your Dri-Eaz product. If you determine service is re-
quired, have your equipment model, serial number and
original proof of purchase available and ask for assis-
tance with obtaining a return material authorization
(RMA).
GROUNDING INSTRUCTIONS
This unit's plug must be inserted into an appropriate out-
let that is properly installed and grounded in accordance
with all local codes and ordinances.
WARNING! Improper connection of the equipment-
grounding conductor can result in a risk of electric
shock. Check with a qualified electrician or service
person if you are in doubt as to whether the outlets
are properly grounded. Do not modify the plugs pro-
vided with the appliance – if the plugs do not fit the
outlets, have proper outlets installed by a qualified
electrician.
This equipment is for use on circuits with a nominal rat-
ing of no more than 230V.
Handle the unit carefully
Always operate the unit on a stable, level surface. Do
not drop, throw, or place where it could fall. Rough treat-
ment can damage the unit, and may create a hazardous
condition or void the warranty.
This unit intended for household and commercial use.
1
Legend Brands Holdings Ltd.
Advertisement
Table of Contents

Related Manuals for Dri-Eaz F413-230V UK


Summary of Contents for Dri-Eaz F413-230V UK
-
Page 1: Grounding Instructions
Dri-Eaz product. If you determine service is re- quired, have your equipment model, serial number and original proof of purchase available and ask for assis-... -
Page 2: Set Unit Upright
CONTROLS AND OPERATING Fig. A: Parts Identification INSTRUCTIONS Carry handles Set unit upright NOTICE: Always store, transport, and use the unit in Control a horizontal position. If the unit is ever placed in a panel vertical position, return it to the horizontal position and let it stand for at least 30 minutes before turning Air inlet Air outlet... -
Page 3: Control Panel Guide
Error messages User Settings Menu A number of display settings may be changed by the If the onboard diagnostics discover a problem, the unit user. System information can also be displayed. These will display an error message. See “Error Messages,” items are accessed by pressing DISPLAY MENU. - Page 4 USER SETTINGS Only menu items followed by a greater-than symbol (>) can be adjusted. If no keys are selected for 5 minutes on screens: INLET OUT- LET, GRAIN DPR (INLET-OUTLET for 230V models), the display will return to normal display mode. In all the other menu items, the display with return to the normal display mode after 20 seconds.
-
Page 5: Transportation And Storage
Fig. B: Disassembly for Cleaning AT THE END OF THE JOB Remove the 4 screws To reduce the possibility of drips when moving the from the cover and 2 unit, follow these additional steps to ensure that all top screws each from the inlet and outlet water is removed from the unit. -
Page 6: Before Each Use
As Needed is visible. Clean pump check valve and basin. If the unit displays NOTICE: Replace used filters only with a new Dri-Eaz the message “ER9 PUMP BLOCKED PUMP & HOSE”, filter part no. F583 (24-pack). Other filter types do not the pump check valve and pump basin may need to be provide adequate filtration or airflow. -
Page 7: System Messages
SYSTEM MESSAGES The Control Panel will display the following messages based on system performance and environmental conditions. User action, if any is required, is indicated in the third column. C O N T R O L P A N E L E X P L A N A T I O N U S E R A C T I O N M E S S A G E... -
Page 8: Error Messages
ER6 CONTACT Current sensor failure. If error persists, contact service. SERVICE CENTER ER7 INVALID Incorrect or unsupported DIP switch settings. Contact Dri-Eaz service department for MODEL SETTING correct DIP switch settings. ER8 BUTTON STUCK Key is stuck or has been held down too long. Contact service. -
Page 9: Troubleshooting
TROUBLESHOOTING F A U L T C A U S E S O L U T I O N Water drips out Unit was unplugged before Purge unit before moving. See “At the End of the Job.” when moving unit purging was complete.
Need help?
Do you have a question about the F413-230V UK and is the answer not in the manual?
Questions and answers