
Related Manuals for Covert Code Black LTE 5472


Summary of Contents for Covert Code Black LTE 5472
- Page 1 Code Black LTE 5472 User manual Watch the set up video on our website at: www.covertscoutingcameras.com...
- Page 2 What you will need to set this camera up: ‐Internet Access to Choose Your Plan. https://secure.covert‐wireless.com ‐At least 4 AA Batteries ‐SD Card ...
-
Page 3: Table Of Contents
Table of Contents Camera Button Control Diagram ...... 05 Main Screen Info ........... 06 Installing the Batteries .......... 07 Downloading the Mobile App ....... 08 Purchasing Your Plan .......... 09 Setting up the Wireless Network ...... 14 Send a Test Photo .......... 16 Customizing Camera Settings ....... 18 PIR Tab .............. 21 SYS Tab .............. 26 Formatting the SD Card ........ 30 Viewing Photos on Color Display ...... 31 Troubleshooting ........... 33 Tricks and Tips on Field Setup ...... 35 Warranty Policy ............ 37 International Warranty Policy ...... 39 Technical Specifications ........ ... - Page 4 Congratulations on your purchase of the 5472 Covert Scouting Camera! We truly value your business and will continue to provide you top quality customer service should you ever need help with any of our products. Check out our other products on our website at: www.covertscoutingcameras.com We hope you enjoy hassle free performance from this quality product for years to come. Covert Scouting Cameras, Inc. 4338 Greenridge Spa Road Lewisburg, KY 42256...
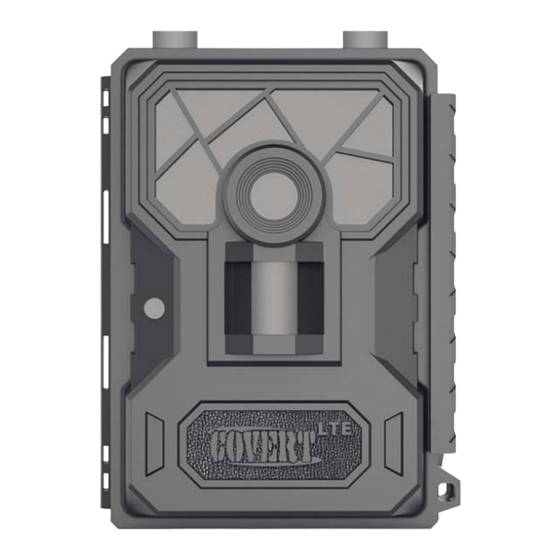
- Page 5 Camera overview: 1: Black vision IR flash 2: Lens 3: Light sensor 4: Power switch 5: PIR sensor 6: Key board 7: HD TFT screen 8: LTE Mani antenna 9: LTE DVI antenna ...
-
Page 6: Installing The Batteries
Installing the batteries: Your 5472 can function short term on 4‐ AA batteries. Improved battery life on 8‐AA, but we suggest you use 12‐AA batteries to get the most out of your cameras battery life. Using Covert rechargeable NiMH, 2300mAh, AA batteries will extend the battery life significantly when paired with a Covert Solar Panel. DISCLAIMER: Do not use external power source (Example: Solar Panel) with non‐rechargeable AA batteries installed in camera. Install batteries by sliding the top battery into the sleeve, then depressing the spring with the other battery and snapping down in place. Pay attention to the (+) or (‐) molded into each sleeve to determine if you insert the positive or negative end into the sleeve first. Negative battery terminal always contacts the spring. -
Page 7: Downloading The Mobile App
Downloading the Mobile App: Search "Covert Wireless" in your Google Play Store or Apple App Store. Accessing the Web Portal: Open your web browser to: www.covert‐wireless.com... -
Page 8: Purchasing Your Plan
Purchasing your Plan: Follow these simple steps to activate or renew an AT&T plan: 1. Open your web browser to: https://secure.covert-wireless.com 2. Select the type of plan you'd like to add 3. Follow the prompts to select your rate plan, enter your personal/billing information and complete your purchase. 4. Log back into your account. 5. Enter the ICCID number located on the SIM card included with your camera. Then enter the IMEI for your camera found on the inside white label of the camera or on the outer packaging. (Figure 5.) Figure 5 6. Click the green activate button and refresh your page. - Page 9 7. Rename your camera in the nickname field provided. (OPTIONAL) Activating Multiple Cameras: Same Rate Plan‐ To activate multiple cameras on the same rate plan, simply enter the ICCID and IMEI number under said rate plan and click activate. Note: You can activate as many cameras as you’d like on a rate plan. Rate plans are a per device charge. ‐ Different Rate Plan To activate cameras on a different rate plan, scroll to Purchase Additional Subscription Plans. Select the provider and the rate plan of your choice. This will add the rate plan option under My Services and Equipment.
- Page 10 Other Plan Information: Auto Renew: Covert Wireless plans automatically renew, however there is no long‐term contract. To opt out of your billing for certain months, simply hover over the “active” button and click. You will no longer be billed for services until you log back into your account and “click to activate.” ...
- Page 11 Now that you have activated your AT&T plan, you will need to install a SD card in the bottom of the camera, (Covert SD card recommended). See Figure 8 for card orientation. Push in until it clicks and release. To remove, repeat that process, the card will pop out enough to remove. You can use any SD card size up to 64GB. You must have the SD card in the camera to be able to turn the camera on and set it up. ...
-
Page 12: Setting Up The Wireless Network
Setting up the wireless network: NET tab: While finding the network you will see the words Searching Signal, in red on the screen. The camera will then say Connecting to Server as it is connecting to the server. Once you see AT&T in the top right corner, you are ready to move on. Quick Tip: If your camera says Connection Failed, turn the camera OFF then back ON. (Power Cycle.) Definitions: INSTANT: Turns wireless feature ON to send a picture every time the camera is triggered. ... - Page 13 Download Firmware: Anytime your camera needs a firmware update, it will be automatically pushed to your camera. When you go check your camera, we encourage you to scroll to the NET Tab and download the latest firmware version in case there’s been an update. Then take out your SD card, lock it and put it in your camera. Turn your camera onto setup, scroll to the SYS tab and scroll down to default set. Press OK. Then turn your camera off, unlock your SD card and put in back in your camera. Important Note: Anytime you make changes directly to the camera, press OK to save the changes on your camera and choose “Upload settings” in SYS to sync the changes directly to the web portal. ...
-
Page 14: Send A Test Photo
Send a test photo: This is a great way to make sure that your camera is working properly before leaving your camera set up remotely. 1) Press the button that has the CAMERA symbol on it (1) time to manually take a photo with the camera. You will know that a photo has been taken because the photo counter on the screen will say 001. 2) Press the PLAY button, located under MENU, to enter the Play mode and then press the MENU button. You will see the following screen. 3) Press the ▼to highlight the SEND option and press OK. 4) The LCD screen will start to count up from step 1 to 4 with brief pauses between numbers. Once you see Send Successful, you have successfully sent your first photo and your camera is ready to take photos. Press PLAY to return to the main menu... - Page 15 ...
-
Page 16: Customizing Camera Settings
Customizing the camera settings : Camera Mode Photo Mode: You can change Photo Size, set Flash power, and Photo Burst in Custom Settings. Video Mode: You can further set the Video Size and Video Length. Picture +Video Mode: You can further set the Custom Settings, Video Size and Video Length. - Page 17 Trigger Mode Settings PIR Sensitivity: The camera will react on movements and temperature changes. Auto High PIR Interval: The PIR sensor takes a break in order to avoid unnecessary recordings. 0 seconds means the PIR function is opened all the time.
- Page 18 Time Lapse: Camera release at defined intervals: 5-60 seconds in 5 seconds steps 1-5 minutes in steps of 1 minute 5-60 minutes in steps of 5 minutes 1-8 hours in steps of 1 hour 12,16,20,24 hours in steps of 4 hours. Time Frame Setting Select ”ON”...
- Page 19 If you wish the camera to be active permanently, select the time frame menu and switch it “OFF”. Note: 1. Work hour: 00:00-00:00 means 24 hours. 2. Start: 20:00 Stop: 10:00 means 00:00-10:00 am and 20:00-24:00 of the chosen day.
- Page 20 System Settings The following settings can be done. (Information about navigation please see chapter camera programming) Set Clock You can choose different date formats according to different countries to set date and time. Password: Select ”On” and enter a 4 digit code to protect the camera from unauthorized use.
- Page 21 Rename: Enter a name that will be shown on each picture stamp. Overwrite Save the new data file to overwrite the old data file when SD card is full. SD card formatting: Delete all data of your memory card. Be sure that you won’t need the data any more.
- Page 22 AUXILIARY POWER: Your camera comes with a standard 4mm Auxiliary power jack. Covert offers an auxiliary cable to extend your battery life with an external 6, 9 or 12 volt battery. In order to use 12 volt, you must use the Covert auxiliary battery cable. We also sell a Covert Solar Panel to directly hook up to your camera for optimal battery usage. MINI USB: Your camera can use a mini USB cable to hook up to your computer or TV to look at the photos.
-
Page 23: Troubleshooting
Troubleshooting: COMMON ERROR MESSAGES: “LOG IN FAIL” “SEND FAIL” “NETWORK BUSY” Reasons for error: Login Fail: 1. The service in your area is insufficient to run the camera. 2. Make sure that your antenna is attached securely. 3. Make sure the firmware on your device is the most up‐to‐date version. Send Fail: 1. The camera does not have sufficient service to send the picture. Make sure you have setup an... - Page 24 account and selected a rate plan from secure.covert‐wireless.com 2. You have entered your ICCID and/or IMEI number incorrectly. Click the Red X to delete the camera from your secure.covert‐wireless.com account and add the correct information. Network Busy: 1. The AT&T Network service provider is busy. 2. The camera does not have sufficient service to send the picture. 3. Network busy can also mean there isn’t enough money on your account with AT&T. No SIM: 1. Take the SIM card out and reinsert it. Ensure it clicks into place. If it’s a cellular service issue you may need to purchase a booster antenna from Covert Scouting Cameras to help boost the signal. These can be very effective in boosting the signal to your camera in a poor signal area.
-
Page 25: Tricks And Tips On Field Setup
If you are still having problems, contact customer service at 877‐462‐1799 or e‐mail support@dlccovert.com If you e‐mail or have to leave a message, we will get back to you as quickly as we can. Cannot access the SET‐UP menu: Reasons for issue: 1) SD card not inserted 2) SD card is corrupted 3) Batteries are low Suggestions to remedy 1) Install new SD card 2) Replace batteries Tricks and tips on field setup: For best results, mount the camera approximately 3 feet off the ground facing straight forward, as level as possible. - Page 26 To enhance the flash, we recommend positioning the camera in an area with a backdrop to reflect the maximum amount of light. For instance, place the camera 20‐30’ from a field edge facing the woods. For the inside of timber, positioning the camera facing a thicket approximately 20‐30’ away. Try to set the camera up so it’s not facing directly into the sun either in the morning or the evening when game movement is at its peak. Use the Covert Tree60 mounting system to mount the camera up higher pointing down on them for a better look. Works great when you don’t have a straight tree to attach to. Included in this manual is an extra “O” ring/seal for your Covert 5472. You don’t need to do anything with this seal. The FW version is reference to our engineers to ensure a speedy and efficient warranty repair should the need arise.
- Page 27 Covert Scouting Cameras Warranty: Covert Scouting Cameras warranties this product for a period of two (2) years from the date of purchase. This warranty only covers manufacturer’s defects and does not cover damage caused by misuse or abuse of the product. This warranty includes two years repair or replacement service on product from date of purchase. If you have problems with this product, please do not contact the store you purchased it from. Contact Covert Scouting Cameras Customer Service toll free at 877‐ 462‐1799 or e‐mail support@dlccovert.com. ** Proof of purchase required for replacement** Covert Warranty Policy and Procedure: To receive repair or replacement by Covert Scouting Cameras two year warranty, we ask you to do the following:...
- Page 28 ‐All returns must have a Return Authorization (RA#) prior to sending in the camera. 1. E‐mail or call our customer service department. ‐support@dlccovert.com ‐toll free: 877‐462‐1799 Please explain to the technician what issues you are having with your camera. 2. If you are asked to return your camera to Covert Scouting Cameras, you will be responsible for the cost of shipping to Covert Scouting Cameras. In return, Covert will provide fast and exceptional service as well as incur the cost of shipping back to you. (Only within the Continental United States.) 3. Please include the following information when sending in your camera. ‐RA# on outside of package ‐Return address ‐Telephone and Email address ‐Brief description of the problem ‐Copy of proof of purchase...
- Page 29 4. Please make sure all the accessories are removed (i.e. SD Cards, batteries, solar panels SIM cards, straps, ETC.) before shipping. All accessories received by Covert Scouting Cameras will NOT be returned. 5. This warranty only covers manufacturer’s defects and does not cover damaged caused by misuse or abuse of the product. Covert International Warranty Policy and Procedure: 1. Outside the US, service is the available through the distributor/reseller of purchase. 2. All returns must have an RA# provided by Covert. Copy of Proof of Purchase is required for all returns. 3. Covert is not responsible for lost or damaged products incurred during the shipping process.
- Page 30 4. Insurance for returns is at the discretion of the customer. Additional charges apply for return shipping. In the maintenance of the product, Covert Scouting Cameras may use new or like‐new assemblies or products for equal or improved quality. All defective parts, assemblies, and products become the property of Covert. Returns and claims will be handled according to the current Covert Scouting Cameras, Inc. procedure. These warranties shall not apply to any defect, failure or damage caused by improper use or inadequate maintenance and care. Covert shall not be obligated under these warranties to repair: a. Damage resulting from attempts by personnel other than Covert representatives to install, repair or service the product unless directed by a Covert representative.
- Page 31 b. Damage, malfunction or degradation of performance resulting from improper use or connection to incompatible equipment or memory. c. Damage, malfunction, or degradation of performance caused by the use of non‐ Covert supplies or consumables or the use of Covert supplies not specified for use with this product. d. An item that has been modified or integrated with other products when the effect of such modification or integration increases the time or difficulty of servicing the product or degrades performance or reliability. e. To perform user maintenance or cleaning or to repair damage, malfunction. f. Damage, malfunction or degradation of performance resulting from use of the product in an environment not meeting the operating specifications set forth in the user manual.
- Page 32 g. Damage, malfunction or degradation of performance resulting from failure to properly prepare and transport the product as prescribed in published product materials. h. Any failure to register the product warranty within 10 days of purchase. i. To replace items that have been refilled, are used up, abused, misused, or tampered with in any way. j. To install replacement items that are not considered customer replaceable. k. To support software not supplied by Covert l. To provide software or firmware updates or upgrades. Any service identified in the above list and provided by Covert at the Customer’s request shall be invoiced to the customer, at Covert’s then current rates for parts, labor and shipping. THE ABOVE WARRANTIES ARE GIVEN BY COVERT WITH RESPECT TO THIS PRODUCT AND ITS RELATED...
- Page 33 ITEMS IN LIEU OF ANY OTHER WARRANTIES, EXPRESS OR IMPLIED. COVERT AND ITS VENDORS DISCLAIM ANY IMPLIED WARRANTIES OF MERCHANTABILITY OR FITNESS FOR A PARTICULAR PURPOSE OR ANY SIMILAR STANDARD IMPOSED BY APPLICABLE LEGISLATION. COVERT’S REPONSIBILITY TO REPAIR OR REPLACE, FOR DEFECTIVE PRODUCTS AND RELATED ITEMS IS SOLE AND EXCLUSIVE REMEDY PROVIDED TO THE CUSTOMER FOR BREACH OF THESE WARRANTIES. Some states, provinces, and countries do not allow the exclusion or limitation of incidental or consequential damages or exclusions or limitation on the duration of implied warranties or conditions, so the above limitations or exclusions may not apply to you. This warranty gives you specific legal rights, and you may have other rights that vary by state, province, or country. TO THE EXTENT ALLOWED BY LOCAL LAW, EXCEPT FOR THE OBLIGATIONS SPECIFICALLY SET FORTH IN THIS WARRANTY STATEMENT, IN NO EVENT SHALL...
- Page 34 COVERT AND ITS VENDORS BE LIABLE FOR ANY INDIRECT, SPECIAL, INCIDENTAL OR CONSEQUENTIAL DAMAGES (INCLUDING LOSS OF PROFITS) WHETHER BASED ON CONTRACT, TORT, OR ANY OTHER LEGAL THEORY AND IRRESPECTIVE OF WHETHER COVERT OR THE VENDOR HAS ADVANCE NOTICE OF THE POSSIBILITY OF SUCH DAMAGES.
-
Page 35: Technical Specifications
Appendix One: Technical Specifications Picture Resolution 12MP Lens F/NO=2.2 FOV (Field of View)=58° FDD‐LTE:B2/B4/B12; Frequency Bands: WCDMA: B2/B4/B5; GSM: Not supported Flash Power Full, Low Display Screen 2.0” LCD Memory Card Up to 64GB Video Resolution 1080P, 720P, WVGA PIR Sensor Multi Zone PIR Sensitivity Adjustable ( High/Normal/Low) Trigger Time 0.6s Weight Less than 1 Pound (with out batteries Operation/Storage Tem. ‐20 ‐ +60°C / ‐30 ‐ ... - Page 36 1‐8 hours (in 1 hour increments) ; 12h,16h,20h,24h; Photo Burst 1–10 Video Length 1–60s Power Supply 4AA, 8AA or 12AA Stand‐by Current < 0.25 (<6mAh/Day) mA Power Consumption 600 videos (interval=5min, video Length=10s ) ; >800 MMS (use 12*AA batteries) Low Battery Alert LED Indicator Mounting Rope/Belt/Python lock Dimensions 140mmX95mmX57mm (5.51”X 3.74”X2.24”) Weight 474g Operation Humidity 5% ‐ 90% Security authentication FCC ID, AT&T ...
- Page 37 FCC Statement This device complies with Part 15 of the FCC rules. Operation is subject to the following two conditions: 1) this device may not cause harmful interference, and 2) this device must accept any interference received, including interference that may cause undesired operation. Note: This equipment has been tested and found to comply with the limits for a Class B digital device, pursuant to part 15 of the FCC Rules. These limits are designed to provide reasonable protection against harmful interference in a residential installation. This equipment generates uses and can radiate radio frequency energy and, if not installed and used in accordance with the instructions, may cause harmful interference to radio communications. However, there is no guarantee that interference will not occur in particular installation. If this equipment does cause harmful interference to radio or television reception, which can be determined by turning the equipment off and on, ...
- Page 38 the user is encouraged to try to correct the interference by one or more of the following measures: ‐‐Reorient or relocate the receiving antenna. ‐‐Increase the separation between the equipment and receiver. ‐‐Connect the equipment into an outlet on a circuit different from that to which the receiver is connected. ‐‐Consult the dealer or an experienced radio/TV technician for help. Changes or modifications not expressly approved by the party responsible for compliance could void the user’s authority to operate the equipment. ...
- Page 39 RF Exposure Statement This equipment complies with FCC radiation exposure limits set forth for an uncontrolled environment. This equipment normal use should be installed and operated with minimum distance 20cm between the radiator & your body. ...
Need help?
Do you have a question about the Code Black LTE 5472 and is the answer not in the manual?
Questions and answers