ResMed AirFit F20 User Manual
Full face mask
Hide thumbs
Also See for AirFit F20:
- User manual ,
- Manual (20 pages) ,
- Disinfection and sterilisation manual (8 pages)
Table of Contents
Advertisement
Quick Links
Advertisement
Table of Contents

Related Manuals for ResMed AirFit F20


Summary of Contents for ResMed AirFit F20
- Page 1 Full face mask QuietAir User guide English...
- Page 2 Fitting / 配戴 / 配戴...
- Page 3 Adjustment / 调整 / 調整 Removal / 取下面罩 / 取下面罩...
- Page 4 Disassembly / 取下面罩 / 取下面罩...
- Page 5 Reassembly / 重新组装 / 重新組裝...
- Page 6 Cleaning the vent / 清洗通气孔 / 清洗通氣孔 ~ 86°F / 30°C...
-
Page 7: Using This Guide
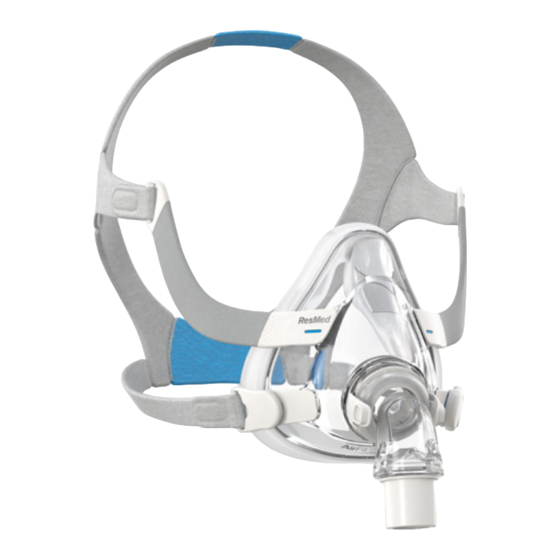
Thank you for choosing the AirFit F20/AirTouch F20. These masks are identical—except for the interchangeable AirFit F20 silicone cushion and AirTouch F20 foam cushion. This offers two choices for your mask, depending on your preferred comfort, stability and seal. This document provides the user instructions for: ™... -
Page 8: General Warnings
QuietAir The QuietAir elbow is intended for single-patient reuse in both home and hospital/institutional environments. WARNING Magnets are used in the lower headgear straps and the frame of the F20. Ensure the headgear and frame is kept at least 2" (50 mm) away from any active medical implant (eg, pacemaker or defibrillator) to avoid possible effects from localised magnetic fields. - Page 9 GENERAL WARNINGS • The mask should not be used unless the device is turned on. Once the mask is fitted, ensure the device is blowing air. Explanation: CPAP and bilevel devices are intended to be used with special masks (or connectors) which have venting to allow continuous flow of air out of the mask.
-
Page 10: Using Your Mask
Fitting 1. Twist and pull both magnetic clips away from the frame. 2. Ensure that the ResMed logo on the headgear is facing outwards and is upright. With both lower headgear straps released, hold the mask against your face and pull the headgear over your head. - Page 11 Adjustment (AirFit F20) If necessary, slightly adjust the position of the mask for the most comfortable fit. Ensure that the cushion is not creased and the headgear is not twisted. 1. Turn on your device so that it is blowing air.
-
Page 12: Cleaning Your Mask At Home (Airfit F20)
1. Attach the cushion to the frame by aligning the circular openings and pushing together until retained. 2. With the ResMed logo on the headgear facing outside and upright, thread the upper headgear straps into the frame slots from the inside. -
Page 13: Cleaning Your Mask At Home (Airtouch F20)
Daily/After each use: 1. Disassemble the mask according to the disassembly instructions. 2. Rinse the frame, elbow and cushion under running water. Clean with a soft brush until dirt is removed. 3. Soak the components in warm water (approximately 30°C) with a mild liquid detergent for up to ten minutes. - Page 14 CAUTION • Visible criteria for product inspection: If any visible deterioration of a system component is apparent (cracking, discolouration, tears, etc.), the component should be discarded and replaced. • The cushion must not be submerged in liquid as this may damage the cushion and affect mask performance.
- Page 15 5. Leave the headgear to air dry out of direct sunlight. Reprocessing the mask between patients Reprocess this mask when using between patients. Cleaning, disinfection and sterilisation instructions are available on www.resmed.com/downloads/masks. If you do not have internet access, please contact your ResMed representative. Troubleshooting (AirFit F20) Problem/possible cause Solution Mask is uncomfortable.
- Page 16 Problem/possible cause Solution Mask leaks around the face. Cushion membrane is creased. Refit your mask according to the instructions. Mask is incorrectly positioned or Ensure that you position the cushion correctly on your face before pulling headgear over your head. adjusted.
-
Page 17: Technical Specifications
As a result of manufacturing variations, the vent flow rate may vary. Pressure Flow (cm H (L/min) AirFit F20 AirTouch F20 Dead space: Empty volume of the mask to the 240 mL (Large) 281 mL (Large) end of the swivel. The mask deadspace varies according to cushion size. - Page 18 Environmental Operating temperature: 5°C to 40°C Operating humidity: 15% to 95% non-condensing conditions Storage and transport temperature: -20°C to +60°C Storage and transport humidity: up to 95% non-condensing Gross Mask fully assembled with elbow assembly (no headgear) 154 mm (H) x 159 mm (W) x 147 mm (D) dimensions International Magnets used in this mask are within ICNIRP guidelines for general...
- Page 19 Storage Ensure that the mask is thoroughly clean and dry before storing it for any length of time. Store the mask in a dry place out of direct sunlight. Disposal This mask does not contain any hazardous substances and may be disposed of with your normal household refuse.
-
Page 20: Consumer Warranty
Keep dry and away from Do not submerge in liquids liquids Consumer Warranty ResMed acknowledges all consumer rights granted under the EU Directive 1999/44/EC and the respective national laws within the EU for products sold within the European Union. - Page 21 Vent / 通气孔 / 通氣孔 Side buttons / 侧按钮 / 側按鈕 Swivel / 万向轴 / 萬向軸 Frame / 框架 / 框架 — — AirFit F20 - Cushion / 护垫 / 護墊 63467 (S) 63467 (S) 63468 (M) 63468 (M) 63469 (L)
- Page 22 AirFit F20 / AirFit F20 AirTouch F20 for Her / AirTouch F20 for Her A+B+C+D APAC: APAC: AirFit F20 - Complete system / 63420 (S) 63423 (S) 完整系统 / 完整系統 63421 (M) 63424 (M) 63422 (L) ANZ: ANZ: 63430 (S)
- Page 23 Bella Vista NSW 2153 Australia See ResMed.com for other ResMed locations worldwide. AirFit, AirTouch, AirSense, AirCurve and QuietAir are trademarks and/or registered trademarks of the ResMed family of companies. For patent and other intellectual property information, see ResMed.com/ip. © 2017 ResMed Ltd. 638117/1 2017-09 ResMed.com...
Need help?
Do you have a question about the AirFit F20 and is the answer not in the manual?
Questions and answers