Table of Contents
Advertisement
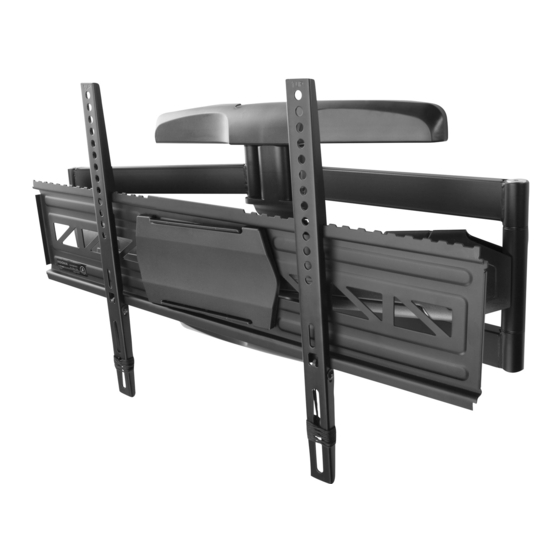
Full Motion Mount for TVs 47" - 80"
NS-HTVMM1703-C
For VESA patterns:
• 7.9 × 7.9" (200 × 200 mm)
• 11.8 × 7.9" (300 × 200 mm)
• 11.8 × 11.8" (300 × 300 mm)
• 15.7 × 7.9" (400 × 200 mm)
• 15.7 × 11.8" (400 × 300 mm)
• 15.7 × 15.7" (400 × 400 mm)
• 19.7 × 15.7" (500 × 400 mm)
• 23.6 × 15.7" (600 × 400 mm)
For wood-stud or concrete
wall installations
Before using your new product, please read these instructions to prevent any damage.
IN STA L LATI ON GUIDE
Safety Information And Specifications . . . . . 2
Tools Needed. . . . . . . . . . . . . . . . . . . . . . . . . . . . . 3
Package Contents . . . . . . . . . . . . . . . . . . . . . . . . 3
Installation Instructions. . . . . . . . . . . . . . . . . . . 5
Advertisement
Table of Contents

Related Manuals for Insignia NS-HTVMM1703-C


Summary of Contents for Insignia NS-HTVMM1703-C
- Page 1 IN STA L LATI ON GUIDE Full Motion Mount for TVs 47" - 80" NS-HTVMM1703-C For VESA patterns: • 7.9 × 7.9" (200 × 200 mm) • 11.8 × 7.9" (300 × 200 mm) • 11.8 × 11.8" (300 × 300 mm) •...
-
Page 2: Safety Information And Specifications
Overall dimensions (H × W ): CAUTION: Do 16.9 × 28 in. (42.9 × 71.1 cm) not use this product for any purpose not explicitly specified by Insignia. Wall-mount weight: 22 lbs. (10 kg) Improper installation may cause We’re here for you property damage or personal injury. -
Page 3: Tools Needed
Full Motion Mount for TVs 47" - 80" Tools needed You will need the following tools to assemble your new TV wall mount: ardware Pencil Edge-to-edge Measuring tape stud finder Drill Phillips screwdriver 3/16 in. (5 mm) wood drill Tape Hammer bit (for wood stud wall) 3/8 in. - Page 4 NS-HTVMM1703-C TV Hardware Bag Label Hardware Qty. Label Hardware Qty. M4 × 12 mm screw Lag bolts M4 × 25 mm screw M5 × 12 mm screw Concrete anchor M5 × 25 mm screw M6 × 12 mm screw Lag bolt washer M6 ×...
-
Page 5: Installation Instructions
Full Motion Mount for TVs 47" - 80" Installation instructions STEP 1 - Determine whether your TV has a flat back or an irregular or obstructed back Carefully place your TV screen face-down on a cushioned, clean surface to protect the screen from damages and scratches. - Page 6 NS-HTVMM1703-C STEP 2 - Select screws, washers, and spacers Select the hardware for your TV (screws, washers, and spacers). A limited number of TVs come with mounting hardware included. (If there are screws that came with the TV, they are almost always in the holes on the back of the TV.) If you don't know the correct length of the mounting screws your TV...
- Page 7 Full Motion Mount for TVs 47" - 80" STEP 3 - Option 1: Attaching the mounting hardware to TVs with a flat back Align the left and right TV brackets with the screw holes on the back of the TV. Make sure that the brackets are level.
- Page 8 NS-HTVMM1703-C STEP 3 - Option 2: Attaching the mounting hardware to TVs with irregular or obstructed backs Place spacers (A10) over the holes on the back of the TV. Align the left and right TV brackets with the screw holes on the back of the TV. Make sure that the brackets are level.
- Page 9 Full Motion Mount for TVs 47" - 80" STEP 4 - Determine wall-mount location Note: • For more detailed information on determining where to drill your holes, visit our online height-finder at: http://mf1.bestbuy.selectionassistant.com/index.php/heightfinder • Your TV should be high enough so your eyes are level with the middle of the screen. This is normally 40 to 60 in.
- Page 10 NS-HTVMM1703-C STEP 5 - Option 1: Installing on a wood stud* wall Note: Any drywall covering the wall must not exceed 5/8 in. (16 mm). Locate the stud. Verify the center of the stud with an edge-to-edge stud finder. Align the center of the wall plate template at the height (a + b) you determined in the previous step, make sure that the template is level, then tape it to the wall.
- Page 11 Full Motion Mount for TVs 47" - 80" STEP 5 - Option 2: Installing on a solid concrete or concrete block wall CAUTION: To prevent property damage or personal injury, never drill into the mortar between blocks. Mount the wall plate directly onto the concrete surface. Align the center of the wall plate template at the height (a + b) you determined in the previous step, make sure that it is level, then tape it to the wall.
- Page 12 NS-HTVMM1703-C STEP 6 - Install the decorative end caps • Snap a decorative end cap on each end of the wall plate. Decorative end cap You’ll need Decorative end cap (2) www.insigniaproducts.com...
- Page 13 Full Motion Mount for TVs 47" - 80" STEP 7 - Mount the TV to the wall plate Holding the TV with the top of the screen tilted toward the wall, slide the upper edges of the right and left TV brackets into the notches on the upper lip of the wall-mount arm on the wall mount. Push the bottom of the TV towards the wall until the latch mechanism clicks into place.
- Page 14 NS-HTVMM1703-C STEP 8 - Manage cables Snap the plastic covers onto the top and bottom edges of the wall plate. Thread cables for attached devices through the grooves on the plastic covers, then snap the cable management clips 1 over the plastic covers.
- Page 15 Full Motion Mount for TVs 47" - 80" STEP 9 - Adjust the mount angle To adjust the arm tension (to make the arm easier or harder to move), loosen or tighten the tension screw with an Allen wrench. To rotate the TV left or right, hold the sides of the TV, then push one side while pulling the other side. To tilt of the TV up or down, hold the top and bottom of the TV, then tilt the TV forward or backward.
- Page 16 NS-HTVMM1703-C STEP 10 - Secure the TV to the wall plate • Press the TV brackets against the wall-mounting plate until they lock into place. To remove the TV from the wall mount, pull down on both ribbons on the bottom of the TV brackets to unlock the brackets, then lift the TV off the wall mount.
- Page 17 Insignia and are not returned to you. If service of Products or parts are required after the Warranty Period expires, you must pay all labor and parts charges. This warranty lasts as long as you own your Insignia Product during the Warranty Period.
- Page 18 REPAIR REPLACEMENT AS PROVIDED UNDER THIS WARRANTY IS YOUR EXCLUSIVE REMEDY FOR BREACH OF WARRANTY. INSIGNIA SHALL NOT BE LIABLE FOR ANY INCIDENTAL OR CONSEQUENTIAL DAMAGES FOR THE BREACH OF ANY EXPRESS OR IMPLIED WARRANTY ON THIS PRODUCT, INCLUDING, BUT NOT LIMITED TO, LOST DATA, LOSS OF USE OF YOUR PRODUCT, LOST BUSINESS OR LOST PROFITS.
- Page 19 1-877-467-4289 www.insigniaproducts.com INSIGNIA is a trademark of Best Buy and its affiliated companies Distributed by Best Buy Purchasing, LLC 7601 Penn Ave South, Richfield, MN 55423 U.S.A. ©2016 Best Buy. All rights reserved Made in China V6 ENGLISH 16-0801...
Need help?
Do you have a question about the NS-HTVMM1703-C and is the answer not in the manual?
Questions and answers