Table of Contents
Advertisement
Advertisement
Table of Contents

Related Manuals for Craftsman 944.528117


Summary of Contents for Craftsman 944.528117
- Page 1 OWNER'S MANUAL MODEL NO. 944.528117 Caution: Read and follow all Safety Rules and instructions Before Operating This Equipment Sears Canada, 27" TWO-STAGE POWE OW TH • Assembly • Operation • Maintenance • Service and Adjustments • Repair Parts inc., Toronto,...
- Page 2 Safe Operation This snow thrower is capable of amputating hands and feet and throwing objects. Failure to observe the following safety instructions could result in serious injury. & Look for this symbol to point out ira= portant safety precautions. CAUTION!!! BECOMEALERT!!! SAFETY IS INVOLVED.
- Page 3 6. Whencleaning, repairingorinspectingthesnowthrower, stoptheengine andmakecertain thecollector/impel- ler andall moving parts havestopped.Disconnect thesparkplugwireandkeepthewireaway fromthe plug. toprevent someone f romaccidentally starting the engine. 7. Donot runthe engine indoors, e xcept w henstarting theengine andfortransporting thesnowthrower i nor outof thebuilding. O pentheoutside doors; e xhaust fumes aredangerous.
- Page 4 THIS PARAGRAPH SHALL NOT APPLY, BUT THE REMAINING PROVISIONS OF THIS DOCUMENT SHALL REMAIN VALID. SEARS retains the exclusive right to repair or replace the product or offer a full refund of the purchase price at its sole discretion. SUCH REMEDY SHALL BE YOUR SOLE AND EXCLUSIVE REMEDY FOR ANY BREACH OF WARRANTY...
- Page 5 PARTS PACKE (1) POWER CORD (198563) (1) DISCHARGE CHUTE EXTRA SHF=AR B OLTS ANDNUTS ÷ (2)SHOULDER BOLT 1/4-20 x 1-3/4 (192090) ROTATOR HEAD MOUN_NG (1) WASHER 3/8 (19131316) CHUTEDF=FtICTOR REMOTECONTROL (1) LOCKNUT (1) CARRIAGE 5/16-18 5/16-18 x 5/8 (751153) (72250505) Read these instructions and this manual in its entirety before you attempt to assemble or operate your new snow thrower.
- Page 6 ASSE NOTE: The multi-wrench may be used for assembly of the chute rotator head to snow thrower and making adjustments to the skid plates. UNFOLD UPPER HANDLE Raise upper handle to the operating tighten handle knobs securely. bolts, washers and handle knobs are in bag of parts. Use to secure upper handle to lower handle.
- Page 7 INSTALL AUGER CONTROL ROD (See Figs. 5 and 6) Retrieve vinyl sleeve and spring from bag of parts and retrieve the auger control rod from carton chute tray. Slide straight rod end through the small hole in the vinyl sleeve. Hook spring in hole in rod end. Hook end of spring into control arm with loop opening up as shown.
- Page 8 ASSE INSTALL CHUTE DEFLECTOR (See Figs. 8 and 9) Install remote cable bracket to discharge chute with 5/16-18 carriage bolt and 5/16-18 Iocknut as shown. Tighten securely. Install remote cable eyelet to chute deflector with 1/4-20 shoulder bolt and 1/4-20 Iocknut as shown. Tighten nut securely.
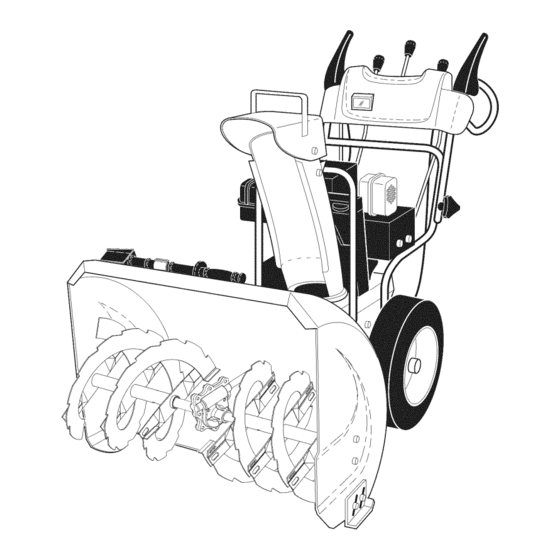
- Page 9 KNOW YOUR SNOW THROWER READ THIS OWNER'S MANUALAND the illustrations with your snow thrower to familiarize yourself with the location of various controls and adjustments. this manual for future reference. These symbols may appear on your snow thrower or in literature supplied with the product. Learn and understand their meaning.
- Page 10 GASOLINE FILLER CHOKE" CON- TROL SAFETY IGNITION ON / OFF SWITCH NOTE: iTEMS ABOVE ARE SHOWN iN THEIR TYPICAL LOCATION ON THE ENGINE. ACTUAL LOCATION MAY VARY WiTH THE ENGINE ON YOUR UNIT. AUGERS MEETS A.N.S.I. SAFETY REQUIREMENTS Our snow throwers conform to the standards of the American National Standards Institute. Toolbox - used to store spare shear bolts, Iocknuts and wrench.
- Page 11 The operation of any snow thrower can result in foreign objects thrown into the eyes, which can result in severe eye damage. Always wear safety glasses or eye shields while operating your snow thrower or performing any adjust- ments or repairs. We recommend standard safety glasses or a wide vision safety mask worn over spectacles.
- Page 12 USING THE CLEAN=OUT TOOL (See Fig. 14) in certain snow conditions, the discharge chute may be- come clogged with ice and snow. Use the clean-out tool to dislodge this blockage. When cleaning, repairing, or inspecting, make certain all controls are disengaged ger/impellerand all moving parts have stopped.
- Page 13 HiGH (LOW GROUND -_-_ NUTS LOW POSiTiON (HIGH GROUND CLEARANCE) FIG. 16 SCRAPER BAR (See Fig. 16) The scraper bar is not adjustable, but is reversible. considerable use it may become worn. When it has worn almost to the edge of the housing, it can be reversed, providing additional service before requiring replacement.
- Page 14 Allow the engine to warm up for a few minutes. Engine will not develop full power until it has reached normal operat- ing temperature. WARM START - ELECTRIC STARTER Follow the steps above, keeping the choke control in the "OFF" position. COLD START - RECOIL STARTER Insert safety ignition key (tied to recoil start cord) into ignition slot until it clicks.
- Page 15 MAINTENANCE FILL IN DATES AS YOU COMPLETE REGULAR SERVICE Check for Loose Fasteners Clean/Inspect Snow Thrower Check / Replace V=Belts RE Lubrication Chart Check Engine Oil Level Change Engine Oil Inspect Muffler Check / Replace Spark Plug Empty Fuel Tank GENERAL RECOMMENDATIONS The warranty on this snow thrower does not cover items...
- Page 16 AUGER GEAR CASE The gear case was filled with lubricant to the proper level at the factory. The only time the lubricant needs attention is if service has been performed on the gear case. • If lubricant is required, use only grease.
- Page 17 WARNING: To avoid serious injury, before performing any service or adjustments: Be sure the on/off switch Make sure the augers and all moving parts have completely stopped. Remove safety ignition key. Disconnect spark plug wire from spark plug and place wire where it cannot come in contact with plug.
- Page 18 The V-belts on your snow thrower are of special construction and should be replaced by original equipment manufacturer (OEM) belts available from your nearest Sears service center/department. Using other than OEM belts can cause )ersonal injury or damage to the snow thrower.
- Page 19 Overspeeding the engine above the factory high speed setting can be dangerous and will void the warranty. If you think the engine-governed speed needs adjusting, contact a Sears or other qualified INNER HOLE service center, which has proper equipment and experience to make any necessary adjustments.
- Page 20 Immediately prepare your unit for storage at the end of the season or if the unit will not be used for 30 days or more. WARNING: Never thrower with gasoline in the tank inside & a building where fumes may reach an open flame, spark or pilot light as on a furnace, water heater, clothes dryer or gas appliance.
- Page 21 Empty fuel tank & carburetor, refill with fresh, clean gasoline. Contact a Sears service center/department. Tighten all fasteners. Replace damaged parts. If vibration remains, contact a Sears service center/department. See "IF RECOIL STARTER HAS FROZEN" in the Operation section of this manual. Check / replace drive belt.
- Page 22 REPAIR PARTS AUGER HOUSING / iMPELLER ASSEMBLY NOTE: All component dimensions given in U.S. inches. iMPORTANT: Use only Original Equipment Manufacturer (O.E.M.) replacement parts. Failure to do so could be hazardous, damage your snow thrower and void your warranty. SNOW THROWER - - MODEL NUMBER i}/-30 01.07.026-D...
- Page 23 REPAIR PARTS AUGER HOUSING /iMPELLER NOTE: All component dimensions given in U.S. inches. iMPORTANT: Use only Original Equipment Manufacturer (O.E.M.) replacement parts. Failure to do so could be hazardous, damage your snow thrower and void your warranty. SNOW THROWER - - MODEL NUMBER ASSEMBLY PART DESCRiPTiON...
- Page 24 REPAIR PARTS AUGER HOUSING / iMPELLER ASSEMBLY NOTE: All component dimensions given in U.S. inches. iMPORTANT: Use only Original Equipment Manufacturer (O.E.M.) replacement parts. Failure to do so could be hazardous, damage your snow thrower and void your warranty. SNOW THROWER - - MODEL NUMBER (5x) (5x)
- Page 25 REPAIR PARTS AUGER HOUSING /iMPELLER 01.07.024-B o1.11.ool-B NOTE: All component dimensions given in U.S. inches. IMPORTANT: Use only Original Equipment Manufacturer (O.E.M.) replacement parts. Failure to do so could be hazardous, damage your snow thrower and void your warranty. SNOW THROWER - - MODEL NUMBER ASSEMBLY PART...
- Page 26 REPAIR PARTS CONTROL PANEL / DISCHARGE PART DESCRIPTION CHUTE WELDMENT 435023X615 DEFLECTOR WELDMENT 178633X615 DEFLECTOR CONTROL ASSEMBLY 420673 DEFLECTOR SEAL 420325 KNOB BLACK 414280 POP RIVET 128415 SCREW 10-24 X .625 17501010 CHUTE SNOW SHIELD 430324 SHIELD RETAINER STRAP 419822X431 SHOULDER BOLT 1/4-20 X .375 "10 179829...
- Page 27 REPAIR PARTS CONTROL PANEL / DISCHARGE PART DESCRIPTION 428272 LEVER/CABLE SCREW 10-24 X .625 17501010 ROTATOR HEAD 420678 ROTATOR PIVOT BRACKET 405932 PULLEY PIVOT 420675 CABLE ASSEMBLY ADJUSTABLE 428273 CABLE ASSEMBLY HEAT SHIELD 428310 NOTES: 1. ITEMS INDICATED WITH AN * ARE LISTED AS REFERENCE FOR SERVICE PARTS ONLY. NOTE: All component dimensions given in U.S.
- Page 28 REPAIR PARTS HANDLES 01.08.004-B 01 05 002-c NOTE: All component dimensions given in U.S. inches. iMPORTANT: Use only Original Equipment Manufacturer (O.E.M.) replacement parts. Failure to do so could be hazardous, damage your snow thrower and void your warranty. SNOW THROWER - - MODEL NUMBER X_ 4 01.08.007-B...
- Page 29 REPAIR PARTS HANDLES NOTE: All component dimensions given in U.S. inches. IMPORTANT: Use only Original Equipment Manufacturer (O.E.M.) replacement parts. Failure to do so could be hazardous, damage your snow thrower and void your warranty. SNOW THROWER - - MODEL NUMBER PART 180480 405740...
- Page 30 REPAIR PARTS HANDLES 01.08.002-G NOTE: All component dimensions given in U.S. inches. iMPORTANT: Use only Original Equipment Manufacturer (O.E.M.) replacement parts. Failure to do so could be hazardous, damage your snow thrower and void your warranty. SNOW THROWER - - MODEL NUMBER PART DESCRIPTION 412683X431...
- Page 31 REPAIR PARTS DRIVE \\\\ NOTE: All component dimensions given in U.S. inches. IMPORTANT: Use only Original Equipment Manufacturer (O.E.M.) replacement parts. Failure to do so could be hazardous, damage your snow thrower and void your warranty. SNOW THROWER - - MODEL NUMBER 944,528117 01.03.005-B PART DESCRIPTION...
- Page 32 REPAIR PARTS SNOW THROWER - - MODEL NUMBER 944,528117 DRIVE 39./_ 01.02.013-A NOTE: All component dimensions given in U.S. inches. 1 inch = 25.4 mm iMPORTANT: Use only Original Equipment Manufacturer (O.E.M.) replacement parts. Failure to do so could be hazardous, damage your snow thrower and void your warranty.
- Page 33 REPAIR PARTS DRIVE PART DESCRIPTION SPEED SELECTOR ASSEMBLY 198875 SCREW 10-24 X .625 17501010 END PLATE 402685X615 17490508 SCREW 5/16-18 X .50 WASHER 57079 CONTROL ARM 405485 CLEVIS PIN 198580 SHIFTER PLATE 403097×431 SHOULDER BOLT 402881 SHIFTER BRACKET 403096×431 191730 NUT 1/4-20 CLUTCH PLATE 402856X431...
- Page 34 REPAIR PARTS CHASSIS / PULLEYS / ENGINE 0I .01.007-B NOTE: All component dimensions given in U.S. inches. iMPORTANT: Use only Original Equipment Manufacturer (O.E.M.) replacement parts. Failure to do so could be hazardous, damage your snow thrower and void your warranty. SNOW THROWER - - MODEL NUMBER PART...
- Page 35 REPAIR PARTS CHASSIS / PULLEYS / ENGINE PART DESCRIPTION IMPELLER BELT 408007 TRACTION BELT 419744 IDLER ARM BRACKET 423723X431 IDLER PULLEY 180523 426589 NUT 5/16-18 74780524 SCREW 5/16-18 X 1 .50 IDLER BRACKET 423990X431 428867 SCREW 5/16-18 X .625 424297 SHOULDER BOLT 5/16-18 X .500 751153 NUT 5/16-18 NYLOCK...
- Page 36 REPAIR PARTS WHEELS NOTE: All component dimensions given in U.S. inches. IMPORTANT: Use only Original Equipment Manufacturer (O.E.M.) replacement parts. Failure to do so could be hazardous, damage your snow thrower and void your warranty. SNOW THROWER - - MODEL NUMBER 01-06-016-A 944,5:28117 PART...
- Page 37 REPAIR PARTS BAG OF PARTS s.,_ _',,.6 01.14.003-B Ol .14.007-A NOTE: All component dimensions given in U.S. inches. IMPORTANT: Use only Original Equipment Manufacturer (O.E.M.) replacement parts. Failure to do so could be hazardous, damage your snow thrower and void your warranty. SNOW THROWER - - MODEL NUMBER PART...
- Page 38 REPAIR PARTS DECALS NOTE: All component dimensions given in U.S. inches. iMPORTANT: Use only Original Equipment Manufacturer (O.E.M.) replacement parts. Failure to do so could be hazardous, damage your snow thrower and void your warranty. SNOW THROWER - - MODEL NUMBER PART DESCRIPTION DECAL DANGER...
- Page 39 SERVICE NOTES...
- Page 40 B&S ENGINE 48 SHORT BLOCK I 1058 OPERATOR'S 358 ENGINE GASKET SET 1095 VALVE GASKET SET 1036 EMISSIONS LABEL 684 ¢_ 1210 1211_ MANUAL [ 1329 REPLACEMENT ", 1022 287 _ 24 d _ 456 _ 1022 562 % MODEL NUMBER 150114-8939-E8 ENGINE...
- Page 41 B&S ENGINE 692_ 108_ 127 o 186 @ _137_ 278@ 1251A 1318 1022 619 d:'_ 1034_ 957A 892_ 332 (_ 604A 1196A MODEL NUMBER 150114-8939-E8 1029 1347_ 1005 1392 1251 1252 %851 190(_ 584_ 65A ¢# 1009 1119...
- Page 42 B&S ENGINE PART DESCRIPTION 794188 CYLINDER ASSEMBLY 796961 KIT-BUSHING/SEAL (MAGNETO SIDE) 299819S SEAL-OIL (MAGNETO SIDE) HEAD-CYLINDER 791720 GASKET-CYLINDER 791716 TUBE-BREATHER 695745 GASKET-CRANKCASE 699485 699482 SCREW (CYLINDER HEAD) PLUG-OIL DRAIN 691686 CRANKSHAFT 797077 COVER-CRANKCASE 699804 692550 SEAL-OIL (PTO SIDE) CAP-OIL FILL 281658S 699478 SCREW (CRANKCASE...
- Page 43 B&S ENGINE PART DESCRIPTION 791956 WIRE ASSEMBLY 791759 COVER-BREATHER 791760 GASKET-BREATHER PASSAGE 691696 SCREW (PAWL FRICTION PLATE) SHIM-END PLAY 220624 791850 CLAMP-HOSE 601A 691638 CLAMP-HOSE (PRIMER HOSE) COVER-CONTROL 790473 COVER-CONTROL 604A 793134 STARTER-REWIND 699335 ARRESTER-INTAKE 794614 699209 SCREW (MUFFLER) RETAINER-GOVERNOR 692576 CRANK-GOVERNOR 692547...
- Page 44 WWW,SeSrS,C8 (_)/ TMTrademarks of Sears, Roebuck and Co. used under license by Sears Canada MD Marque d_pos_e / MCMarque de commerce de Sears, Roebuck and Co. utilis_e en vertu d'une licence de Sears Canada 435569 Rev 3 07.29.10 TH Printed in the U.S.A.