Advertisement
Included:
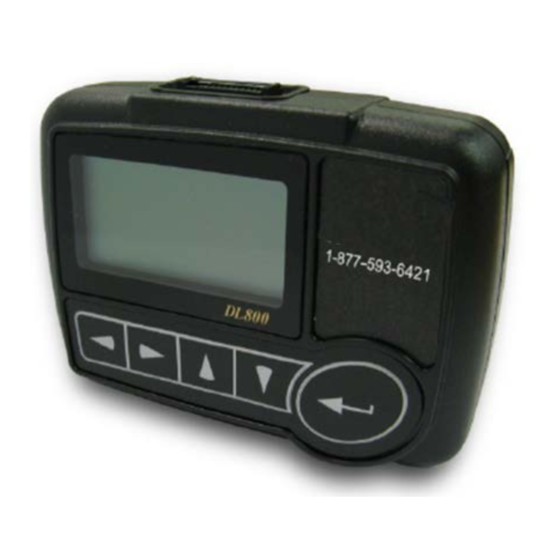
DL800 Monitor
Hook Up Kit—Includes all supplies you will need for
testing period
UPS Return Mailer and Label
TEST PROCEDURE
Skin Prep:
- Shave area (if applicable)
- Clean skin (Soap and water or alcohol wipes)
- Use Buff pad to remove dead skin from area
2) Snap colored leads onto electrode stickers found
in kit.
3) Peel off backing to electrode stickers and apply
to chest per diagram To the Right
Insert one AA battery (supplied in kit)
1 battery will last entire test
5) Press any button on device to turn it on.
Enter Patient ID Number of your choosing. This can be any number. We recommend last 4 of
your Phone Number
When you're done choosing the ID number, use the arrow down key to
Then press the ENTER key again to return to the patient information screen.
PLEASE NOTE: The ID number is the only piece of patient information you need
Use the LEFT AND RIGHT ARROW keys to move past "CH1, CH2, CH3, and
SEE REVERSE SIDE FOR ADDITIONAL INSTRUCTIONS
24 HR PATIENT HOLTER
INSTRUCTIONS
You have received a DL800 Holter Monitor.
Your doctor has ordered this device for you to wear 24 Hours.
Scroll the numerical line using the LEFT AND RIGHT ARROW keys:
Highlight the first digit you need and press the ENTER key.
Repeat that process for each desired digit.
to enter. There is no need for you to enter name, address etc.
START:" tabs to the "SETTINGS" tab
When you're ready to start monitoring:
You will see a message saying: "Press the
Press the ENTER key if you're ready to start recording..
Device will display clock and Time Remaining. This indicates that
Do not remove battery from this point forward or risk losing
For Assistance Please Call Support
Monday-Friday 8:30AM-4:30PM EST
highlight "OK:"
to start recording."
the recording has been started.
recorded data!
1-877-593-6421
Advertisement
Table of Contents

Subscribe to Our Youtube Channel
Related Manuals for BioTel Heart DL800


Summary of Contents for BioTel Heart DL800
- Page 1 24 HR PATIENT HOLTER INSTRUCTIONS You have received a DL800 Holter Monitor. Your doctor has ordered this device for you to wear 24 Hours. Included: For Assistance Please Call Support DL800 Monitor 1-877-593-6421 Hook Up Kit—Includes all supplies you will need for...
- Page 2 DL800 HOLTER INSTRUCTIONS (CONTINUED) IMPORTANT Do not remove battery for any reason once testing has begun. Removal of battery will result in loss of data. WARNING—EARLY OUT PROCEDURE If Test must be stopped early, you must follow EARLY OUT PROCEDURE to prevent loss of data.
Need help?
Do you have a question about the DL800 and is the answer not in the manual?
Questions and answers