Kaiterra Sensedge Getting Started
Professional indoor air quality monitor
Hide thumbs
Also See for Sensedge:
- Faq and troubleshooting (12 pages) ,
- Deployment manual (26 pages) ,
- Manual (13 pages)
Table of Contents
Advertisement
Advertisement
Table of Contents

Related Manuals for Kaiterra Sensedge


Summary of Contents for Kaiterra Sensedge
- Page 1 Sensedge SE-100 Professional Indoor Air Quality Monitor Getting Started...
-
Page 3: Table Of Contents
Contents Introduction to Sensedge Externals and air flow Connection ports Accessories Sensor modules About the measurement Data buffer Sensedge First Use Charging the device Powering up the device Setting the language Connecting to Wi-Fi Setting a PIN code Views Views: My Air... -
Page 4: Introduction To Sensedge
Support Portal, at http://www.kaiterra.com/support Externals and air flow Air is drawn into the Sensedge from both the modules on the lower side, as well as the air intake on the upper side. It is vital that neither side of the device is covered, or the airflow blocked. -
Page 5: Accessories
Mini screw driver: Used to remove and attach the Sensedge wall mount from the Sensedge body. The mini screw driver is not for use with the wall screws, and should not be used to mount the device on a wall. -
Page 6: About The Measurement
Sensedge can have a measurable impact on temperature. Changes in airflow or currents in an indoor space can all have a measurable impact on the readings of the Sensedge, and correct usage is vital for accurate and reliable readings. -
Page 7: Sensedge First Use
Powering up the device Before turning the Sensedge on for the first time, connect it to a power source using the Micro-USB cable and adapter supplied. Upon connection to power, a battery level will be displayed on the screen. -
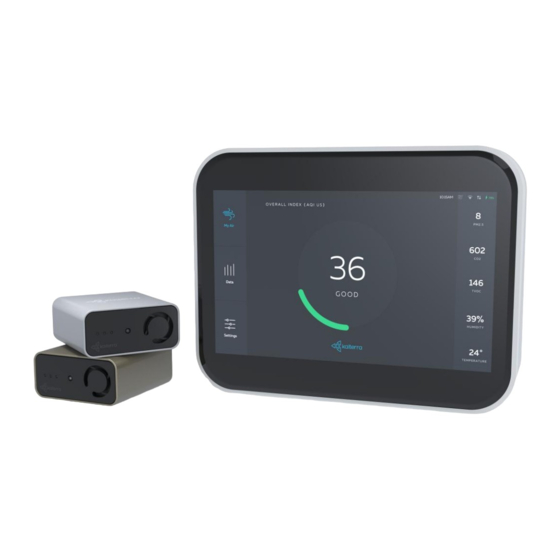
Page 8: Views
By default the Kaiterra Overall Index is used, but this may be modified in the settings menu, to utilise a variety of air quality standards and indices. -
Page 9: Views: Settings
For details, see the guide for the app being used. Sensors Modular sensors currently inserted into the two bays of the Sensedge will be displayed on this page. The model number of the module is displayed, along- side the current readings of the sensor, and the module’s health. -
Page 10: Data Export
If the Sensedge is connected to the Internet most of the time, this is the recommended method of data export. -
Page 11: Ethernet
Time By default, the Sensedge is configured to automatically set the date and time when connected to the Internet. For seamless capture and storage of air qual- ity data, it is important to ensure the date, time, and timezone are set correctly on the device. - Page 12 The current firmware version of the Sensedge can be seen in the device details page, as well as several settings regarding firmware updates. The Sensedge supports over-the-air (OTA) updates, so that the firmware running on the device may be updated. Firmware updaters make both new features as well as security upgrades available.
-
Page 13: Mounting The Sensedge
Mounting the Sensedge The Sensedge may be used as a portable device, or mounted on a wall. Mounting the Sensedge is done by first mounting the backplate to the wall, using three screws. Once mounted, the main device may be inserted, by first inserting the upper side, and then the lower side. -
Page 14: Technical Specifications
Technical Specifications Sensor Sensor type Accuracy Non-dispersive infrared ±5% Accuracy Resolution ±3% ±50ppm Resolution KM-100 Module 1ppm Sensor Type Range Light scattering (350nm) 400-2000ppm Precision 9 10 ±10% (<30µg/m : ±3µg/m KM-102 Module TVOC Resolution Sensor Type 1µg/m3 Range Precision 1-1000µg/m ±15% Measurable particle size... -
Page 15: Endnotes
The default calibration is appropriate for most applications, as it simulates the wide variety of ambient aerosols found in urban locations. When connected to the Kaiterra cloud, by default, the Sensedge’s calibration factor will automatically be adjusted according to the geographic location of the device, using cloud based calibration. - Page 16 FCC Warning This device complies with Part 15 of the FCC Rules. Operation is subject to the following two conditions (1) this device may not cause harmful interference, and (2) this device must accept any interference received, including interference that may cause undesired operation.
Need help?
Do you have a question about the Sensedge and is the answer not in the manual?
Questions and answers