Table of Contents
Advertisement
Quick Links
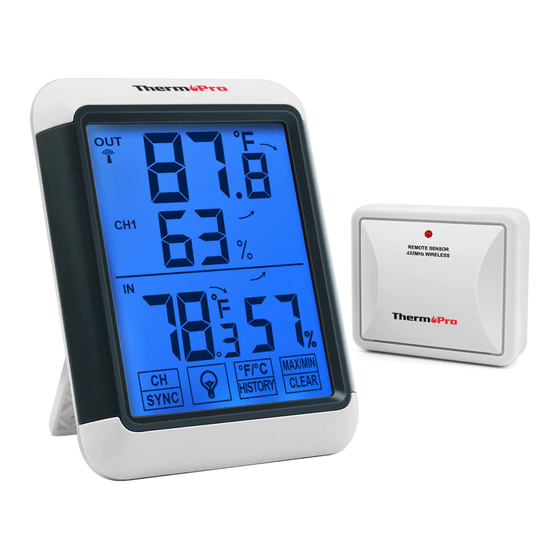
WIRELESS INDOOR/OUTDOOR HUMIDITY AND TEMPERATURE MONITOR
Introduction
Congratulations on your purchase of the wireless indoor/outdoor humidity and temperature monitor. You will
now be able to know the outdoor/indoor temperature and humidity while sitting inside.
Components
1. One base station unit (Receiver)
2. One remote sensor (Transmitter)
* Although the remote sensor is designed to be rain-proof, it still must be always put in a dry place to
avoid direct rainfall.
Indoor Base Station (Receiver) Features
1. LCD display: Displays the current outdoor temperature and indoor humidity/temperature
2. Battery Compartment: Holds 2 AAA batteries to power the unit
3.
Tabletop and
wall-mounted
4.
Indoor Temperature range: -4 ° F ~ 158° F (-20 ° C ~ 70 ° C).
5.
Humidity range: 10% ~ 99%.
6.
Temperature display unit: ° C and ° F selectable
7.
Temperature Resolution: 0.1 ° C/° F
8.
Humidity Resolution:1%
INSTRUCTION MANUAL
Model No. TP-65S
design
Advertisement
Table of Contents

Related Manuals for ThermoPro TP-65S


Summary of Contents for ThermoPro TP-65S
- Page 1 WIRELESS INDOOR/OUTDOOR HUMIDITY AND TEMPERATURE MONITOR INSTRUCTION MANUAL Model No. TP-65S Introduction Congratulations on your purchase of the wireless indoor/outdoor humidity and temperature monitor. You will now be able to know the outdoor/indoor temperature and humidity while sitting inside. Components 1.
- Page 2 Low battery indication 10. Four touch buttons 11. Backlight Touch Buttons CHANNEL/SYNC: Press once to display the temperature readings from up to 3 outdoor remote sensors; Press and hold this button to enter the synchronization mode. MAX/MIN/CLEAR: once to display the maximum or minimum temperature and humidity; Press and hold Touch to clear the history data.
- Page 3 To access CHANNEL SELECTOR and RESET buttons, you need to unscrew the cover as per Fig. CHANNEL Selector (1,2,3): Slide to set Channel 1,2 or 3. RESET: Press once to reset the remote sensor. : Press and hold for 2 seconds to turn ON/OFF the unit. Low battery Warning If the battery power (base station or remote sensor) is low, there will be low battery icon showing on the base station display.
- Page 4 2. Once the batteries are installed in the base station, the RF indicator (located on the upper left of the base station display) will flash for 3 minutes, indicating that the base station is in synchronization mode: it is waiting for remote sensors to be registered. 3.
- Page 5 PURCHASING ADDITIONAL REMOTE SENSORS The model number of the remote sensor for this unit is TX-3. Additional sensors may be ordered directly from Amazon or ThermoPro by contacting our customer service listed below. Hints and Tips If the receiver can’t connect to the transmitter, try as following: ...
- Page 6 FCC STATEMENT OF COMPLIANCE This device complies with Part 15 of the FCC rules. Operation is subject to the following two conditions: l) This device may not cause harmful interference. 2) This device must accept any interference received, including interference that may cause undesired operation.
- Page 7 LIMITED ONE-YEAR WARRANTY ThermoPro warrants this product to be free of defects in parts, materials and workmanship for a period of one year, from date of purchase. Should any repairs or servicing under this warranty be required, contact Customer Service by phone or email for instructions on how to pack and ship the product to ThermoPro.
Need help?
Do you have a question about the TP-65S and is the answer not in the manual?
Questions and answers