Table of Contents
Advertisement
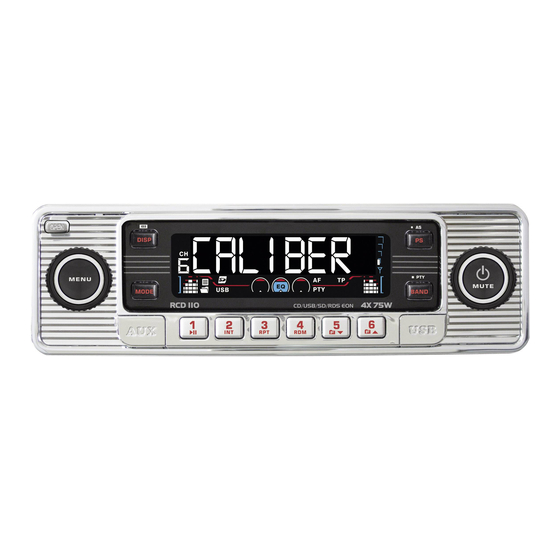
CAR CD/MP3 PLAYER / RDS RECEIVER
USB INTERFACE, SD INTERFACE
2
10
3
1
OPEN
ID3
DISP
MENU
MODE
AUX
15
1. PANEL RELEASE BUTTON
2. ENCODER VOLUME KNOB
3. SYSTEM MENU BUTTON
4. PRESET MEMORY BUTTONS
5. ENCODER TUNING UP/ DOWN & TRACK UP / DOWN BUTTON
6. POWER / MUTE BUTTON
7. MODE BUTTON
8. BAND/ BUTTON / PTY BUTTON
9. AUTOMATICALLY STORE / PRESET SCAN (AS/PS) BUTTON
10. DISPLAY BUTTON / MP3/ID3 INFORMATION BUTTON
11. RADIO SIGNAL STREGTH METER
12. EJECT BUTTON
13.CD SLOT
14. USB COVER / FLIP OPEN TO ACCESS TO USB SOCKET
15. AUX-IN JACK ON FRONT PANEL
WITH
1 1
1
2
3
INT
RPT
7
4
5
6
RDM
4
13
9
6
5
AS
PS
PTY
MUTE
BAND
USB
14
8
12
Advertisement
Table of Contents

Subscribe to Our Youtube Channel
Related Manuals for Caliber RCD110


Summary of Contents for Caliber RCD110
- Page 1 CAR CD/MP3 PLAYER / RDS RECEIVER WITH USB INTERFACE, SD INTERFACE OPEN DISP MENU MUTE MODE BAND 1. PANEL RELEASE BUTTON 2. ENCODER VOLUME KNOB 3. SYSTEM MENU BUTTON 4. PRESET MEMORY BUTTONS 5. ENCODER TUNING UP/ DOWN & TRACK UP / DOWN BUTTON 6.
-
Page 2: Handling Compact Discs
1. HANDLING COMPACT DISCS MOISTURE CONDENSATION On a rainy day or in a very damp area, moisture may condense on the lenses inside the unit. Should this occur, the unit will not operate properly. In such a case, remove the disc and wait for about an hour until the moisture has evaporated. -
Page 3: Installation
2. INSTALLATION Before finally installing the unit, connect the wiring temporarily and make sure it is all connected up properly and the unit and system work properly. Use only the parts included with the unit to ensure proper installation. The use of unauthorized parts can cause malfunctions. -
Page 4: Din Rear-Mount (Method B)
Removing the unit a. Frame b. Insert fingers into the groove in the front of frame and pull out to remove the frame. (When re-attaching the frame, point the side with a groove down wards and attach it.) c. Insert the levers supplied with the unit into the grooves at both sides of the unit as shown in figure until they click. -
Page 5: Detachable Control Panel(D.c.p)
3. DETACHABLE CONTROL PANEL(D.C.P) Removing The Detachable Front Panel Step 1 Open button Step 2 To remove the front panel: 1. Press the Panel Open Button. 2. After flipping down the front panel, push it rightwards ( ), then draw the left of the Step 1 front panel outwards ( Step 2... -
Page 6: Wiring Diagram
4. WIRING DIAGRAM ANTENNA SHOCKET ANTENNA JACK REAR CONNECTOR Figure 2 ISO CONNECTOR WIRING CHART WIRE COLOR FUNCTION/LABEL YELLOW BATTERY(+) POWER ANTENNA BLUE IGNITION(ACC) BLACK GROUND VIOLET RIGHT REAR SPEAKER (+) VIOLET/BLACK RIGHT REAR SPEAKER (-) GREY RIGHT FRONT SPEAKER (+) RIGHT FRONT SPEAKER (-) GREY/BLACK WHITE... -
Page 7: Basic Operations
5. BASIC OPERATIONS 1) PANEL OPEN BUTTON ( OPEN ) Press this button to fold down the front panel. 6) POWER ON/OFF BUTTON ( press POWER/MUTE button or any other button on the front of the radio (except Open / Eject) to turn the unit on. And Long press POWER /MUTEbutton again to turn the unit off. - Page 8 6. AUDIO / MENU OPERATIONS 3) AUDIO MENU ( MENU ) Press “ MENU ” button to access the Audio Menu. User can navigate thru the Audio Menu intems by pressing the MENU button. Once the desired menu item appears on the display, adjust that option by using the encoder volume knod within 5 seconds.
-
Page 9: Radio Operations
7. RADIO OPERATIONS 11) RADIO SIGNAL STRENGTH METER (RSLM) This is use to indicate the signal strength of current radio station broadcast. When you choose RADIO mode, it will show on the display. Best reception Worst reception 9) AUTO MEMORY STORE/PRESET SCAN BUTTON (AS/PS) 1.PRESET SCAN: Press AS/PS button briefly to enter Preset Scan mode, it will scan all the preset stations in the memories, you can hear that it will stay on each station for about 5 seconds. -
Page 10: Rds Operations
8. RDS OPERATIONS 8) PTY BUTTON Each time when this button is pressed, the PTY mode will toggle in the following order: PTY Music Group -> PTY Speech Group ->PTY Off The current PTY code is displayed on the LCD, use the 6 preset buttons to select the other PTY code, the distribution of program type are as follow: Button Number Music Group... -
Page 11: Eject Button
9.CD OPERATIONS 13) CD SLOT Insert the disc into CD slot. The CD will begin to play. M1) PAUSE BUTTON ( PAU ) Press this button to pause CD play, press again to release pause. M2) INTROL BUTTON (SCN) Press this button, the first 10 seconds of each track will be played sequentially until this button is pressed again, then normal play will resume at the current track. -
Page 12: Usb Drive Operations
PLEASE READ THIS INSTRUCTION CAREFULLY BEFORE OPERATING THE UNIT 10. USB DRIVE OPERATIONS COMPATIBILITY Due to the fast changing technology world, this unit may or may not P .1 be compatible to all the USB drive / device available with all the future technology, especially those USB drive / device which require to install a driver. - Page 13 11. SD OPERATIONS 1.Press panel open button to release the front panel.(P .1) P .3 3.The SD card slot is located on the unit as indicated in (P .4). 4. Insert the SD card into the card slot in the correct direction until a “CLICK” sound is heard.(P .5) 5.Close the front panel.(P .6) P .4...
-
Page 14: Loading Disc
12.MP3/WMA OPERATIONS(ENCODER VERSION) Notes : This unit support : MPEG1/2/2.5/ Layer 2/3 WMA Version 7/8/9 Sampling frequency - MPEG1 : 32/44.1/48 KHz - MPEG2 :16/22.05/24 KHz - MPEG2.5 : 8/11.025/12KHz - WMA : 22/32/44/48KHz Sampling But rate - MP3/WMA : 32~320Kbps & VBR CDROM Mode 1 / 2 ISO9660 Level 1 / 2 &... - Page 15 ENTER BUTTON and continue to search the directory or file name in the directory by TUNE UP / DOWN Button (TUNE DOWN First). The selected file can be played by pressing MP3 Enter Button, t distribution of alphabetical characters are listed as follow : Button MODE TUNE DN TUNE UP VOL UP/DN...
-
Page 16: Specifications
13. SPECIFICATIONS CD PLAYER Compact disc audio system System Compact disc Usable disc 44.1KHz Sampling frequency 1bit No of quantization bits 5-20,000Hz Frequency 2 stereo Number of channels 70dB S/N Ration RADIO SECTION 87.5-108 MHz Frequency Range 10.7 MHz Intermediate Frequency Better than 15dB at S/N 30 dB Usable Sensitivity 25 dB at 1KHz... -
Page 17: Troubleshooting
14. TROUBLE SHOOTING Before going through the check list, check wiring connection. If any of the problems persist after check list has been made, consult your nearest service dealer. Symptom Cause Solution If the power supply is properly connected No power The car ignition is not on.
Need help?
Do you have a question about the RCD110 and is the answer not in the manual?
Questions and answers