Table of Contents
Advertisement
Advertisement
Table of Contents

Related Manuals for Bush KCA-A23


Summary of Contents for Bush KCA-A23
- Page 1 Instruction manual FM ALARM CLOCK RADIO KCA-A23...
- Page 2 We’re here to help you get the most from your FM Alarm Clock Radio. Should you require any guidance, a simple solution can often be found online at: www.bush-support.com If you still require further assistance, call one of our experts on 0345 604 0105...
-
Page 3: Table Of Contents
Contents Safety information Power source Moisture and water Heat sources and flames Ventilation Positioning the FM Alarm Clock Radio General safety information Using your FM Alarm Clock Radio Location and description of Controls Power supply Basic Operations Other Information Other Information Other Information Technical Specification Technical Specification... -
Page 4: Safety Information
Safety information... -
Page 5: Power Source
Safety information Important - Please read these instructions fully before installing or operating Power source • Only use the power supply that came with the product. Using an unauthorised power supply will invalidate your guarantee and may irrecoverably damage the product. •... -
Page 6: Ventilation
Safety information Important - Please read these instructions fully before installing or operating Ventilation • Do not block or cover slots, holes or openings on the product by placing on soft furnishings such as carpets, rugs or beds as these are provided for functionality and/or ventilation to ensure safe operation of the product. - Page 7 Safety information Important - Please read these instructions fully before installing or operating CAUTION: TO REDUCE THE RISK OF ELECTRIC SHOCK, DO NOT REMOVE ANY COVER. NO USER-SERVICEABLE PARTS INSIDE, REFER ANY SERVICING TO QUALIFIED SERVICE PERSONNEL. FM Alarm Colck Radio...
-
Page 8: Using Your Fm Alarm Clock Radio
Using your FM Alarm Clock Radio... -
Page 9: Location And Description Of Controls
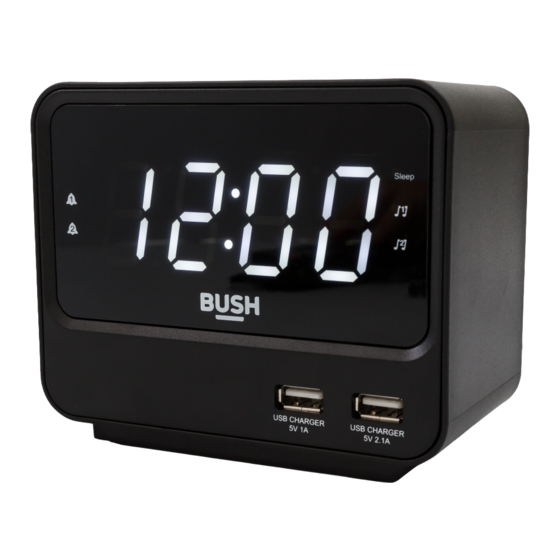
Using your FM Alarm Clock Radio Let’s get started Location and Description of Controls Top View Front View FM Alarm Clock Radio... - Page 10 Using your FM Alarm Clock Radio Let’s get started Back View Bottom View 1. POWER button 6. PRESET/CLOCK button 2. VOL-/AR1 Volume-/Alarm 1 button 7. SNOOZE/SLEEP/DIMMER button 3. VOL+/AR2 Volume+/Alarm 2 button 4. TUNING-/HOUR 8. Time indicator Tuning-/Hour button 5. TUNING+/MINUTE Tuning+/Minute button 9.
-
Page 11: Power Supply
Using your FM Alarm Clock Radio Let’s get started Alarm 2 buzzer indicator 14. USB charger port for 5V 1A output 11.Sleep indicator 15. USB charge port for 5V 2.1A output 12.Alarm 1 Radio indicator 16. LED display 17. DC power external input 13.Alarm 2 Radio indicator 18. - Page 12 Using your FM Alarm Clock Radio Let’s get started Turn On/Off unit The unit is in clock mode when it is plugged in, press button to turn on or long press to turn off. Sound Volume Press VOL-/AL1 or VOL+/AL2 to adjust sound level. There are 16 volume levels. Dimmer Press and hold SNOOZE/DIMMER/SLEEP button to select the brightness of the screen: high ,middle or low.
- Page 13 Using your FM Alarm Clock Radio Let’s get started Listening to station presets Press PRESET button then press TUNING +- button to select your station. Setting the Alarm mode 1.In standby mode, press VOL-/AL1 (press VOL+/AL2 to set alarm 2), the display blinks.
-
Page 14: Other Information
Other information... -
Page 15: Technical Specification
Other information Helpful technical information Technical specification AC-DC Adaptor: input 100-240V ~ 50/60 Hz 0.55A MAX output 5V 3A Battery for backup : 2x1.5V, battery type AAA/R03/UM4 (not included) USB output : 5V 1A, 5V 2.1A FM Frequency range: 88-108MHz DIMENSION: 13(L) X 1.8(W) X 7(H) CM FM Alarm Clock Radio... -
Page 16: Product Support
Product support... - Page 17 Product support Help is always at hand Troubleshooting If you are experiencing problems with your FM Alarm Clock Radio, there are some quick and easy checks that you can do, which may help to solve the problem. No sound / power: Adjust the volume using the volume control button.
- Page 18 If you require any technical guidance or find that your FM Alarm Clock Radio is not operating as intended, a simple solution can often be found in the Troubleshooting section of these instructions or online at www.bush-support.com If you still require further assistance, call one of our experts on 0345 604 0105*. To help...
- Page 19 Hereby, Argos Ltd, declares that this FM Alarm Clock Radio is in compliance with the essential requirements and other relevant provisions of the Radio Equipment Directive 2014/53/EU. The complete declaration of conformity can be obtained by contacting www.bush-support.com FM Alarm Clock Radio...
- Page 20 Call us now and activate your 12 month guarantee Thank you for choosing Bush. Your new product is guaranteed against faults and breakdowns for 12 months. Don’t forget to register it with us today so we can provide you with our best possible after-sales service and useful updates.
- Page 21 Contact: www.bush-support.com Helpline: 0345 604 0105.
Need help?
Do you have a question about the KCA-A23 and is the answer not in the manual?
Questions and answers