
Related Manuals for Blackridge BRG1700

Summary of Contents for Blackridge BRG1700
- Page 1 1700W Inverter Generator For service, spare parts or product information, please contact Smart Marketing Group Pty. Ltd. AUST. 1300 660 457 N.Z. 0800 474 876 02833 08/11...
-
Page 2: Table Of Contents
SUggeSTed ApplicATioNS coNTeNTS These are some suggestions of appliances which Section page could be powered by this generator. These suggestions can not be run at the same time, please Contents read page 11 for full details: • Laptop computers up to 800W Suggested Applications •... -
Page 3: Introduction
iNTRodUcTioN What is covered • Manufacturing fault or defect. Dear Customer, How to claim under this warranty. Thank you for purchasing this generator which has • Call customer service, phone number at the top. passed through our extensive quality assurance •... - Page 4 coMpleTe WARRANTY STATeMeNT – geNeRAToR gRoUp As soon as you have purchased the generator, Damage caused to attached equipment or third we recommend that you check to make sure party accessories will not be covered under it is intact and that you read the operating this warranty.
-
Page 5: General Safety Instructions
SAFeTY SelecT A geNeRAToR WiTH A SUFFicieNT RATiNg Before attempting to operate this generator the following basic safety precautions should be Select the right generator for the job. Do not taken to reduce the risk of fire, electric shock use a generator to do a job for which it was not and personal injury. - Page 6 MAiNTAiN YoUR geNeRAToR eXTeNSioN coRdS & ReelS WiTH cARe Inspect extension cords periodically and replace if damaged. Never use damaged extension cord When not using your generator ensure the fuel as these may cause injury. Always unwind any cock is ‘OFF’. Never leave the fuel cock ‘ON’ extension cords fully before plugging into mains as this can damage the carburettor.
- Page 7 peRSoNAl SAFeTY clothing Do not wear loose clothing, jewellery or anything that could get caught in moving machinery. Hair Long hair should be tied back or contained in a protective covering. eye protection The use of safety goggles is highly recommended (normal glasses are not sufficient for eye protection) when using or refuelling generators.
-
Page 8: Specific Safety Instructions
SpeciFic SAFeTY • Never operate or store the generator on its side, ALWAYS operate or store in an upright iNSTRUcTioNS manner on firm, solid ground. Warning! Do not use the generator in areas • Your generator is factory set, NEVER attempt where there is a risk of explosion or fire from to speed it up as this could endanger the user combustible materials. -
Page 9: Electrical Information
iMpoRTANT elecTRicAl dATA This generator is fitted with a sealed electrical connection socket that is compatible with the generator. If the electrical connection socket becomes damaged it must be replaced with a complete assembly that is identical to the original, and this must be replaced by an authorised service agent. Never connect to an external power supply. -
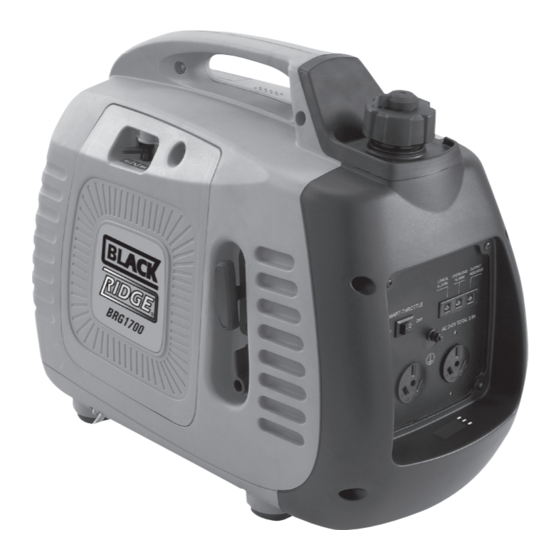
Page 10: Components And Controls
pic. 1 coMpoNeNTS ANd coNTRolS pic. 1 1. Fuel tank cap with pump 9. Earth lead attach point 2. Fuel cap breather lever 10. 240V AC Power outlet sockets 3. Carry handle 11. Output power green light 4. Choke lever 12. -
Page 11: Operating Instructions
opeRATiNg iNSTRUcTioNS pic. 2 Unpacking Carefully unpack your generator. This generator is heavy (26.5Kg) and may require two (2) people to lift. Dispose of all packing material in an environmentally responsible manner. Open carton, gently lift the generator clear of the carton and packaging, this may require 2 people. - Page 12 Adding lubricating oil pic. 3 Always use clean fresh oil as specified on page 9. Incorrect or old oil can cause the generator to run rough and damage the motor; this will not be covered by warranty. 1. Ensure that engine is OFF when filling oil. 2.
- Page 13 generator ‘earthing’ pic. 6 Always ensure that this generator is “Earthed” BeFoRe starting and using. 1. Ensure that engine is OFF when fitting the “Earth” stake and wire. 2. Attach the wire to the “Earth” point on the generator, see Pic. 6. 3.
- Page 14 4. Lift pump up and push it down, repeat this 3 times, Pic. 9. pic. 9 5. Turn choke to START by sliding the choke lever to the right, Pic. 10. 6. Turn the fuel/engine lever downwards to ON, Pic. 11. 7.
- Page 15 USiNg YoUR geNeRAToR pic. 12 c outlet Your generator is equipped with dual 240V AC power sockets this will run a range of devices providing they are with in the limits of the generators output. NOTE: The peak (surge) power requirements of some devices e.g.
- Page 16 output power overload light pic. 13 Once you have attached a device to the generator and turned it on, check to ensure that the output power overload light is NOT illuminated, see Pic. 13. If the output power overload light stays illuminated STOP the device immediately.
- Page 17 low oil light pic. 15 pic. 13 pic. 15 If the oil level in the motor sump drops to a dangerously low level then the generator will automatically stop. If the oil level in the motor sump is dangerously low, then the generator will not start, however the low oil light will flicker only when the recoil starter is pulled.
- Page 18 TRANSpoRTiNg/SToRiNg pic. 16 YoUR geNeRAToR Allow the generator to cool before transporting or storing. Bowl screw 1. Warning: Empty the carburettor bowl and turn the fuel cap breather OFF before transporting or storing. 2. To empty carburettor remove the access panel, Pic.1 Item 5, page 10.
-
Page 19: Maintenance
MAiNTeNANce iNFoRMATioN pic. 18 If scheduled maintenance is NOT carried out then this will void your warranty. Use the Service Log on page 23 to keep track of the regular servicing. Fuel tank filter under Ensure that the authorised service agent has fuel tank cap dated, signed and stamped this log to ensure your warranty is not void. - Page 20 Air Filter pic. 21 Air filter should be checked daily and replaced every 50 hours (operation) or every 3 months which ever occurs first or whenever considered necessary. To check or replace the air filter; 1. Remove the access panel. 2.
-
Page 21: Trouble Shooting
Insufficient ventilation to a more adequate supply of fresh air Repairs Repairs to your generator should only be carried out by an authorised service agent. Call BLACKRIDGE for your closest centre, Aust. Aust. 1300 660 457 N.Z. 0800 474 876. -
Page 22: Parts Diagram
pARTS diAgRAM User replaceable parts listed below. All other parts must be serviced/replaced by an authorised service agent. Part Description SMG Part No. Fuel tank filter for pump 84 BRG1700TFF Fuel tank cap with pump 84 BRG1700FCP Rubber feet 84 BRG1700RF Spark plug 84 BRG1700SP Air filter element... -
Page 23: Service Log
SeRVice log Purchase Date Place of Purchase This Service is to be complete within 50 hours or This Service is to be complete within 100 hours or 3 months of purchase, which ever comes first. 6 months of purchase, which ever comes first. Replace Replace check &... -
Page 24: Technical Information
Monday to Friday 8.30am - 5.30pm AEST do not return to place of purchase. Keep your purchase receipt, this will be required to make any claims under the 12 month warranty. Blackridge® is a registered trademark of Smart Marketing Group Pty Ltd...
Need help?
Do you have a question about the BRG1700 and is the answer not in the manual?
Questions and answers