Ikelite 6970.05 Instructions Manual

Ikelite 6970.05 Instructions Manual

Underwater ttl housing for canon eos 200d rebel sl2

Advertisement

Quick Links

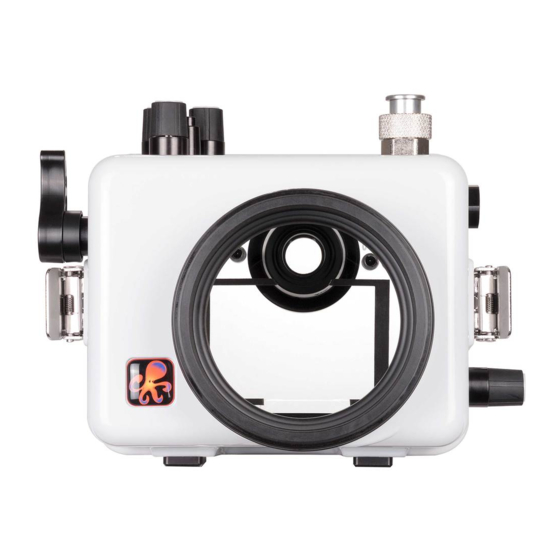
200DLM/C Underwater TTL Housing for Canon
EOS 200D Rebel SL2
Product # 6970.05 / 6970.06

Product Registration

Please register your product within 15 days of purchase. Our product
registration database is the quickest way for us to contact you in the
event of a product update.
To register, send a photo of the above registration label to us via
ikelite@ikelite.com along with your name, address, and phone
number.

Advertisement

Table of Contents
loading

Summary of Contents for Ikelite 6970.05

  • Page 1: Product Registration

    To register, send a photo of the above registration label to us via ikelite@ikelite.com along with your name, address, and phone number.
  • Page 2: Introduction

    1962. We are available if you have any questions or want photo advice. Send us an email 24 hours a day to ikelite@ikelite.com. We strive to reply within 1 business day. An electronic version of this instruction manual is available for download via the product page on our website: https://www.ikelite.com...
  • Page 3: Important Notices

    Important Notices This housing requires a compatible DLM lens port for » waterproof operation. The housing is not waterproof without a DLM lens port attached. A bulkhead cap or sync cord must be attached to the housing » bulkhead for waterproof operation. Never submerge the housing in water without either a sync cord or bulkhead cap attached.
  • Page 4: Table Of Contents

    Contents Product Registration Introduction In the Box Important Notices Getting to Know Your Housing Tray Mounts Accessory Port Trigger Extension Lanyard Mount Setting Up Your Camera Pre-Installation Checklist Camera Settings Camera Settings Display Exposure Settings Power Save Setting Up Your Housing Opening the Housing Installing the Camera Attaching the Hotshoe...
  • Page 5 Entering the Water Shooting Underwater Learning about Underwater Photography Maintaining Your Housing Post-Dive Lens Port Storage Servicing Recommendations Lubricating Controls Lubricating Push Buttons Lubricating Control Shafts Troubleshooting Spare Parts Limited Warranty Service and Repairs Contact Us...
  • Page 6: Getting To Know Your Housing

    Getting to Know Your Housing Bulkhead Port mount with cap Accessory port Shutter Tray mounts Lid snap Lens release...
  • Page 7 INFO Menu Lanyard Viewfinder mount INFO MENU CANON SL2 MADE IN USA Rear o-ring snap hook Live view / movie shooting AF point selection INFO MENU AE / FE lock Exposure compensation Quick control / setting Left Right Down Playback Erase CANON SL2 MADE IN USA...
  • Page 8 Front o-ring Thumbscrew groove Main dial Bulkhead without cap Power Mode...
  • Page 9 Zoom / focus knob Dome shade Thumbscrew Sealing surface Drain hole...
  • Page 10: Tray Mounts

    Visit ikelite.com for an updated list of compatible products. Do not remove or loosen the accessory port plug unless you »...
  • Page 11: Setting Up Your Camera

    Setting Up Your Camera Pre-Installation Checklist 1. Insert a fully charged camera battery. 2. Insert a properly formatted memory card. 3. Remove any attached lanyard or neck strap. 4. Remove the camera’s eyecup. Failure to remove the eyecup prior to installation will prevent the rear controls from operating properly. Camera Settings •...
  • Page 12: Exposure Settings

    Refer to the in the Photo School section of our website for recommendations on exposure settings for a wide variety of shooting situations: https://www.ikelite.com/blogs/cheat-sheets Power Save The camera’s power saving functions allow you to extend battery life Auto Power Off and yet always be ready for the next shot.
  • Page 13: Installing The Camera

    4. Remove the housing back. Installing the Camera 1. Remove any lanyard or neck strap which may be attached to the camera. 2. Remove the camera mount plate from the housing. 3. Line the mount screw up with the camera’s tripod socket. Use a flat screwdriver to tighten the mount plate to the camera.
  • Page 14: Attaching The Hotshoe

    Attaching the Hotshoe 1. Orient the hotshoe with the arrow on top pointing towards the front of the camera. Camera hotshoe mount Housing hotshoe 2. Slide the housing hotshoe into camera’s hotshoe mount until it stops. The hotshoe must be all the way forward in the camera mount »...
  • Page 15: Attaching A Lens Port

    5. Push the lid snaps towards the housing until they are flat against the housing and the lock has engaged. Close both lid snaps at the same time. 6. Check the o-ring seal. The o-ring should form a uniform, solid line visible through the back of the housing.
  • Page 16 4. Apply a very thin, even layer of lubricant to the exposed portion of the front o-ring and to the lens port sealing surface. Avoid dry spots or uneven build-up of lubricant. 5. Loosen the port thumbscrews until they do not show on the inside of the lens port.
  • Page 17 7. Press the port firmly towards the housing until the base of the port is almost flush with the housing front. If there is resistance, remove the port and re-check that the thumbscrews are loosened and the o-ring is properly lubricated. Small gap ~ 0.15”...
  • Page 18: Setting Up An External Strobe

    TTL Strobe Compatibility When compatible Ikelite DS strobe(s) are attached by electrical sync cord, the TTL circuitry built into the housing allows the camera to communicate directly with the attached strobe(s). The camera triggers the strobe(s) and adjusts the strobe(s) power automatically for perfect exposure.
  • Page 19: Attaching An Electrical Sync Cord

    Strobes from SEA&SEA, INON, and other manufacturers may be attached by electrical sync cord. These strobes are not capable of powering the TTL circuitry built into this housing. Non-Ikelite strobes must be used in manual power modes. Attaching an Electrical Sync Cord 1.
  • Page 20: Shooting Manual Flash With A Ds Strobe

    3. Align plug and insert into the housing bulkhead. Each male pin mates with a female receptacle. Failing to line up the contacts properly before tightening may result in damage to the converter plug and/or housing bulkhead. 4. Hand-tighten the retaining ring. 5.
  • Page 21: Entering The Water

    4. Check camera battery level and available storage space on your memory card. 5. Draw a vacuum on the housing to check for leaks using the optional vacuum kit, if using (sold separately). 6. Submerge the housing in a fresh water tank dedicated to underwater photography equipment.
  • Page 22: Learning About Underwater Photography

    Learning about Underwater Photography Visit the Photo School section of ikelite.com for a wide range of information on shooting underwater including: • Product Tutorials Videos •...
  • Page 23: Maintaining Your Housing

    Maintaining Your Housing Post-Dive 1. Rinse the housing in fresh water. Rotate the housing controls and press each button several times while submerged in fresh water to flush out any salt or debris to ensure smooth operation on future dives. 2.
  • Page 24: Storage

    Servicing Recommendations It is recommended that the housing be sent to Ikelite or an authorized service center annually for routine service and maintenance. Service may be required more or less frequently depending on care and use.
  • Page 25: Lubricating Controls

    Remove controls for lubrication only if they continue to stick after applying a small amount of lubricant to the exposed portion of the shafts and working them many times. Use only Ikelite lubricant. Other types of lubricant may cause » swelling of o-rings or cracking of plastic components.
  • Page 26: Lubricating Control Shafts

    After a few minutes, operate the push button. If this does not correct the problem, return the housing to Ikelite for maintenance. To prevent build-up of salt, sand, or debris, the push buttons »...
  • Page 27 4. If there is a spring associated with the control, make sure it is in its proper position. Knob Housing Control Control gland shaft screw Control flat 5. Re-install the shaft from the inside of the housing. Rotate the shaft gently for smooth installation into the gland.
  • Page 28: Troubleshooting

    Move light(s) farther away from your subject. • Adjust exposure compensation in the camera. • Adjust lighting power. • If using an Ikelite DS strobe, set strobe to TTL. Photos are under-exposed (too dark) • Adjust aperture (larger), shutter speed (slower), or ISO (higher) setting. •...
  • Page 29 Strobe(s) will not fire • Turn on strobe. • Check the strobe(s) battery life. • Restore the camera to factory default settings. There are some camera settings that will prevent an external flash from firing. • Check camera settings recommended for use with an external strobe in the beginning of this manual.
  • Page 30: Spare Parts

    This Ikelite product is warranted against any manufacturing defects for a period of two (2) years from the original date of purchase. Defective products should be returned to Ikelite postage paid. Ikelite will, at its sole discretion, repair or replace such products, and will return to customer postage paid.
  • Page 31: Service And Repairs

    Service and Repairs Ikelite is most interested in performing any service to ensure that all products perform as intended. No prior authorization is required. You may return directly to us or through your dealer. Please include a brief description of the problem, any relevant email correspondence, and/or description of the service request.

This manual is also suitable for:

200dlm/c6970.06

Table of Contents