Table of Contents
Advertisement
Advertisement
Table of Contents

Related Manuals for Crowcon Detective+


Summary of Contents for Crowcon Detective+
- Page 1 Detective+ User Manual M07664 Jan 2015 Detecting Gas Saving Lives Issue 6...
- Page 2 -20°C to +50°C and photocopied, reproduced, or translated to another language should not be used outside this range without the prior written consent of Crowcon Detection Use only battery pack supplied by Crowcon. Instruments Ltd. Charging is only permitted in the non-hazardous Publication number: M07664 area.
-
Page 3: Table Of Contents
Contents Quickstart Guide ..............1 I. General Description ............3 II. Unpacking ................4 III. Operation .................6 3.1 Switch On ..................6 3.2 Display .....................7 3.3 Overrange ..................8 3.4 Cautions ..................9 3.5 Backlight ..................9 3.6 Alarms .....................9 3.7 Status Screens/Alarm Reset ..............9 3.8 Switching Off .................10 IV. - Page 4 Appendix 1 – Pumped version (optional) ......33 Appendix 2 – Default Flammable Correction Factors ...34 Appendix 3 – Front Panel Text Items ........35 Appendix 4 – Sensor Limitations .........37 Appendix 5 – Menu Map ............38 Appendix 6 – Alarm Tone Setting on the IS-mA3 Sounder ..39...
-
Page 5: Quickstart Guide
Detective+ Detective+ Quickstart Guide Section 2 Quickstart Guide Overview Alarm LED Power On LED Operator screen UNMARKED button: use this button to silence sounder, reset alarm and select options from the Menu ON button Switch-off: CAL button: press the ON button use this button to BACKLIGHT and UNMARKED... - Page 6 Section 2 Quickstart Guide Detective+ Detective+ Turn On Backlight Press the BACKLIGHT button . It stays on for 30 minutes unless the button is pressed again. This is programmable, but is 30 minutes by default. Battery Low Green LED flashes quickly, the sounder frequency increases and a warning is flashed on the display.
-
Page 7: General Description
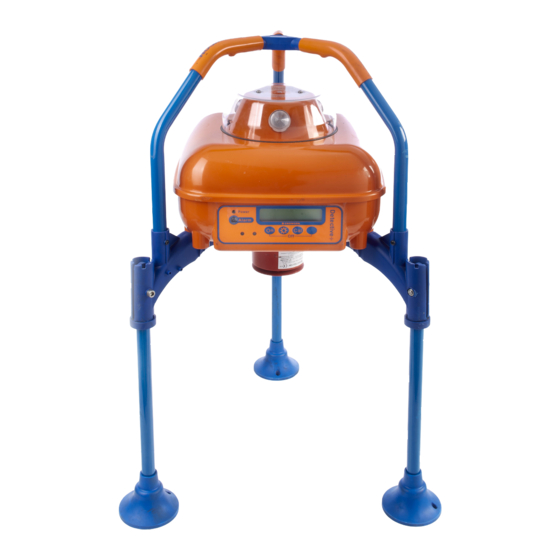
Detective+ Section 2 I. General Description The Crowcon Detective+ is a microprocessor controlled transportable gas detector which is capable of monitoring up to four gas types simultaneously and providing warning of hazardous levels. Using electrochemical, catalytic and thermal conductivity sensors, the instrument may be configured to detect any practical combination of oxygen, toxic and flammable gas. -
Page 8: Unpacking
Section 2 Detective+ II. Unpacking The Detective+ can be supplied with either a rigid steel tripod or a hinged com- posite tripod designed to be folded away for storage. When unpacking the steel framed Detective+ for the first time, the three legs must be attached to the main body of the units’... - Page 9 Detective+ Unpacking Detective+ Section 2 To unfold the legs a) pull the leg upwards until it reaches its stop, b) rotate the leg downwards away from the instrument until it is pointing downwards, c) push the leg upwards until it firmly fits into position. If the legs are too loose or are required to be permanently deployed, gently tighten the fixing bolt at the leg hinge.
-
Page 10: Operation
Ensure the unit is in clean air. Press the 'ON' button to switch on the Detective+. The instrument will display the message 'Crowcon Detective+' and the serial number. The unit will test the red alarm LED, sounder and alarm bea- cons. -
Page 11: Display
Detective+ Detective+ Operation Section 2 About 10 seconds after the instrument is switched on, the Detective+ will com- plete its self-tests and indicate the current gas levels. If the instrument enters an alarm condition then the sounder will be triggered and the alarm LEDs will flash. -
Page 12: Overrange
Section 2 Operation Detective+ Detective+ Display options The instrument may be configured into alternative display modes, by the DISPY option (see DISPY in section 4.2, Configuration Options). The ON button can be programmed to switch between modes. The possible display modes are: All gas values, units and names are displayed in real time. -
Page 13: Cautions
Detective+ Operation Detective+ Operation Section 2 Tetra 3.4 Cautions Sensors may be adversely affected by exposure to silicones, lead compounds, high levels of hydrogen sulphide and chlorine, and some industrial solvents. 3.5 Backlight In low ambient light conditions, the backlight can be activated to illuminate the display by pressing the BACKLIGHT button . -
Page 14: Switching Off
Section 2 Tetra Operation Detective+ Detective+ Run mode The date, current time, and the time elapsed since instrument switch on is displayed. Serial number and calibration due date is displayed. Alarm 1 levels are shown for all sensors. Short-term exposure levels are displayed for toxic sensors. Long-term exposure levels are displayed for toxic sensors. -
Page 15: Setting Up
Detective+ Setting Up Detective+ Detective+ Setting Up Section 2 IV. Setting Up The Detective+ has been designed to display as much or as little information to the user as is required by the controller of the equipment. On the one hand it is a four channel measuring instrument with continuous readout, on the other, a basic alarm only detector with status display and no way of switching it off. - Page 16 Section 2 Setting Up Detective+ Detective+ How to enter the configuration Menu Use the scroll buttons to select the MENU item and press the UNMARKED button. The screen will display 'Password?' Press the buttons in the following sequence within 5 seconds to enter the default password: ON, BACKLIGHT, CAL and UNMARKED.
- Page 17 Detective+ Section 2 START : ZERO & LOG << >> QUIT Press the CAL button to select option and QUIT Use these buttons to scroll menu through options (Section 4.2) Save the changes made? Press the first button to save the change and move the menu back up a level, and the last key to leave the selection as it was (unchanged) and move back up a level.
-
Page 18: Configuration Options
Configuration options Detective+ Section 2 Detective+ 4.2 Configuration Options LIGHT: Configures the backlight timeout option to be NEVER TIMEOUT, 10 MINS., 20 MINS., 30 MINS., or ALWAYS ON. Whatever option is selected, the backlight will always come on when the instrument is in alarm. DISPY Display mode. - Page 19 Detective+ Configuration options Detective+ Section 2 ZERO enables the option of zeroing the sensors at start, as per the zero all option above – the prompt to zero the sensor will appear several seconds after start up (to give the sensors time to settle) and will timeout (without performing a zero) if the YES button is not pressed within about 5 seconds.
- Page 20 You will need a calibration flow plate, which is included as stand- ard with the Detective+ and a supply of Crowcon calibration gas (see section VIII Maintenance and Calibration). The top line now displays one of the instru- ment’s gas channels.
- Page 21 Use the two keys labelled on the display as UP and DOWN to adjust this alarm level between to the required value. Note: Crowcon does not generally recommend that alarm levels be set to a level that is less than 5% of the sensor’s range because of the possibility of spurious alarms being triggered.
-
Page 22: Quickcal
Section 2 Quick Cal Detective+ Detective+ LOG MENU The LOG MENU acts similarly to the MENU system just described. Options are: START or STOP. One of these two options is displayed depending on the cur- rent state of the data logger. Press START to turn data logging on, and STOP to turn logging off. -
Page 23: Pellistor Saving
Detective+ Detective+ Pellistor saving Section 2 If all channels are successfully calibrated the instrument will display the message 'Calibration successful', otherwise the message 'Calibration failed!' with the list of gases that failed the calibration displayed. When performing a calibration with a gas from a pressurised source, the instrument’s pump (if present) should always be turned off. -
Page 24: Battery Charging
36 hours (including a 30 minute period in the Alarm condi- tion). The unit incorporates a two stage charging circuit that is powered from the local main supply, using the appropriate Crowcon charging lead that is sup- plied with the instrument. - Page 25 Refer to section IX for instructions on replacing the Battery pack. Use only the Crowcon supplied parts, see spares list, when replacing the battery pack.
-
Page 26: Data Logging
Section 2 Data Logging Detective+ Detective+ VI. Data Logging The data logging aspect of the instrument can be configured to be active when the instrument is switched on by the START menu option. Additionally, the instrument records events (such as alarms) and an event will cause the logger to be switched on. -
Page 27: Interconnection Between Devices
Two connector sockets are provided at the rear of each Detective+ unit to permit this mode of operation. Using only suitable Crowcon supplied cables, connect each Detective to its two neighbours in a “Daisy Chain” configuration. -
Page 28: Troubleshooting Guide
Section 2 Troubleshooting Guide Detective+ Detective+ VIII. Troubleshooting Guide SYMPTOM DIAGNOSIS REMEDY/CHECK Does not switch on Battery flat Recharge battery Does not switch off OFF disabled Alter configuration* No audible tick Tick disabled Alter configuration* Alarm signals, no gas Alarm latched Reset with UNMARKED button Flashing red alarm,... -
Page 29: Maintenance And Calibration
The correct calibra- tion flow rate is 0.5 litres per minute. Most Crowcon gas bottles use a fixed flow rate regulator which automatically provides the correct flow rate. -
Page 30: Replacing A Sensor Module
Section 2 Replacing a Sensor Module Detective+ Detective+ 6) Remove the Main PCB and its mounting chassis plate, exposing the battery pack. 7) Remove the battery from the base of the unit and substitute it with the replacement battery pack. Ensure that the Battery pack is located within the rectangular retaining features of the lower case moulding. -
Page 31: User Replaceable Fuses
11) Replace the centre fixing bolt on top of the unit, replace and secure the lamp cover. Detective sensor modules are supplied precalibrated from the Crowcon factory and will identify themselves to the instrument when it is switched on. It is advis- able to check the response to test gas to ensure that no damage has occurred in transit and that installation has been carried out successfully. -
Page 32: Pc Interface And Software
The Detective+ can be connected to a PC using the serial communications link, to configure, calibrate and monitor the unit. To do this the user will require the Computer Interface Lead and an installed copy of the Crowcon Portables PC software, version 1V1.5 or later. The Computer Interface Lead, Part Number E07394, and Portables PC Software, Part Number C01832, are available from Crowcon or any of their approved agents. -
Page 33: Limitations Of Use
Detective+ Detective+ Limitations of Use Section 2 XI. Limitations of Use LONG TERM STORAGE LIMITS OPERATING LIMITS TEMPERATURE 0°C 20°C -10°C 50°C PRESSURE 900 mbar 1100 mbar 900 mbar 3 bar HUMIDITY 15%RH 90%RH 0%RH 90%RH (non condensing) Detecting Gas Saving Lives... -
Page 34: Specification
Section 2 Specification Detective+ Detective+ XII. Specification Dimensions Rigid frame: 640 h x 482 w x 457 d mm (25.2 x 19 x 18 inches) Folding frame: 640 h x 453 w x 454 d mm (25.2 x 17.8 x 18 inches) Weight 8 kg ( 17.6 lbs) Housing, degree of protection... -
Page 35: Accessories And Spares
Detective+ Detective+ Accessories and spares Section 2 XIII. Accessories and spares Accessories list Crowcon Description part number Aspirator assembly and lead C01685 Extra Aspirator Hose M04032 Sewermans Baffle Plate C01325 Computer Interface Lead E07394 Portables PC Interface Software C01832 Water Trap... - Page 36 Section 2 Detective+ Retaining Strap for Socket Covers M04398 Retaining Strap Fastener M03405 Rigid Steel Tripod Variant Frame Leg Assembly – 3 per set M01754 Frame Support Plate M01755 Frame Handle Assembly M01756 Fold-away Composite Tripod Variant Leg Assembly S011970 Leg Hinge Bolt M03670 Frame Support Bracket...
-
Page 37: Appendix 1 - Pumped Version (Optional)
Detective+ Appendix 1 – Pumped version (optional) Appendix 1 – Pumped version (optional) The internal pump, when used in conjunction with the external flow plate and sampling tube, enables the Detective+ to monitor inaccessible atmospheres. It offers a consistent flowrate and is not fatigued, unlike the manual hand bulb. Pumped units are fitted with a water trap which requires periodical inspection and emptying. -
Page 38: Appendix 2 - Default Flammable Correction Factors
Appendix 1 – Pumped version (optional) Appendix 2 – Default Flammable Correction Factors Detective+ Detective+ Appendix 2 – Default Flammable Correction Factors Correction with Correction with 3 character name respect to methane respect to pentane Pentane Methane Butane Propane Hydrogen Toluene Ethanol Petrol... -
Page 39: Appendix 3 - Front Panel Text Items
Detective+ Detective+ Appendix 1 – Pumped version (optional) Appendix 3 – Front Panel Text Items Appendix 3 – Front Panel Text Items This Appendix lists all the possible values the front-panel configuration param- eters may take. Top level configuration items – accessible by pressing the CAL button: Text Description MENU... - Page 40 Appendix 1 – Pumped version (optional) Appendix 3 – Front Panel Text Items Detective+ Detective+ LOG level configuration items: Text Description/Options START* Start data logging STOP** Stop data logging SITE Select site: Site 1, Site 2, …. Or string programmed via SetPortable USER Select user: User 1, User 2, ...Or string programmed via SetPortable *This option is only present if the logger is currently stopped.
-
Page 41: Appendix 4 - Sensor Limitations
Toxic sensors may also be cross-sensitive to gases other than their specific target gas, and hence the presence of other gases may cause the sensor to respond. If unsure, contact Crowcon or your local agent. Use of high power radio transmitters in close proximity to the instrument may exceed RFI immunity levels and cause erroneous indications. -
Page 42: Appendix 5 - Menu Map
15 APPENDIX 5 – Menu Map Appendix 1 – Pumped version (optional) Appendix 5 – Menu Map Detective+ Detective+ Appendix 5 – Menu Map Detecting Gas Saving Lives... -
Page 43: Appendix 6 - Alarm Tone Setting On The Is-Ma3 Sounder
Detective+ Appendix 6 – Alarm Tone Setting on the IS-mA3 Sounder Appendix 6 – Alarm Tone Setting on the IS-mA3 Sounder When fitted with the red IS-mA3 sounder, the tone of the audible alarm on the Detective+ can be selected by means of a DIP switch within the sounder. The default tone, selected during manufacture, is an alternating 2400/2900 Hz signal with a period of 2 Hz. - Page 44 Appendix 6 – Alarm Tone Setting on the IS-mA3 Sounder Detective+ Dip Switch Setting Alarm Tone Low Battery Tone Sweeping 500/1000 Hz Continuous 2400 Hz @ 1 Hz 1 2 3 4 5 6 Continuous 800 Hz Continuous 2400 Hz 1 2 3 4 5 6 Sweeping 500/1000 Hz Continuous 2400 Hz...
- Page 45 Detective+ Appendix 6 – Alarm Tone Setting on the IS-mA3 Sounder Dip Switch Setting Alarm Tone Low Battery Tone 420 Hz @ 0.625 s – Continuous 2400 Hz Australian Alert 1 2 3 4 5 6 Sawtooth 1200/500 Hz Intermittent 1000 Hz, @ 1 Hz –...
Need help?
Do you have a question about the Detective+ and is the answer not in the manual?
Questions and answers