Table of Contents
Advertisement
Advertisement
Table of Contents

Related Manuals for Cuddeback C


Summary of Contents for Cuddeback C
- Page 1 C & E model User Manual...
- Page 2 Please support us online by writing a positive review on any of the Extend the warranty on your Cuddeback retail or forum websites. We thank you for your camera to 24 months by registering your support.
- Page 3 SD card and SD Card Notice transfer images from internal memory to the SD card. This Cuddeback camera is compatible with SD cards sizes 2GB to 32GB. Do not use SDXC cards. Micro SD cards will function with the proper adapter (usually included with the micro SD card).
- Page 4 Design Theory Cuddeback C & E model cameras have been designed to be as compact as possible, without compromising the performance, features, reliability, and image quality Cuddeback is known for. 1. User Interface is weather resistance and covered with a sealing door. This resilient rubber/plastic door is more robust than a conventional hinge door.
- Page 5 C and E Models Install batteries Install batteries by removing the 2 battery door Cuddeback C & E models are very similar, but with thumb screws and removing the battery door. Insert these notable differences. 8 AA batteries as shown. Make sure to observe the ✓...
- Page 6 Zone Control We recommend Rayovac, Duracell, or Energizer brand batteries only. (Choose batteries carefully - This camera is equipped with Cuddeback’s patented there is a difference, especially in cold temperatures). Zone Control. The motion sensor can be set to detect Lithium batteries provide better performance in cold animals in a wide angle or a narrow view.
- Page 7 Quick Start Guide (EZ Mode) C & E model cameras have 2 operating modes, EZ and ADVANCED. The default mode is EZ and we will explain that first. There are 6 LEDs named CLOCK, TESTS, COMMANDS, SETTINGS, ARM, OFF that correspond to user settings.
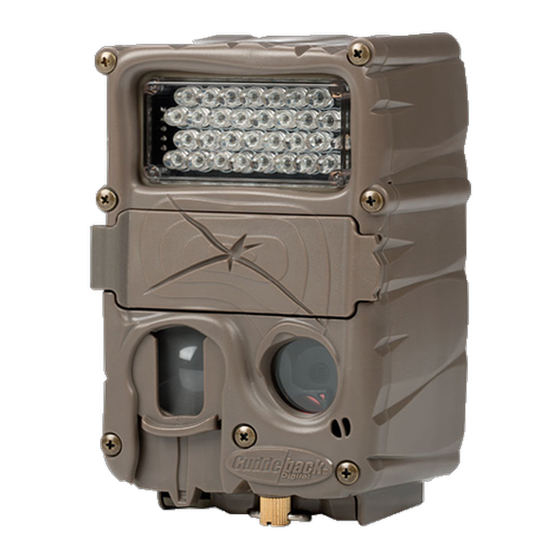
- Page 8 C & E camera front view CLOCK, TESTS, COMMANDS, SETTINGS, ARM, OFF LEDs (control panel door open) Mode & Up & Down Flash LED’s More Test LED Keys (Long Range IR) Keys Mode & More Setting the clock will demonstrate how the user Keys Up &...
- Page 9 Test Item DOWN as needed to set the HOUR. When correct, press MORE to advance to minute. Minute will Press MODE until the begin flashing and use the UP and DOWN to set the TESTS LED is illuminated. correct minute. Press MORE again to complete the After a short delay WALK time setting.
- Page 10 Pressing MORE from the WALK test will display batteries. This value is calculated based upon TEST CAM. See Appendix D: Troubleshooting, how much battery power is used to take a picture Service & Support for instructions on how to use or video.
- Page 11 4. ASPECT – this selects the format of the image. 10. IM COPY – Use this command to copy images Select WIDE view or FULL view. WIDE is the modern from the cameras internal memory to the SD card. 16 x 9 format, and FULL is the traditional 4 x 3 format. 11.
- Page 12 ✓ Lifetime Flash Image is how many flash images Video – press UP or DOWN to select the length of that camera has taken. the video or OFF if you do not want to record videos. 13. MODEL – Displays the camera’s model number. Armed Item Press MODE until the ARM 14.
- Page 13 SD VIDEO is the number of videos on the accidentally leaving the camera afield not armed. SD card Off Item c. SD FREE is the amount of free space on the SD card Press MODE until the OFF LED is displayed. You will d.
- Page 14 Additional Topics Strap Use and Assembly For secure strap use follow the steps below: Mounting Genius mount is more versatile than the traditional Step 1 – Route strap through bracket. strapping the camera to a tree. The Genius mount is easy to attach to a tree and the camera can be quickly attached and removed without altering the camera aim and alignment.
- Page 15 1. Detection range will be reduced in hot (over 26˚C or 80˚F) temperatures. Long Range IR 2. Animals walking directly towards the camera 50 feet...
- Page 16 Be aware of these things if you use your camera 7. Using Cuddepower to operate the camera in extreme cold (below 0˚C or 32˚F). with 6 D cell batteries will greatly improve cold weather performance and battery life.
- Page 17 The was taken letter a, b, c, d, or e will indicate image position Flash Mode – the second in the burst sequence. icon indicates if the flash...
- Page 18 Camera ID – if you set Camera ID to a non-zero Advanced Mode number it will be displayed here. Advanced mode provides these additional features: 1. Separate delays for day and night operation SD Card Organization Files are saved on the SD card in this format: 2.
- Page 19 3. Press UP or DOWN to select ADV MODE. a.i. D/ DELAY a.ii. D/ IMAGE a.iii. D/ VIDEO a.iv. D/ LAPSE b. NIGHT will be displayed to indicate that 4. Press MORE to retain the viewed setting. the next settings only affect nighttime camera operation.
- Page 20 • Use time lapse during the day, and motion sense at night c. VIDEO – sets the length of the video to record. Settings are OFF, 10 sec, 20 sec, • Record videos during the day, and images at 30 sec.
- Page 21 Updating your Cuddeback camera firmware is a 2 step process: 1) retrieving firmware from the Cuddeback website, and 2) loading the firmware onto your camera.
- Page 22 Use our Trophy Room Windows PC program g. The LCD display will display BUSY and the which will automatically inform you when LEDs will illuminate. When finished the new firmware is available. You can download time will be displayed and you can remove Trophy Room at http://cuddeback.com/...
- Page 23 2. Using shorter video length (10 seconds) will extend battery life. 3. Temperatures below 32˚F (0˚C) may reduce battery life 50% or more. 3. At night a longer delay (15 second of more) will extend battery life.
- Page 24 Want even longer battery life? The CuddePower Battery Booster allows C & E model cameras to operate from 6 D batteries. 6 D batteries have 4 times the power capacity of 8 AA batteries. This extra power provides a higher quality night image, better cold weather performance, and 1.
- Page 25 Appendix D: Troubleshooting, Service & Support If you suspect your Cuddeback is not functioning correctly, follow these simple steps: Press MODE until the TESTS LED is illuminated. Press MORE and TEST CAM will be displayed. 4. Insert into camera 5. Assure gasket and...
- Page 26 5. FILTER verifies the camera filter works Trophy Room correctly. Press UP to test and you should Cuddeback offers a free Windows PC tool to see the filter move inside the camera. manage your trail camera images. Trophy Room is valued at over $100, but is free to all trail 6.
- Page 27 For additional product support visit http://support. under this Limited Warranty. cuddeback.com. You can also email us your ques- 2. Limitations. Limited Warranty service will not be tions by visiting http://cuddeback.com/email. provided unless the Product is returned in the manner set forth below.
- Page 28 ALL WARRANTIES NOT STATED IN THIS WARRANTY. ANY IMPLIED WARRANTIES THAT MAY BE IMPOSED c. Any defect in or damage to the Product that occurs BY LAW ARE LIMITED IN DURATION TO THE TERMS due to transport, dropping, shock, or other similar OF THIS EXPRESS LIMITED WARRANTY.
- Page 29 Increasing power, image quality and extended Visit www.cuddeback.com and click Product Support battery life. or go to cuddeback.com/support for up to date service • Four times the power capacity of 8 AA batteries options and phone numbers. Here you will also find •...
- Page 30 Cuddeback camera from bears, ® Mount thieves and the elements! • Fits Cuddeback C & E model scouting cameras • Heavy-duty, bear-proof metal design Put your Cuddeback • Easy to install (lag-bolts to tree); accepts a padlock virtually anywhere! • Makes for easier card checking/battery replacement...
- Page 31 Designed in USA with ¼ Second Trigger Speed www.cuddeback.com NON TYPICAL, INC., PO Box 10447 Green Bay, WI 54307-0447...
Need help?
Do you have a question about the C and is the answer not in the manual?
Questions and answers