Table of Contents
Advertisement
Advertisement
Table of Contents

Related Manuals for Sangean K-200


Summary of Contents for Sangean K-200
-
Page 2: Table Of Contents
Table of Contents Important Safety Instructions ... 2-3 Introduction ... 4 Controls and connections ... 5-8 Display icons…………………...……………………9 Using the Radio for the First time ... 10 Operating your radio – Search tuning AM/FM ... 11 Manual tuning – AM/FM ... 12 Setting up the tuning step increment……………..………..13 Display Modes –... -
Page 3: Important Safety Instructions
Important Safety Instructions 1. Read and understand all safety and operating instructions before the radio is operated. 2. Retain instruction: The safety and operating instructions should be retained for further reference. 3. Heed warnings. All warnings on the appliance and operating instructions should be followed. - Page 4 14. Do not attempt to service the radio yourself. Removing the cover may expose you to dangerous voltage, and will void the warranty. Refer all servicing to authorized service personnel. 15. Object and Liquid Entry-Never push objects of any kind into this radio through opening as they may touch dangerous voltage points or short-out parts that could result in a fire or electric shock.
-
Page 5: Introduction
Introduction The Sangean K-200 AM/FM RDS Digital Tuning Radio provides the following range of features in a stream-lined portable size: Radio for AM and FM (with RDS) broadcasts. 10 radio station presets (5 for AM and 5 for FM) Clock display with time when in standby. -
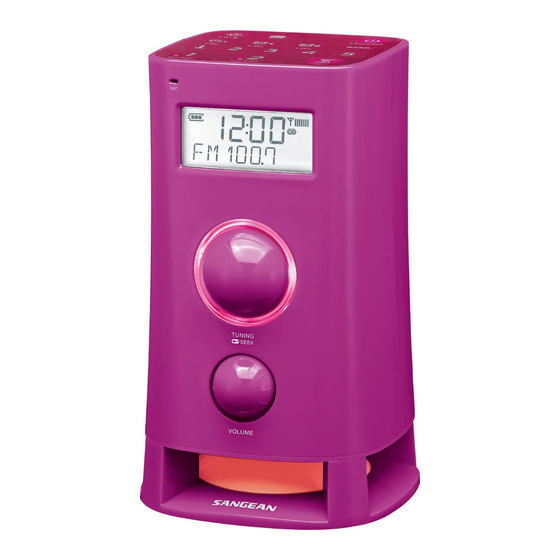
Page 6: Controls And Connections
Controls and connections Backlight button RDS button Standby / Auto off Alarm 2 button Band button Station presets Egg Timer button Message 2 button Message 1 button CT (auto clock time) button Alarm 1 button... - Page 7 Controls and connections Built-in Microphone LCD display Tuning control knob Volume control knob...
- Page 8 Controls and connections Battery compartment Headphone socket AC in socket Aux in socket FM Antenna jack...
-
Page 9: Controls And Connections
Controls and connections Buzzer level control... -
Page 10: Display Icons
Display icons Battery capacity indicator PM display Time indicator RDS icon Signal bar CT icon Alarm 2 indicator Alarm 1 indicator Frequency display Timer icon... -
Page 11: Using The Radio For The First Time
Using the radio for the first time A. AC operation 1. Place your radio on a flat surface. 2. Insert the adaptor plug into the AC socket located on the back of your radio ensuring that the plug is pushed fully into the socket. 3. -
Page 12: Operating Your Radio - Search Tuning Am/Fm
Operating your radio – Search tuning AM/FM 1. Press the Standby button to switch on your radio. 2. Press the Band button as needed until the AM or FM band is selected. 3. Press and release the Tuning knob to carry out an auto-tune. Your radio will scan up the AM/FM band from the currently displayed frequency and will stop scanning automatically when it finds a station of sufficient strength. -
Page 13: Manual Tuning - Am/Fm
Manual tuning – AM/FM 1. Press the Standby button to switch on your radio. 2. Press and release the Band button to select AM or FM radio mode. 3. Rotate the Tuning control to tune to a station. The FM frequency will change in steps of 200kHz (American version) / 100kHz (European version) and AM frequency will change in steps of 10kHz (American version) / 9kHz (European version). -
Page 14: Setting Up The Tuning Step Increment
Setting up the tuning step increment 1. Make sure your radio is in power off mode. 2. Press and hold the Tuning control knob until the setting of time format begins to flash. 3. After setting up the time format, press and release the Tuning control to enter the step increment setting. -
Page 15: Display Modes - Fm
Display modes – FM Your radio has a range of display options for FM radio mode. 1. Repeatedly press and release the RDS button to view the RDS information of the station you are listening to. Station name Displays the name of the station being listened to. -
Page 16: Am/Fm Modes
Presetting stations in AM/FM modes There are 5 preset stations each for AM and FM radio. They are used in the same way for each waveband. 1. Press the Standby button to switch on your radio. 2. Press the Band button to select the desired waveband. Tune to the required radio station as previously described. -
Page 17: Clock And Alarms
Clock and Alarms Setting the time format The clock display used in stand-by mode and on the playing mode screens can be set to 12 or 24 hour format. The selected format is then also used when setting the alarms. 1. - Page 18 Setting the clock time manually 1. Press the Standby button to switch on your radio. 2. Press and hold the CT button until the radio beeps once to enter the clock time setting, and the hour setting will begin to flash. The display will show “CLOCKSET”.
- Page 19 Setting the clock time using RDS CT 1. Tuning to a station transmitting RDS data, and press and release the CT button. The LCD display will show . The clock time of the radio will set up automatically according to the RDS data received. 2.
-
Page 20: Setting The Alarm Clock
Setting the alarm clock Your K-200 radio has two alarms which can each be set to wake you to AM/FM radio, buzzer alarm or voice messages. The alarms may be set while the unit is in standby mode or while playing. - Page 21 4. Rotate the Tuning control to choose the required alarm type, and then press and release the Tuning control to confirm the setting. The alarm can be set to buzzer, AM radio, FM radio or voice message (MSG1, MSG2 or MSG1+2). When radio mode is selected, the radio frequency and the preset number on the display will begin to flash.
-
Page 22: Snooze & Auto Off Timer
When the alarm sounds To cancel a sounding alarm, press and hold the Alarm 1 or Alarm 2 button until the radio beeps once, and the display shows “ALR OFF”. And The LCD will return to normal display. When the buzzer alarm activates, the alarm will start softly and gradually increase in level. - Page 23 Auto Off Timer Your radio can be set to turn off automatically after a preset time has elapsed. The Auto Off Timer setting can be adjusted between 15, 30, 45, 60, 90 and 120 minutes. 1. Press and hold the Standby button to enter the Auto Off Timer setting.
-
Page 24: Egg Timer
Egg Timer function 1. Press and release the Egg timer button to enter the egg timer setting. The egg timer setting will start flashing on the display. 2. Rotate the Tuning control to adjust the minute setting during 1 and 120 minutes with 1 minute interval. -
Page 25: Display & Audio
Display Brightness control The brightness of the display when the unit is in standby mode may be adjusted. If you use the unit in the bedroom, you may prefer a lower standby brightness level than the standard setting. 1. Press and release the Backlight button to adjust the current brightness level of the LCD display. - Page 26 Message function The message function can record and playback with 2 sets of voice message for 30 seconds each. 1. Press and hold the Message button to record the voice up to 30 seconds length. The LED is lighted during recording and the display will show “RECORD”.
-
Page 27: Software Version
Software version The software display cannot be altered and is just for your reference. 1. Make sure your radio is in power off mode (standby mode). 2. Press and hold the Tuning control knob until the setting of time format begins to flash. 3. -
Page 28: Auxiliary Input Socket
Auxiliary input socket A 3.5mm stereo Auxiliary Input socket is provided on the rear of your radio to permit an audio signal to be fed into the unit from an external audio device such as iPod, MP3 or CD player. 1. -
Page 29: Specification
Specifications Power Requirements Mains AC 9V ~/ 0.7A (AC to AC) Frequency Range FM: 87.5 – 108 MHz AM: 520 – 1710 kHz (USA version) 522 – 1629 kHz (other version) Battery 4 X 1.5V Size “C” / UM-2 / R14 If at any time in the future you should need to dispose of this product please note that: Waste electrical products should not be disposed of with household waste.