Table of Contents
Advertisement
Advertisement
Table of Contents

Related Manuals for Syngene NuGenius


Summary of Contents for Syngene NuGenius
- Page 1 USER MANUAL NuGenius/NuGenius+ User manual...
-
Page 2: Table Of Contents
RINTING CHAPTER FIVE - IMAGE ENHANCEMENT ........................23 ............................... 23 MAGE ENHANCEMENT ................................24 NNOTATION ................................24 IGITAL CHAPTER SIX - USER PREFERENCES ..........................26 ................................. 26 ETTINGS ............................. 26 TROBE COMPENSATION UV S ................................26 AFETY NuGenius/NuGenius+ User manual... - Page 3 DATE & TIME …………………………………………………………………………………………………………………………………………………. 28 CHAPTER SEVEN - TROUBLESHOOTING AND CONTACT INFORMATION .……………………………………………………………………. 29 ….………………………………………………………………………………………………………………………………………... 29 ROUBLESHOOTING ..……………………………………………..…………………………………………………………………………………………… 29 ONTACT YNGENE APPENDIX A - LOOKING AFTER YOUR NUGENIUS/NUGENIUS+ SYSTEM ............... 30 APPENDIX B – DISPOSING OF YOUR IMAGING SYSTEM ....................31 NuGenius/NuGenius+ User manual...
-
Page 4: Safety Practices
Ultimately, maintenance of a safe laboratory environment is the responsibility of the user and the user’s organization. Please consult all documentation supplied with the NuGenius/NuGenius+ before you start working with the instrument. Carefully read the safety information in this document and in the other documentation supplied. - Page 5 Symbol used to indicate that the product should be kept dry. Symbol indicating that the device is "fragile" and should be handled with care. Symbol indicating the correct upright position of the transport package. NuGenius/NuGenius+ User manual...
- Page 6 Rating and Serial Number abel UV Safety Warning NuGenius/NuGenius+ imaging system has a UV Transilluminator. If you open the door the system will automatically switch the UV off. If you wish to override the UV, please refer to section 6.3. NuGenius/NuGenius+...
- Page 7 Whenever circumstances arise that mean your NuGenius/NuGenius+ may be unsafe, make it inoperative. In particular, a NuGenius/NuGenius+ may be unsafe if it: Shows visible damage ...
- Page 8 The unit should be transported and stored in an environment -10°C to +50°C, not condensing. If you must move the imaging system any great distance please contact your local distributor to advise you about moving your system. NuGenius/NuGenius+ instrument requires two people to lift it safely. NuGenius/NuGenius+ weighs 20kg.
- Page 9 The electrical safety of the instrument is likely to be impaired if, for example, the instrument: Shows visible damage Has been subjected to prolonged storage in unfavorable conditions NuGenius/NuGenius+ User manual...
- Page 10 (overvoltage) category II of IEC 60364-4- 443. Pollution Degree 2: Normally only non-conductive pollution occurs. Occasionally, however, temporary conductivity caused by condensation must be expected. Electrical Specifications The NuGenius/NuGenius+ power rating is as follows: Voltage 100-240Vac Frequency 50-60Hz Current Fuse 2 of 20 mm x 5 mm IEC127 T 6.3 A H 250V...
- Page 11 EMC compliance EC directive The NuGenius/NuGenius+ instrument has been designed and tested to meet the requirements of the EC directive 2014/30/EU. The NuGenius/NuGenius+ instrument complies with the EMC standard EN61326 (EMC standard for electrical equipment for measurement, control and laboratory use) and EN55011 (ISM) class B (RF emissions).
-
Page 12: Chapter One - Introduction
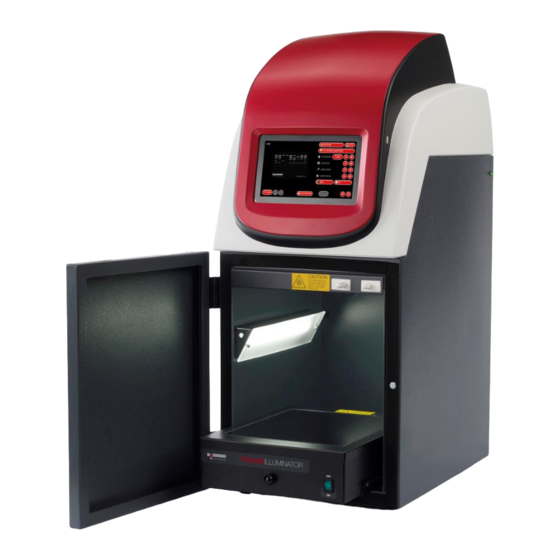
1. Introduction Chapter One - Introduction NuGenius/NuGenius+ system has been designed to make your gel imaging simple, quick and easy. This system is the perfect choice for a low budget gel imaging system and features a compact darkroom which has an internal LED white light and a motorised lens. -
Page 13: 1.2.2 System Components
1.2.2.3 LCD Touch Screen A built-in 7 inch colour LCD touch-screen allows users to preview, capture, print and save images, as well as to select various processing functions, without the connection of an external keyboard or mouse. NuGenius/NuGenius+ User manual... -
Page 14: 1.2.3 Accessories
The drivers are preinstalled. 1.2.3.3 Analysis software NuGenius/NuGenius+ system is supplied with 4 copies of GeneTools analysis software from Syngene. This may be loaded on a PC of your choice. Please see the loading instructions in section 2.6. NuGenius/NuGenius+ User manual... -
Page 15: Chapter Two - Installation
CAUTION: Do not connect power supply to any of the components until you are satisfied that everything is connected correctly. For assistance please contact your supplier or Syngene directly. 2.1.1 Transilluminator set-up Place the UV Transilluminator inside and connect it to the free flying mains lead... -
Page 16: Dynamic Field Correction
Installing GeneTools on a separate PC Plug the Syngene branded flash drive into the PC you wish to install GeneTools on. Navigate into the “GeneTools” folder on the flash drive and run the “InstallGeneTools” program. -
Page 17: Chapter Three - Image Acquisition
Set an exposure time you are happy with and press ‘CAPTURE’. Alternatively, the auto-exposure function sets the exposure time to a level that ensures no saturation of the image occurs. To use the auto-exposure function press ‘AUTO’. You can then save or print the image. NuGenius/NuGenius+ User manual... -
Page 18: Capturing An Image Of A Protein Gel ( Coomassie , Silver Stained ) Or Other White Light Image
Set an exposure time you are happy with and press ‘CAPTURE’. Alternatively, the auto-exposure function sets the exposure time to a level that ensures no saturation of the image occurs. To use the auto-exposure function press ‘AUTO’. You can then save or print the image. NuGenius/NuGenius+ User manual... -
Page 19: Capturing An Image Of An Agarose "Safe" Dye Gel
Set an exposure time you are happy with and press ‘CAPTURE’. Alternatively, the auto-exposure function sets the exposure time to a level that ensures no saturation of the image occurs. To use the auto-exposure function press ‘AUTO’. You can then save or print the image. NuGenius/NuGenius+ User manual... -
Page 20: Capturing An Image Of A Stain-Free Gel (Nugenius+)
3. Image Acquisition Capturing an image of a Stain-Free gel (NuGenius+) Step 1 – Position sample and choose lighting Press the 'Live' button, then position the sample on the centre of the Transilluminator and then close the door. Select ‘STAIN-FREE QUICK’ (2.5 min) or ‘STAIN-FREE FULL’... -
Page 21: Chapter Four - Saving / Opening Images And Printing Images
Insert a USB flash drive into the USB port on the front of the instrument. Press on the ‘OPEN SAVED IMAGE’ button. Open Saved Image button NOTE: Before removing the USB drive, we recommend you press the ‘EJECT USB DRIVE’ button to ensure no data is lost. Eject USB Drive button NuGenius/NuGenius+ User manual... -
Page 22: Printing
4. Saving/Opening and Printing Images Printing To print directly from the NuGenius/NuGenius+ system, press the ‘PRINT’ icon. If the print button is not available, you have not selected your printer. See section 6.4 for more details on selecting your printer. -
Page 23: Chapter Five - Image Enhancement
5. Image Enhancement Chapter Five - Image Enhancement The NuGenius/NuGenius+ system offers a variety of functions ranging from image enhancement to annotation. Image enhancement To access the enhance functions select the button until you get to the “Image Enhancement” screen. From here you can select to smooth, sharpen, invert, lighten, darken or rotate your image. -
Page 24: Annotation
‘REMOVE’ button. Digital zoom To zoom in or out of your image use the ‘ZOOM’ buttons on screen once you have captured your image. Digitally zoom in on your image. NuGenius/NuGenius+ User manual... - Page 25 5. Image Enhancement Zoom settings can be reset at any time. Digitally zoom out of your image. NuGenius/NuGenius+ User manual...
-
Page 26: Chapter Six - User Preferences
Select your regional power frequency settings - choose between 50Hz or 60Hz. UV safety Select ‘PERMIT OVERRIDE’ if you wish the user to be able to override the UV Safety protocols. To turn the Transilluminator on while the door is open, this must be selected. NuGenius/NuGenius+ User manual... -
Page 27: Printer
Printer Click ‘SELECT PRINTER’ and then select the printer you have attached to the NuGenius/NuGenius+ system and then click ‘OK’. If no printer is connected and/or not detected by the system an error message will appear. Connect the printer to the system and then select ‘Ok’. -
Page 28: Date & Time
6. User Preferences Date & Time Select ‘SET INTERNAL CLOCK’ - the current time and date will appear. To change the time or date, select ‘OK’ and adjust accordingly, then select ‘OK’ to save. NuGenius/NuGenius+ User manual... -
Page 29: Chapter Seven - Troubleshooting And Contact Information
If still not on, remove power cord and attach another one plugged in elsewhere. If Transilluminator comes on there is an electrical supply problem within the NuGenius/NuGenius+. If it still does not come on it is likely the Transilluminator has failed. Contact Syngene. NOTE: Please take UV precautions. -
Page 30: Appendix A - Looking After Your Nugenius/Nugenius+ System
Switch off the mains voltage and remove the mains cord before cleaning. You can clean the outside of the NuGenius/NuGenius+ using a soft lint-free cloth, moistened if required with a little water. Mild detergent may be used, if necessary. Do not use abrasive or solvent based cleaning materials. -
Page 31: Appendix B - Disposing Of Your Imaging System
Specific treatment of WEEE is indispensable in order to avoid the dispersion of pollutants into the recycled material or waste stream. Such treatment is the most effective means of protecting the customer’s environment. NuGenius/NuGenius+ User manual...
Need help?
Do you have a question about the NuGenius and is the answer not in the manual?
Questions and answers