HALE FoamLogix 1.7AHP Description, Installation And Operation Manual
Class "a" electronic foam proportioning systems
Hide thumbs
Also See for FoamLogix 1.7AHP:
- Description, installation and operation manual (102 pages)
Table of Contents
Advertisement
FoamLogix
TM
Model 2.1A and 1.7AHP Class "A"
Electronic Foam Proportioning Systems
Description, Installation and
Operation Manual
HALE PRODUCTS, INC / CLASS 1
607 NW 27th Avenue ● Ocala, FL 34475
U.S.A. Telephone: 352-629-5020
FAX: 800-533-3569
GODIVA LTD.
Charles Street ● Warwick, England CV34
5LR Phone: 44-1-926-623600
5LR Phone: 44-1-926-623600
IDEX DINGLEE TECHNOLOGY (Tianjin) Co. Ltd.
No.9, 2nd Haitai Fazhan Road Huayuan Industrial Development Area (outside of ring road)
Tianjin High-Tech Industrial Park Tianjin China
Telephone: 011-86-22-8568-9800
FAX: 011-862285689808
Manual p/n: 029-0020-74-0-F
Advertisement
Table of Contents
Troubleshooting

Subscribe to Our Youtube Channel
Related Manuals for HALE FoamLogix 1.7AHP


Summary of Contents for HALE FoamLogix 1.7AHP
- Page 1 FoamLogix Model 2.1A and 1.7AHP Class “A” Electronic Foam Proportioning Systems Description, Installation and Operation Manual HALE PRODUCTS, INC / CLASS 1 607 NW 27th Avenue ● Ocala, FL 34475 U.S.A. Telephone: 352-629-5020 FAX: 800-533-3569 GODIVA LTD. Charles Street ● Warwick, England CV34...
- Page 2 Class A Foam Factor NOTICE! Hale Products does not assume responsibility for product failure resulting from improper maintenance or operation. Hale Products is responsible only to the limits stated in the product warranty. Product specifications contained in this manual are subject to change without notice.
-
Page 3: How To Use This Manual
SECTION SETUP AND CALIBRATION Is used by the installer and end user for start-up and calibration of the Hale foam proportioning system. SECTION OPERATION Is primarily used by the apparatus user for proper operation and maintenance of the Hale foam proportioning system. - Page 4 NOTES FoamLogix, Model 2.1A and 1.7AHP Class “A” Electronic Foam Proportioning Systems...
-
Page 5: Table Of Contents
SYSTEM CONFIGURATION .................... 20 PACKAGE “A” ............................20 PACKAGE “B” ............................20 Figure 3: Typical Hale FoamLogix 2.1A and 1.7AHP System Layout ............ 21 Hale FoamLogix 2.1A Foam Proportioner System ..................22 Low Tank Level Sensor Options ........................23 Flow Sensors ............................... 24 Figure 4: Pipe Size vs. - Page 6 Water and Foam Solution Plumbing ......................35 Check Valve Manifold ..........................35 Figure 9: Check Valve Manifold Installation ................... 36 Optional Hale Piping Components ......................36 “Waterway” Check Valves ............................36 Figure 10: Typical Midship Pump Installation ..................37 Figure 11: “Typical 4” Check Valve Installation, Midship Pump” ............. 37 Flow Sensor ..............................
- Page 7 Contents - continued ..............Page START-UP CHECKLIST ....................48 Electrical ..............................48 Liquid ................................48 Foam Pump ..............................48 SYSTEM INSTALLER START-UP ..................49 Initial System Power Check......................... 49 Initial System Check ............................ 49 Figure 23: Control Unit Ready Indication ....................49 Figure 24: Simulated Flow Display ......................
- Page 8 Pump/Motor ..............................72 Bar Graph ..............................73 Summary ..............................73 Problem Isolation............................73 Troubleshooting charts ..........................74 Chart 44: Hale FoamLogix System Troubleshooting Flow Diagram ........... 74 Contents - continued ..................Page SECTION 7 ILLUSTRATED PARTS BREAKDOWN ..............76 General ................................... 76 Abbreviations ................................
-
Page 9: Foamlogix, Model 2.1A And 1.7Ahp Class "A Electronic Foam Proportioning Systems
Figure 7-5: Additional FoamLogix Components ..................85 FoamLogix 2.1A Pump Repair Kit........................86 APPENDIX A HALE FOAM CONCENTRATE COMPATIBILITY ..............87 Table A-1: Hale Foam Concentrate Compatibility..................87 Reference ..............................88 Distribution Box Replacement - Required Checks ................89 Foam Flow Sensor Replacement Instructions ................93 Warranty ................................ - Page 10 FoamLogix, Model 2.1A and 1.7AHP Class “A” Electronic Foam Proportioning Systems...
-
Page 11: Section 1 Safety
SECTION SAFETY ❑ A foam tank low level sensor must be utilized to protect the Hale Foam proportioner from dry running. Failure to use a low level sensor with the Hale Foam system voids warranty. IMPORTANT! ❑ DO NOT permanently remove or alter any guard or insulating devices, or attempt to THE HALE “FOAMLOGIX™”... - Page 12 Always disconnect the power cable, ground ❑ ❑ The cord sets provided with each Hale Foam straps, electrical wires and control cables from system are indexed to ensure correct receptacle the control unit or other Hale Foam system installation (they insert one way only).
- Page 13 Use a minimum 8 AWG type SGX (SAE J1127) There are no user serviceable parts inside Hale ❑ chemical resistant battery cable and protect with Foam system electrical/electronic components. wire loom. Opening of the distribution box or control unit voids the warranty.
- Page 14 NOTES FoamLogix, Model 2.1A and 1.7AHP Class “A” Electronic Foam Proportioning Systems...
-
Page 15: Section 2 Description
The distribution box then The heart of the Hale FoamLogix 2.1A and 1.7AHP provides power to the electric motor. As the motor systems are an electric motor driven rotary plunger rotates the pump, foam concentrate flows through pump. -
Page 16: Low Pressure Strainer
Hale FoamLogix 2.1A and 1.7APH units. Ordering Hale FoamLogix 2.1A and 1.7AHP Foam Systems is simple. Using the current Hale FoamLogix 2.1A Foam System Price List and Maximum Foam Solution Flow Order Form helps ensure a complete matched... - Page 17 Using the information provided in this manual and the detailed ordering procedures on Ordering the components as a complete system the option order form ensures that a complete Hale allows Hale to configure and test the complete Foam system is ordered thus eliminating delays order, to ensure a problem-free system.
-
Page 18: Hale Foam System Specifications
HALE FOAM SYSTEM SPECIFICATIONS 2.1A 1.7AHP Foam Pump Dual Plunger Dual Plunger Maximum Foam Concentrate Output 2.1 GPM (8 LPM) 1.7 GPM (6.5 LPM) Maximum System Operating Pressure 250 PSI (17 BAR) 400 PSI (27.5 BAR) Maximum Operating Temperature F (71... -
Page 19: Figure 2: Foam Pump Installation Envelope Dimensions
Figure 2: Foam Pump Installation Envelope Dimensions FoamLogix, Model 2.1A and 1.7AHP Class “A” Electronic Foam Proportioning Systems... -
Page 20: System Configuration
SYSTEM CONFIGURATION Package A Part Number: (Choose One) FLX21-12-1-10-1 (2.1A 12 Volt) FLX17-12-1-10-1 (1.7AHP 12 Volt) FLX21-24-1-10-1 (2.1A 24 Volt) FLX17-24-1-10-1 (1.7AHP 24 Volt) Description: FoamLogix Kit with single stainless steel check valve manifold Includes the following: FoamLogix full function digital display control that displays flow, foam %, total flow and total foam Foam pump assembly with bypass and strainer service valves 15 feet of cable between display and pump and 10 feet of cable between display and flow sensor... -
Page 21: Figure 3: Typical Hale Foamlogix 2.1A And 1.7Ahp System Layout
(Supplied by system installer) Double Check Valve Assembly Figure 3: Typical Hale FoamLogix 2.1A and 1.7AHP System Layouts (Also see Figure 20: “Control Harness Connections” on page 45) FoamLogix, Model 2.1A and 1.7AHP Class “A” Electronic Foam Proportioning Systems... -
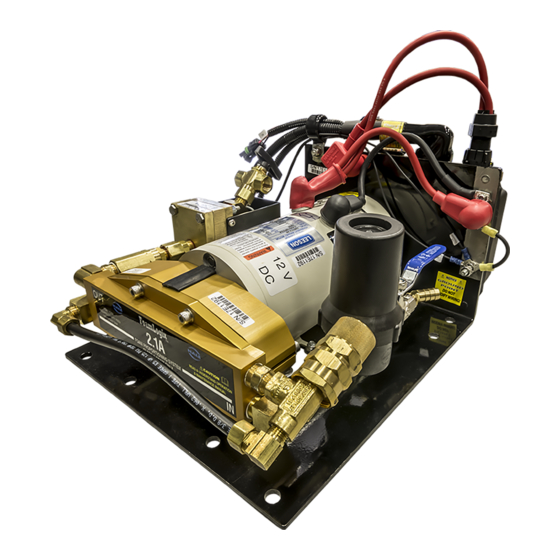
Page 22: Hale Foamlogix 2.1A Foam Proportioner System
Hale FoamLogix 2.1A and 1.7AHP Foam Proportioner Systems All Hale FoamLogix 2.1A and 1.7AHP systems include: Foam Pump/Motor Assembly and Control Unit FoamLogix Base Unit, Foam Pump/Motor Assembly 2.1A - 12V: 115498 2.1A - 24V: 115499 1.7AHP - 12V: 119276 1.7AHP - 24V: 119277... -
Page 23: Low Tank Level Sensor Options
Low Tank Level Sensor Options One Low Tank Level Sensor is Required Top Mount Low Level Tank Sensor Bottom Mount Low Level Tank Sensor p/n: 200-2110-06-0 p/n: 200-2100-04-0 (Extends from 2-1/2’ to 5’ (0.8 to 1.5 meters) - may (1” NPT threaded bushing to mount from outside be cut shorter if required.) foam tank.) FoamLogix, Model 2.1A and 1.7AHP Class “A”... -
Page 24: Flow Sensors
Flow Sensors Each Hale foam system requires a flow sensor for operation. Pipe size must be selected based on the minimum and maximum water flow in the foam capable discharge. Following is a list of pipe size and rated flow ranges, along with flow sensor saddle clamp part number. -
Page 25: Check Valve Manifolds, Flanges And Gaskets
p/n 038-1570-08-0 FoamLogix, Model 2.1A and 1.7AHP Class “A” Electronic Foam Proportioning Systems... -
Page 26: Elbows And Mini-Manifolds
H ALE lassf Elbows and Mini-Manifolds Close Flanged Elbow Close Fit Flanged Elbow p/n: 098-0190-00-0 p/n: 098-0140-00-0 24330 flange inlet with 3• female (115 flange let with 3" Victaulic outlet) 4" Victaulic outlet) Close Fit Flanged Elbow pin: 098-0050-00-0 (11 5 flange inlet with 2.5"... -
Page 27: Remote Start Option
Remote Start Option Switch p/n: 513-0330-01-0 Remote Start Option Harness p/n: 513-0680-00-0 (5m) FoamLogix, Model 2.1A and 1.7AHP Class “A” Electronic Foam Proportioning Systems... - Page 28 NOTES FoamLogix, Model 2.1A and 1.7AHP Class “A” Electronic Foam Proportioning Systems...
-
Page 29: Section 3 Installation
Differences in apparatus plumbing and foam FOAM PUMP AND MOTOR ASSEMBLY system configuration make it impractical to show exactly how the Hale FoamLogix 2.1A and 1.7AHP The foam pump and motor assembly must be systems are installed on a particular apparatus. -
Page 30: Control Unit And Instruction/System Diagram Placard
Foam Concentrate Suction Hose Foam suction connections ❑ ❑ Tank drainage The Hale FoamLogix 2.1A and 1.7 AHP Foam ❑ Proper fill openings, per NFPA requirements. systems are provided with 15’ (4.6 meters) of 1/2” (13mm) ID reinforced PVC foam concentrate suction In addition, a foam tank refill system may hose. -
Page 31: Foam Concentrate Discharge Hose
Layout” on page 21.) pressure of the fire pump must be used. Fittings and hoses must be compatible with all foam agents to be When a Hale FoamLogix 2.1A and 1.7AHP foam used. injection systems and related components are properly installed the required check valves are integral parts of the system. -
Page 32: Flushing Water Hose
This routinely takes on the form and function of mounting the FoamLogix If a Hale and USFS approved Class “A” foam system in a limited ventilation area that is served concentrate is used, flushing of the Hale FoamLogix by an appropriate pump house auxiliary heater. -
Page 33: Foam Concentrate Tank
Hale Foam-Logix when When planning cable runs make sure the primary the main apparatus electrical system is energized wires are routed by the shortest most direct route. and the pump is in gear. Use of a solenoid with... -
Page 34: Foam Pump Mounting
Also see Figure 8: “Base Plate Mounting Hole Locations” on page 35. PLUMBING INSTALLATION Hale FoamLogix System plumbing diagram is located on page 21 of this manual. Figure 7: FoamLogix Pump Installation FoamLogix, Model 2.1A and 1.7AHP Class “A”... -
Page 35: Water And Foam Solution Plumbing
Figure 8: Base Plate Mounting Hole Locations Check Valve Manifold The diagram provides recommended guidelines for the installation of system components that handle Hale pre-made stainless steel foam manifolds water, foam concentrate and foam solution. The are recommended. sequence in which the plumbing installation is completed depends on your individual installation. -
Page 36: Optional Hale Piping Components
The Hale mini manifold provides a 1” NPT tap for Note: When the manifold is installed the drain tap that must be placed in the “down” position and installation of the check valve/injector fitting. plumbed to an individual drain. The Hale mini manifold and elbow components When properly mounted, the flow sensor and check offer 4-3/8”... -
Page 37: Figure 11: "Typical 4" Check Valve Installation, Midship Pump
Figure 11: “Typical 4” Check Valve Installation, Midship Pump FoamLogix, Model 2.1A and 1.7AHP Class “A” Electronic Foam Proportioning Systems... -
Page 38: Flow Sensor
15” 2-1/2” Flow Sensor 3” 18” The Hale FoamLogix flow sensor is specially 4” 24” designed to enable quick and easy sensor inspection and maintenance. The flow sensor paddle wheel is installed on a saddle clamp or weld fitting to the foam-capable discharge piping of the apparatus. -
Page 39: Saddle Clamp Installation
Figure 14: Typical Reduced Size Sensor Piping Arrangement 3. Do not mount a flow sensor directly after an elbow or valve. Valves create severe turbulence when they are “Gated”. Saddle Clamp Installation See Figure 16: Flow Sensor/Saddle Clamp Installation“ on page 40. Installation of the Paddle Wheel Flow Sensor using a saddle clamp requires a 1.385“/ 1.390“... -
Page 40: Foam Pump Flush System
A 1/2” hose barb fitting is clamp onto the pipe. supplied to connect the 1/2” ID hose, provided with the Hale Foam-Logix 2.1A installation kit. Foam Pump Flush System The flushing water hose must be a minimum of 1/2”... -
Page 41: Check Valve/Injector Fitting
(25.4mm) threads on the outside, to fit into the 1” deposits or the formation of an ice plug. NPT threaded connection on the Hale mini manifold a pipe tee, or a 1” NPT weld fitting installed in the discharge piping of the fire pump. (See Figure 17: “Check Valve Injector Fitting Installation.”) -
Page 42: Foam Concentrate Injection Hose
Figure 18: Injection and Bypass Hose Connection The inlet connection of the check valve/ injector The bypass is a 3-way directional valve. Determine fitting uses a 1/2” NPT female thread. which port is the INJECT port and which port is the BYPASS. -
Page 43: Electrical Installation
Cables are provided with each Hale FoamLogix Do not mount radio transmitter or transmitter ❑ system to make the flow sensor, control unit and cables in direct or close contact with the Hale motor controller box connections. FoamLogix unit. The system installer must supply primary power ❑... -
Page 44: Control Unit
Display Unit Power and Ground Control Unit Connections The control unit mounts in the operator panel of Power must be connected directly to the display the apparatus. The display is secured with four #8 socket head screws. (See Figure 19 “Control Unit unit. - Page 45 PRIMARY POWER CONNECTION Wire Harness (40 AMPS Minimum - 8 AWG TYPE SGX Connection (113434) (SAE J1127) Minimum for lengths up to 6’. For lengths over 6’ see Table 6 on page 31. Use silicone sealane to prevent corrosion and use rubber boot provided to prevent short circuit.) Figure 21 Power Connection...
-
Page 46: Motor Ground/Primary Power
Ground Connection RFI/EMI Be sure the Hale FoamLogix system is grounded to the chassis. Use a short length of wide flat ground Electrically shielded cables for control unit and strap at least 1-1/4” (32 mm) wide and less than 18”... -
Page 47: Figure 22: Extra Cable Storage
Figure 22: Extra Cable Storage FoamLogix, Model 2.1A and 1.7AHP Class “A” Electronic Foam Proportioning Systems... -
Page 48: Start-Up Checklist
LIQUID START-UP CHECKLIST ❑ Flow sensor mounted with flow arrow in the Before energizing the apparatus and Hale Foam- correct direction for water flow. Logix system for the first time make sure the following items are checked: ❑ Check valves are properly mounted in water and foam concentrate lines. -
Page 49: System Installer Start-Up
System Installer Start-up On initial power-up of the Hale FoamLogix system, at the installer facility, the following procedures must be followed. INITIAL SYSTEM POWER CHECK Watch the display on the control unit as the apparatus electrical system is turned ON. Check... -
Page 50: Figure 24: Simulated Flow Display
DO NOT PUMP WATER WITH THE HALE FOAM- LOGIX FOAM PUMP FOR MORE THAN ONE (1) MINUTE. DO NOT ATTEMPT TO CALIBRATE FOAM PUMP FEEDBACK SENSOR WITH OTHER THAN END USER SPECIFIED FOAM CONCENTRATE. MAKE SURE THE BYPASS VALVE IS IN THE BYPASS POSITION WHEN PUMPING WATER WITH THE FOAM PUMP. -
Page 51: Installation And Delivery Check List
INSTALLATION AND DELIVERY CHECK LIST After the Hale FoamLogix system is installed, use the following check list to verify installation and ensure proper system setup when the apparatus is delivered to the end user. INSTALLATION DATE INITIALS ❑ System properly installed. (Review “Start-Up Check List” on page 48.) ❑... - Page 52 NOTES FoamLogix, Model 2.1A and 1.7AHP Class “A” Electronic Foam Proportioning Systems...
-
Page 53: User Calibration
Table 25: Password Sequence tested at the factory before shipping to the installer. If the Hale FoamLogix system is properly installed, RESTORE FACTORY DEFAULTS further calibration IS NOT necessary until delivery to customer. -
Page 54: Flow Sensor Calibration
SELECT DISPLAY Press and HOLD 27: Display - Flow Sensor Calibration Continued to FLOW SENSOR CALIBRATION HOLD Verify flow sensor calibration during NFPA/UL testing of the apparatus and delivery to end user. Displayed when is pressed IMPORTANT! Displayed when ... -
Page 55: Record Flow And Sensor Calibration Factors
Adjust the setting to the required rate by pressing the or buttons (e.g., S 150). FOAM CONCENTRATE INJECTION RATE When the Hale FoamLogix system power is turned ON, the foam concentrate injection rate stored in memory is the default setting. The user specific... -
Page 56: Foam Pump Feedback Calibration
Press and Press and release - the release - the present value is default value is shown shown Figure 31: Display - Foam Pump Feedback Calibration Figure 30: Display - Foam Concentrate Injection Rate 3. Place a graduated measure container at the Default Value outlet of the bypass hose capable of containing the expected volume of foam concentrate, 5... -
Page 57: Record Foam Pump Feedback Calibration Factor
4. Start the Hale FoamLogix foam pump by pressing the red ON button. Press and The LEDs on the horizontal bar graph lights as release - the the foam pump begins operating at approximately feedback factor is shown two-thirds speed, pumping foam concentrate into the container. -
Page 58: Relief Valve
RELIEF VALVE The Hale FoamLogix system is calibrated at the factory to U.S. measurement (GPM, PSI, GAL- LONS, etc.) units. The pressure relief valve is factory tested and set to 300 PSI (21 BAR). (See Figure 35: “Relief Valve.”) To convert to Metric units: During normal installation and operation, the 1. -
Page 59: Section 4 Operation
The bar graph lights when foam is being injected and indicates system capacity. On initial power up of the apparatus, the Hale FoamLogix system begins a brief self-diagnostic When the ON button is pressed again the LEDs routine. When completed, the system enters the extinguish, indicating that the system is in STANDBY STANDBY mode. -
Page 60: Display Information
See Figure 37: “Display - Function Modes.”) Percentage FLOW The display shows the current flow rate of water or foam solution per minute in Hale flow sensor monitored discharges. % FOAM Foam Percentage (%) The display shows the foam concentrate injection rate setting in the % FOAM mode (e.g., A 0.5). -
Page 61: Bar Graph
WARNING MESSAGES is being exceeded and is running “rich” on foam concentrate percentage. Several safety features are incorporated into the Hale FoamLogix system to protect the foam concentrate pump, electric motor and apparatus RESET FUNCTIONS wiring while maintaining personnel safety. -
Page 62: Low Foam Tank Level
Figure 39: Display - Priming Error LOW Foam Concentrate High Ambient Temperature If the Hale FoamLogix system is operating in an environment of excessive ambient temperatures, the display shows HIGH. Figure 38: Display - Low Foam Tank If the circuitry in the Hale FoamLogix system is... -
Page 63: Priming The Foam Pump
PRIMING THE FOAM PUMP (When the Foam Tank Runs Dry) In some instances, the foam tank may run dry while operating the Hale FoamLogix system. The Power foam pump is designed to pump liquid. When the Reduction fire pump is running the foam pump may not pump... -
Page 64: Normal Operation Summary
NORMAL OPERATION SUMMARY OPERATION ACTION DISPLAY Energize the system Energize apparatus and turn FoamLogix power switch to ON. Initial StarUp Self Diagonstics Select foam tank If System equipped with dual foam tanks place STANDBY Display selector toproper tank. (Single Flow Sensor: FLOW MULTIPLE Flow Sensor: % FOAM) Begin foam injection Establish water flow and... - Page 65 OPERATION ACTION DISPLAY Press or and hold for 2 Change injection rate seconds. Release once rate is set. Foam Concentrate Injecion Rate Read injection rate Press and release or Display shows injection rate and returns to selected function after 2 seconds.
-
Page 66: Simulated Flow Operation
The factory default simulated flow rate is 150 3. Energize the apparatus electrical system and GPM (568 LPM). The simulated flow rate and the press Hale FoamLogix power button ( i ) to turn concentrate injection percentage rate are set by the ON the system. -
Page 67: To End Simulated Flow
To End Simulated Flow When the FLOW LED lights, press and release the and buttons at the same time. 1. First press the ON button to STOP the foam The display shows S 150 (or other preset default pump. - Page 68 NOTES FoamLogix, Model 2.1A and 1.7AHP Class “A” Electronic Foam Proportioning Systems...
-
Page 69: Section 5 Maintenance
Flush foam pump if a non-approved foam below freezing temperatures: concentrate is used. Also see appendix A, “Hale Foam concentrate Compatibility” beginning on o Drain the foam concentrate storage page 87 for recommended foam concentrates. - Page 70 3.0%. • Shut all foam reservoir drain valves. • Operate the discharge hose for one minute. • Fill the foam reservoir with a Hale approved • Shut the foam system “off.” Turn the fire compatible Class A foam concentrate.
-
Page 71: Section 6 Troubleshooting
Note: Hale Foamlogix system electronic components have no user serviceable components inside and are replaced as a unit. Opening of Hale Foamlogix electronic components voids the manufacturer warranty. System Overview The Foamlogix proportioner is a closed-loop system. The “brain”... -
Page 72: System Overview
box. (When the TNKA and TNKB LEDs are OFF the Distribution Box system is in FLUSH mode). ❑ VCC is illuminated when power and ground are The Distribution Box (part of the pump/motor assembly) applied to the distribution box’s pins 1 and 12. This controls the speed of the pump/motor based on commands indicates that the internal 5 volt regulator is from the Foamlogix controller display. -
Page 73: Bar Graph
The COM LED indicates the module’s CAN communication status. On Solid = Module on-line Flashing slow (2Hz) = CAN bus okay, but the module is not receiving messages from the Foam Controller. Flashing fast (8Hz) = CAN bus error, no communications. Gray connector (this connector is the same between the old and new motor drivers) Mating connector: Deutsch DT06-12SA GRAY... -
Page 74: Troubleshooting Charts
System Overview the required motor speed adjustments. This closed-loop runs several times per second and is what makes the system so accurate. If the sensor does fail then the See Figure 43: “FoamLogix 2.1A and 1.7AHP System system enters into “open-loop” or limp mode. The Open- Closed-Loop Flow Diagram.”... - Page 75 Diagram,” beginning on page 74. 44: “Hale FoamLogix System Troubleshooting Flow Diagram,” to show the flow data, a field problem 3. If the Hale FoamLogix control unit is illuminated, can be traced to a particular component for engage the apparatus water pump and establish replacement.
-
Page 76: Section 7 Illustrated Parts Breakdown
WATER FLOW Sensor Operative. SENSOR Is Sensor operating correctly? Check LEDs on Controller Box Figure 44: Hale FoamLogix System Troubleshooting Flow Diagram Chart 44: Hale FoamLogix System Troubleshooting Flow Diagram FoamLogix, Model 2.1A and 1.7AHP Class “A” Electronic Foam Proportioning Systems... - Page 77 FLASH? Replace Sensor Is Sensor Adjusted Adjust Sensor Correctly? Chart 44: Hale FoamLogix System Troubleshooting Flow Diagram - continued Figure 44: Hale FoamLogix System Troubleshooting Flow Diagram - continued FoamLogix, Model 2.1A and 1.7AHP Class “A” Electronic Foam Proportioning Systems...
-
Page 78: Foam Pump Assembly
SECTION 7 ILLUSTRATED PARTS BREAKDOWN GENERAL This section contains drawings and the parts breakdown for the serviceable assemblies, components and most commonly used options for the FoamLogix, Model 2.1A Class “A” Electronic Foam Proportioning System. ABBREVIATIONS The following abbreviations may be used in this IPB: A/R.... - Page 79 NOTES FoamLogix, Model 2.1A and 1.7AHP Class “A” Electronic Foam Proportioning Systems...
-
Page 80: Foam Flow Meter Assembly
FOAM PUMP ASSEMBLY 114034........1..... Motor/Pump Assembly - 2.1A - 12 Volt 114035........1..... Motor/Pump Assembly - 2.1A - 24 Volt 119274........1..... Motor/Pump Assembly - 1.7AHP - 12 Volt 119275........1..... Motor/Pump Assembly - 1.7AHP - 24 Volt 110521........1..... Motor 1/2 HP - 2.1A/1.7AHP - 12 Volt 110393........ - Page 81 Figure 45: Foam Pump Assembly FoamLogix, Model 2.1A and 1.7AHP Class “A” Electronic Foam Proportioning Systems...
-
Page 82: Flow Sensor Components
FOAM PUMP ASSEMBLY – 1.7AHP AND 2.1A Item Part number Description 114034 Motor/Pump Assembly - 2.1A - 12 Volt 114035 Motor/Pump Assembly - 2.1A - 24 Volt 119274 Motor/Pump Assembly - 1.7AHP - 12 Volt 119275 Motor/Pump Assembly - 1.7AHP - 24 Volt 110521 Motor 1/2 HP - 2.1A/1.7AHP - 12 Volt 110393... - Page 83 FLOW METER ASSEMBLY – 1.7AHP AND 2.1A (115497) Item Part number Description 044-1920-01-0 Flowmeter Right Cover 044-1920-00-0 Flowmeter Left Cover 062-0910-00-0 Flowmeter Housing 040-0340-00-0 O-ring 2-034 Buna-N 70 Durometer 016-1010-00-0 Flowmeter Rotor 064-6390-00-0 Sensor Target for Flowmeter Rotor Dowel Pin Ø0.25” x 1.25” SST 064-6680-00-0 Dowel Pin Ø0.13”...
- Page 84 Figure 46: Foam Flow Meter Assembly FLOW SENSOR COMPONENTS 102714 ........... Paddlewheel Flow Sensor 2. 4842010..........Saddle Clamp 2” with Flowmeter Port 4843010..........Saddle Clamp 2.5” with Flowmeter Port 4844010..........Saddle Clamp 3” with Flowmeter Port 4846010..........Saddle Clamp 4” with Flowmeter Port 4845010..........
- Page 85 Figure 47: Flow Sensor Components Dual Check Valve Manifold Single Check Valve Manifold FoamLogix, Model 2.1A and 1.7AHP Class “A” Electronic Foam Proportioning Systems...
- Page 86 Additional Foam Logix Components 1. 111530 FoamLogix Control Head 2. 038-1790-00-0 Injector Check Valve 3. 101-1630-70-0 FoamLogix Placard 4. 200-2110-02-0 Side Mount Low Level Tank Sensor 5. 200-2110-04-0 Bottom Mount Low Level Tank Sensor 6. 200-2110-06-0 Top Mount Low Level Tank Sensor 7.
- Page 87 ADDITIONAL FOAMLOGIX COMPONENTS Figure 49 Additional FoamLogix Components (4.88m) Top Mount Low Level Tank Sensor P/N 200-2100-04-0 P/N 200-2110-06-0 (1” NPT (13 mm) threaded bushing to mount from (Extends from 2-1/2’ to 5’ (0.8 to 1.5 meters) - may outside foam tank.) be cut shorter if required.) FoamLogix, Model 2.1A and 1.7AHP Class “A”...
- Page 88 FoamLogix Pump Repair Kit Item # Part Number Qty. Description Kit A...117495 ..... 1 .... Plunger and Seals Kit B 117496 ..... 1 .... Valve and Seals Kit C ..117497..... 1 .... Cam Bearing FoamLogix, Model 2.1A and 1.7AHP Class “A” Electronic Foam Proportioning Systems...
- Page 89 Appendix A Hale Foam Concentrate Compatibility The following foam concentrates are approved for use in Hale Foam Proportioning Systems. The Class A foam concentrates are approved for use in all Hale Foam Proportioning systems (Hale FoamLogix 5.0, 3.3, 2.1A and 1.7AHP and Hale V Series.
- Page 90 FoamMaster foam pumps built prior April 17, 1997 refer to Bulletin 650, Rev 2. If a particular foam concentrate you wish to use does not appear on this list, please contact your Hale representative for information concerning compatibility with Hale FoamLogix® Foam Proportioning System.
- Page 91 Please perform the following steps verify Foam ogix system integrity after replacing the Motor Driver. Realice por favor pasos siguientes para verifkar la tegridad sistema Foaml despues de substituirel DC Motor Never disconnect whenpower applied. Nunca desconecte cuando energfa es aplicada.
- Page 92 ® Verify the base of diode is connected to the main ground. • • • • • • • •• Verifica l a base del diodo este conectada con la tierra principal. Verify two ground wires from the DC Motor Driver connected to the main ground.
- Page 93 HALE Verify main ground is connected to vehicle chassis ground. Verifica tierra principal este conectada tierra delchasis delvehiculo. Do not use vehicle body as grounding point. No utilice elcuerpo del vehfculo come punto pone a tierra. Verify that all electrical connections are tightened have corrosion.
- Page 94 • The diode may similar to the one shown Verify positive connection toward the above. mounting hole. diode puede similar a elque esta Verifica conexi6n positiva hacia el demostrado arriba. jero de montaje. FoamLogix, Model 2.1A and 1.7AHP Class "A' Electronic Foam Proportioning Systems...
- Page 95 Foam Flow Sensor Replacement Instructions REPAIR KIT 119348 INCLUDES: REQUIRED TOOLS: - 7/16” wrench (2X) - Foam Flow Sensor (200-2481-00-0) - 5/16” wrench - Sealing Washer (097-1971-00-0) - 119376 - Product/Service Bulletin 0017 SAFETY INFORMATION • Remove system power from the FoamLogix system and relieve any trapped pressure. •...
- Page 96 STEPS 8-9 Keep STEP 7 Discard 8. Thread the new foam flow sensor nut onto the sensor about 1/2” (12mm). 9. Thread (do NOT push) the new seal washer onto the foam flow sensor about 1/2” (12mm). • This seal washer should be silver in color, with a black, rubber seal on the inner diameter. 10.
- Page 97 Express Warranty See website for product specific warranty details. HALE PRODUCTS, INC / CLASS 1 607 NW 27th Avenue ● Ocala, FL 34475 U.S.A. Telephone: 352-629-5020 FAX: 800-533-3569 GODIVA LTD. Charles Street ● Warwick, England CV34 5LR Phone: 44-1-926-623600 IDEX DINGLEE TECHNOLOGY (Tianjin) Co. Ltd.
Need help?
Do you have a question about the FoamLogix 1.7AHP and is the answer not in the manual?
Questions and answers