Table of Contents
Advertisement
Advertisement
Table of Contents

Related Manuals for Next Wave Automation CNC Shark HD4


Summary of Contents for Next Wave Automation CNC Shark HD4
- Page 2 FOR THE MOST RECENT MANUALS, DRIVERS, AND OTHER SOFTWARE, PLEASE VISIT http://nextwaveautomation.com *Information in this manual is subject to change without notice* CNC Shark HD4 is a registered trademark of Next Wave Automation. Software copyright by Next Wave Automation. All rights reserved.
-
Page 3: To Our Customers
CNC system. This manual tells you more about your CNC Shark HD4 system and how to operate and maintain it. Please read the manual carefully. The manual also includes our warranty and important safety information. -
Page 4: Serial Number And Software License Information
Serial Number and Software License Information Record your CNC Shark HD4 Controller Interface and Vectric software user name and license codes here for safe keeping. Your software may vary depending on the CNC Shark HD4 model purchased. Controller Serial Number: ____________________________________________... -
Page 5: Table Of Contents
Safety............................4 Emergency Stop ........................5 CNC Shark HD4 Operations Safety Instructions ............... 6 CNC Shark HD4 Hardware and Project Safety Instructions ............7 Overview ........................... 8 General – The CNC Shark HD4 ....................8 CNC Shark Controller and LCD Pendant .................. 9 CNC Shark HD4 Assembly Instructions .................. -
Page 6: Warranty
Shark HD4 machine or any portion of the CNC Shark HD4 machine is modified without the prior written permission of Next Wave Automation, LLC, or if the CNC Shark HD4 machine is located or has been used outside the country of residence of the authorized CNC Shark HD4 machine distributor from whom the CNC Shark HD4 machine was purchased. -
Page 7: Emergency Stop
The second is either the on/off switch or the red Emergency Stop button on the CNC Shark HD4. Hitting either will immediately stop the CNC Shark HD4 movement. This will also stop the router if it is plugged into the Controller Interface. -
Page 8: Cnc Shark Hd4 Operations Safety Instructions
Read and follow all safety and operating instructions before using the CNC Shark HD4. This includes reading the manual for the router that will be mounted on your CNC Shark HD4. Take the time to orient yourself to the Shark HD4 and the workflow steps. -
Page 9: Cnc Shark Hd4 Hardware And Project Safety Instructions
Controller Interface and power supply. This provides a second means of an emergency stop if needed. The CNC Shark HD4 machine is not designed to work with fluids. The router is a ‘dry’ router. Do not cut with any misting, cutter lubrication, or wet material as it may cause a fire. -
Page 10: Overview
Shark HD4 is designed for routing all types of wood, engraving plastics, etching metal, and even etching or cutting tile. The CNC Shark HD4 has impressive power, speed, accuracy and ease of use. The CNC Shark HD4 has a quality design and its parts have been manufactured using CNC machines to ensure the highest accuracy. -
Page 11: Cnc Shark Controller And Lcd Pendant
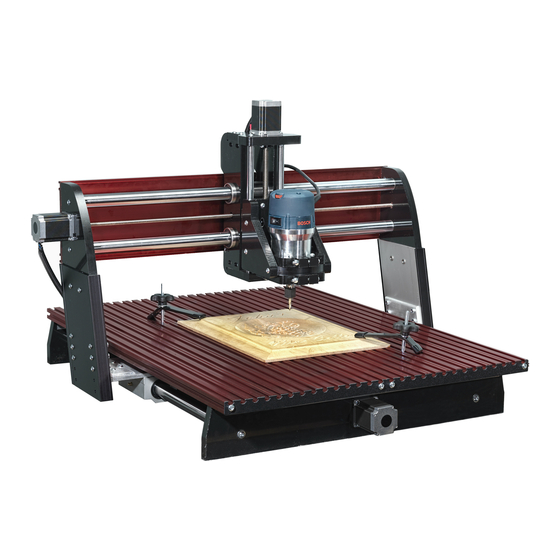
The core components of the CNC Shark HD4 are shown in the figure below. Z - axis motor X - axis Gantry motor Router Carriage Interlocking T - track Clamping base Y - axis motor CNC Shark HD4 Core Components CNC Shark Controller and LCD Pendant The CNC Shark LCD Pendant controls the movement of the X, Y, and Z axis as well as runs the project’s... - Page 12 The CNC Shark HD4 has a Controller Interface with the power supply integrated into a single unit. LCD Touch Screen Pendant April 2018 CNC Shark HD4 | 10...
-
Page 13: Cnc Shark Hd4 Assembly Instructions
2 Hold Down Clamps NOTE: Make sure when removing the CNC Shark HD4 base from its box that you lift it from the supporting rods underneath or the HDPE bottom. Do not lift from aluminum table top as this can cause misalignment. -
Page 14: Attaching The Pendant
You will also hear a slight bumping or clicking noise coming from each of the motors when power is initially supplied. This noise is momentary, and will occur every time power is applied to the Controller Interface. April 2018 CNC Shark HD4 | 12... -
Page 15: Registering Your Shark Hd4
Interface. The CNC Shark HD4 machine’s hardware is now completely setup and is ready for basic operation testing. You must setup the CNC Shark HD4 software before you can completely test your CNC Shark HD4 machine. Registering your Shark HD4 Once you power up your CNC Shark HD4, you will see a screen like below. - Page 16 If you received the success message and did not get a key code back in your email please try the following: 1.) Check your trash and spam email folders. 2.) Register again but send to another email address Always Visit http://help.nextwaveautomation.com/ for help with the latest issues. April 2018 CNC Shark HD4 | 14...
-
Page 17: Workflow Overview
VCarve) it automatically creates the g-code needed by converting into a .TAP file. Next save it onto a USB thumb drive and directly load this into the CNC Shark HD4 via the USB slot on the right side of the pendant. The tap file contains the G-code instructions that will tell the CNC Shark HD4 where to move in X, Y, Z to make the appropriate cuts using the cutter tool selected. -
Page 18: Machining The Part
The ‘Run’ button is selected, and the Shark HD4 starts to machine the part. You can also type a measurement directly into the current location screen. Pressing the location area will display the screen below. April 2018 CNC Shark HD4 | 16... - Page 19 Next, plug the thumb drive containing the .tap file into the LCD Pendant using the USB port on the right hand side of the Pendant. The USB button will now become accessible, press it now. April 2018 CNC Shark HD4 | 17...
- Page 20 At this point, all the steps necessary to run the toolpath have been taken. Next select the ‘Start’ button and the CNC Shark HD4 will start to machine the part. You’ll notice you have complete control to pause and resume should you need to check something (remember to turn router off if your adjusting the work piece) The slide bar for speed override allows you to compensate for things like denser material than what you had originally designed the program for.
-
Page 21: Using The Touch Plate Accessory
The Touch Plate is an optional accessory that can be used to obtain faster, more accurate setups. Just plug it into the CNC Shark HD4. This same Touch Plate is used with the CNC Shark offered by Next Wave Automation through a network of authorized distributors and web store. - Page 22 Attach the magnet to the router bit collar and place the plate on top of the material you’re working with. Then Tap Press to Run and the CNC Shark HD4 will ask to perform a test as below. Raise the touch plate to enough to make momentary contact with the bit, the screen will turn red and you may proceed.
-
Page 23: Virtual Zero
When using Virtual Zero with a file, ensure that the file uses the CENTER as the reference, as opposed to a corner of the material. When running a file, a green “V” indicates that Virtual Zero is armed. ELECTING IRTUAL ERO FROM THE April 2018 CNC Shark HD4 | 21... - Page 24 Even seemingly flat material can be slightly warped. Virtual Zero touches down at five points on the material to compensate for any warps or bends. LIGHTLY WARPED MATERIAL Points at which the router will touch down on the Touch Plate Virtual Zero reference points April 2018 CNC Shark HD4 | 22...
- Page 25 2 inches. Your value will vary depending on the size of the individual area you are machining. Then, select Scan Length Y and enter the length of the machining area. April 2018 CNC Shark HD4 | 23...
- Page 26 Virtual Zero. If you are using a new piece of material, select Capture New Points. If you are using a piece of material on which you have previously run Virtual Zero, you may choose Existing Points. You may also choose No to bypass using Virtual Zero. April 2018 CNC Shark HD4 | 24...
- Page 27 Your numbers may not be the same as those shown in the example picture below. Material width Recorded value at each Point Material length Each of the five dots in the above image corresponds to a point on the material, as depicted below. April 2018 CNC Shark HD4 | 25...
-
Page 28: Informational Resources
Informational Resources Next Wave Automation www.nextwaveautomation.com Manufacturer of the CNC Shark HD4. The website has software and documentation downloads as well as other general product information. CNC Shark Talk User Forum www.cncsharktalk.com A user group of the CNC users geared around CNC Shark owners. -
Page 29: Cnc Shark Hd4 Maintenance & Trouble Shooting Guide
Vendors of CNC-ready, Vcarve compatible two-dimensional clip-art models. CNC Shark HD4 Maintenance & Trouble Shooting Guide Maintenance It is best to vacuum away any dust, wipe down the bars and lubricate them using a dry lube spray such as what we carry. -
Page 30: Improving Touch Plate Accuracy
6.) Make sure that the File System has "FAT32" selected 7.) Click the start button. Formatting should only be a minute or two 8.) Copy your files back onto the USB Drive 9.) Try the USB in the Controller again April 2018 CNC Shark HD4 | 28... -
Page 31: Computer Requirements
There is no requirement to run VCarve on the same computer as you use in the shop to connect to the Shark HD4 Controller Interface. FOR THE MOST RECENT MANUALS, DRIVERS, AND OTHER SOFTWARE, PLEASE VISIT http://nextwaveautomation.com April 2018 CNC Shark HD4 | 29... - Page 32 CNC ACCESSORIES At Next Wave Automation we continue to develop accessories that make your CNC more universal and fun to own. All accessories are designed to work directly with Next Wave Automation machines and include all necessary hardware. DUST BOOT -Quick Remove Brush attachment allows for easy bit change.
Need help?
Do you have a question about the CNC Shark HD4 and is the answer not in the manual?
Questions and answers