Table of Contents
Advertisement
ENERGIZE III P/N # 81741B or ENERGIZE XPC P/N #81745
ENERGIZE III is for trailers with 2 or 4 electric brakes and vehicles with 12-volt negative ground
ENERGIZE XPC is for trailers with 2, 4, or 6 electric brakes and vehicles with 12-volt negative
• Before beginning installation, read and become familiar with these instructions.
• Leave in tow vehicle for future reference.
• Improper installation and operation could cause personal injury and/or equipment and
property damage.
SAFETY INFORMATION
!
!
Electronic Brake Controller
Hayes Brake Controller Company
INSTALLATION MANUAL
READ AND SAVE THESE INSTRUCTIONS
WARNING:
Indicates a potentially hazardous situation that,
if not avoided, could result in death or serious, personal injury.
CAUTION:
Indicates a potentially hazardous situation that,
if not avoided, could result in damage to product or property.
TIP:
Contains helpful information to facilitate installation.
systems only.
ground systems only.
Advertisement
Table of Contents
Troubleshooting

Subscribe to Our Youtube Channel
Related Manuals for Hayes ENERGIZE III

Summary of Contents for Hayes ENERGIZE III
- Page 1 ENERGIZE III P/N # 81741B or ENERGIZE XPC P/N #81745 INSTALLATION MANUAL ENERGIZE III is for trailers with 2 or 4 electric brakes and vehicles with 12-volt negative ground systems only. ENERGIZE XPC is for trailers with 2, 4, or 6 electric brakes and vehicles with 12-volt negative ground systems only.
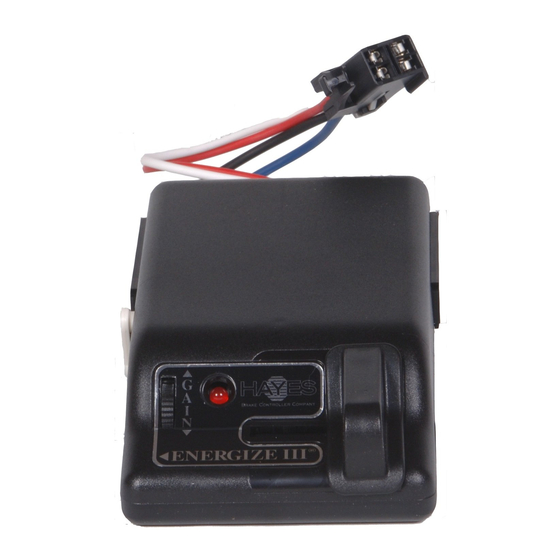
- Page 2 Red Indicator Light Anchor Holes Manual Slide Lever Pendulum Lever Arm Gain Wheel Figure 1 - front view of Energize III or Energize XPC Acceptable Mounting Angles Anchor Holes (4 ea. side) Mounting Bracket -35° to 90° Pendulum Leveling Arm Straight Down...
- Page 3 Controller Mounting and Installation Tinnerman Nut Mounting Bracket Self Tapping Screws Pan Head Machine Screw Figure 3 – attachment of mounting bracket Controller and Bracket mounting • The controller must be mounted with the back of the controller toward the front of the vehicle. •...
- Page 4 Installation Steps 1. Install the mounting bracket to a solid surface under the tow vehicle dash using the two machine screws and fasteners provided. Tighten until snug. See Figure 3 – attachment of mounting bracket. 2. Insert four of the self tapping screws provided through the mounting bracket holes and into the desired controller anchor holes.
- Page 5 Read the wiring instructions completely before you begin wiring the controller to the tow vehicle. WARNING: To reduce the risk of injury or damage to property: • Always connect the white wire first and the black wire second . • All four controller wires must be connected properly for the controller to operate correctly.
- Page 6 Brake Controllers fitted with a connector on the wire leads, making connection a snap. Harnesses are available through all dealer resources. Ask specifically for the Hayes Brake Controller Company (HBC) brand harnesses to match your controller. The following chart describes the function of each of the controller’s wires:...
- Page 7 For vehicles withou t a trailer-towing package: refer to the wiring diagram in Figure 4. NON-POWERED STOPLIGHT WIRE STOP LAMPS 20 AMP INLINE FUSE VEHICLE MECHANICAL (NOT FURNISHED) STOP LIGHT SWITCH GROUND BLACK ENERGIZE III POSITIVE WHITE ENERGIZE XPC BLUE USE SELF-RESETING CIRCUIT BREAKER SEE CHART TRAILER BRAKES...
- Page 8 Appendix OEM TOW VEHICLE WIRING CONVERSION CHRYSLER (THROUGH 2002) CONTROLLER FUNCTION CHRYSLER (NEW) RED W/BLACK TRACE BLACK +12 VOLT SUPPLY WHITE WITH RED TRACE WHITE W/TAN TRACE STOPLIGHT BLUE WITH WHITE TRACE BLUE BLUE TRAILER BRAKES BLUE BLACK WHITE GROUND GREEN WITH BLACK TRACE FORD (THROUGH 2002) CONTROLLER...
- Page 9 ENERGIZE III P/N # 81741B or ENERGIZE XPC P/N #81745 OPERATION MANUAL ENERGIZE III is for trailers with 2 or 4 electric brakes and vehicles with 12-volt negative ground systems only. ENERGIZE XPC is for trailers with 2, 4, or 6 electric brakes and vehicles with 12-volt negative ground systems only.
- Page 10 4. When the tow vehicle brake pedal is released, the controller and red indicator light will be turned off. Red Indicator Light Anchor Holes Manual Slide Lever Pendulum Lever Arm Gain Wheel Figure 1 - front view ENERGIZE III and ENERGIZE XPC...
- Page 11 Gain Wheel Adjustment (for Automatic only) WARNING: • Improper adjustment of the controller could result in loss of trailer brakes, aggressive, grabby, pulsating, or delayed trailer brakes. • Gain wheel adjustments may be required based upon speed, trailer load, and road conditions.
- Page 12 Adjusting the Pendulum WARNING: • Improper adjustment of the pendulum may result in poor performance of trailer brakes. • Brakes may be unresponsive, grabby, delayed, or pulsating. A. Connect the trailer to the tow vehicle for this adjustment. If a load leveling hitch system is used, it should be connected and operational.
- Page 13 Troubleshooting using the manual slide To verify the brake controller is properly wired, follow these steps: A. Disconnect the tow vehicle/trailer electrical connector. Move the manual slide lever (Figure 1) to the left. The red indicator light must become increasingly brighter and the tow vehicle stop lamps must illuminate.
- Page 14 Manual Remote Operation (ENERGIZE XPC only) WARNING: • Remote unit must be controlled by vehicle operator only. • Manual operation via the manual remote may not disengage the Cruise Control on some vehicles. WARNING: • Always keep remote unit clear and away from obstructions to reduce the possibility of undesired trailer brake activation.
- Page 15 Road Test and Performance Adjustments To adjust the gain wheel (Figure 1) with the trailer connected. A. Locate the tow vehicle and trailer on a flat, hard, dry surface. B. Adjust the gain wheel to the midrange setting. C. At a moderate speed (25 mph or less) push on the tow vehicle brake pedal in a normal manner. A firm braking action should occur.
- Page 16 TIP: • Warm trailer brakes tend to be more responsive than cold brakes. Braking on Hills When properly adjusted, the controller will allow a slightly greater amount of trailer braking going downhill and slightly less trailer braking going uphill. Normally, no controller readjusting is needed for towing in the hills.
- Page 17 Test / replace brake magnets brakes are applied. Reduced output to Too many brake magnets are Energize III only handles 1-2 axles with brakes. trailer brakes, red attached to controller Energizer XPC only handles 1-3 axles with brakes. indicator light stops...
Need help?
Do you have a question about the ENERGIZE III and is the answer not in the manual?
Questions and answers