
Related Manuals for Arjohuntleigh Carino


Summary of Contents for Arjohuntleigh Carino
- Page 1 Carino INSTRUCTIONS FOR USE ...with people in mind 04.BO.01_12US.CA September 2014...
- Page 2 Mandatory to read the Instructions for Use Design Policy and Copyright ® and ™ are trademarks belonging to the ArjoHuntleigh group of companies. © ArjoHuntleigh 2013. As our policy is one of continuous improvement, we reserve the right to modify designs without prior notice.The content of this publication may not be copied either whole or in...
-
Page 3: Table Of Contents
Battery Instructions ..............28 Cleaning and Disinfection Instructions ........29 Care and Preventive Maintenance ..........32 Troubleshooting ..............36 Technical Specifications ............38 Labels on the Carino ...............42 Approvals and List of Standards ..........44 Electromagnetic Compatibility ..........44 Parts and Accessories ............46 ArjoHuntleigh Addresses ..........Last page... -
Page 4: Foreword
This IFU is accompanied by a DVD. Please note that the DVD does not replace the information in the IFU Your Carino height adjustable hygiene chair is part of as it contains important information. a series of quality products designed especially for hospitals, nursing homes and other health care use. -
Page 5: Intended Use
The equipment is intended for indoor use. maintenance in the Instructions for use (IFU). The Carino may only be used by appropriately trained Depending on level of wear some equipment parts such caregivers with adequate knowledge of the care... -
Page 6: Safety Instructions
Safety Instructions WARNING WARNING To avoid explosion or fire, never use the To avoid resident falling out of the device, equipment in oxygen rich environment, in make sure that the arm rest are folded presence of heat source or flammable down during transfer. -
Page 7: Preparations
Action Before Every Use (4 steps) Actions Before the First Use (10 Steps) 1 Check that all parts of the Carino are in place. Compare to Part Designations page in this IFU. 1 Visually check the package for damage. If the product looks damaged make a complaint to the 2 Check accessories and parts for damage. -
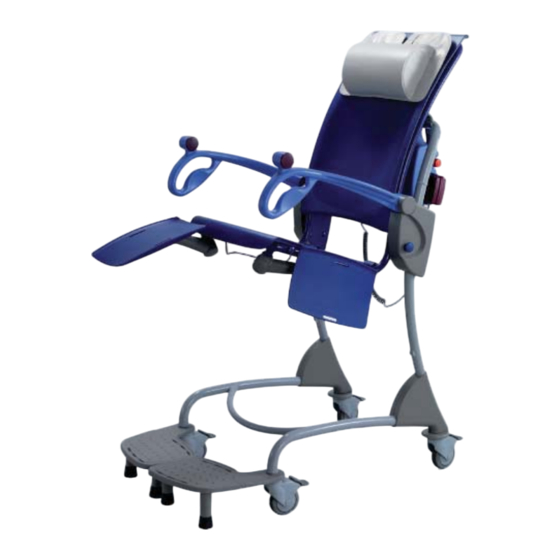
Page 8: Parts Designation
Parts Designation 1 Chassis 2 Lockable castors 3 Back rest 4 Neck pillow 5 Transfer handle 6 Transfer handle 7 Leg rests 8 Foot supports 9 Safety belt 10 Seat 11 Arm rests 12 Hand control 13 Battery 14 Battery holder 15 Battery charger 16 Lifting unit 17 Cover left... -
Page 10: Product Description / Functions
Product Description / Functions The Carino has a total of 15 descriptions and functions. Fig. 1 Lifting Function (High/Low) The chair can be adjusted to a suitable height over the toilet and to a comfortable height during showering. The higher the Carino chair is raised, the more reclined the resident’s position... -
Page 11: Castors
The seat is fixed in its normal position by a snap-in attachment on the front edge of the seat. For optimal ergonomics during cleaning and disinfecting, fold the seat up with the Carino in a comfortable height. (See Fig. 4) -
Page 12: Battery
To reset the emergency stop function, turn the red button clockwise. • • CAUTION This emergency stop function should ONLY be used in an emergency. If the emergency stop has been used due to malfunction, contact an ArjoHuntleigh Service Technician for general inspection of the Carino. -
Page 13: Emergency Lowering
2 Press the emergency lowering button with your finger. Automatic Safety Stop When a surrounding object stops the raising or lowering of the Carino, the automatic safety stop function will activate and stop the chair movement. Move the chair or the obstruction and continue raising or lowering. -
Page 14: Neck Pillow
Toilet Adapter (Accessory) Fig. 4 The toilet adapter is used as a protection between the toilet chair and Carino to prevent splashing during toilet visits. It can be fitted from the back under the seat just like the bedpan. (See Fig. 4) - Page 15 Intentionally left blank...
-
Page 16: Independent Resident
1 Fold away the leg rests and push aside the foot supports. (See Fig. 1) 2 Apply the brakes. (See Fig. 2) 3 Adjust the height of the Carino so that the edge of the seat Fig. 3 touches the back of the resident's knees. (See Fig. 3) 4 Let the resident hold on to the arm rest so that he or she can lean on it. - Page 17 6 Help the resident to sit down. (See Fig. 5) Fig. 5 7 Use the safety belt if needed. 8 Raise the Carino to a height which is convenient for transfer and the resident’s feet just above the foot supports. (See Fig. 6) Fig.
-
Page 18: Dependent Residents
3 Place the lift with the resident as close as possible to the Carino. (See Fig. 3) 4 Undress the lower part of the resident. (See Fig. 3) 5 Position the resident straight over the seat of Carino using the active lift. (See Fig. 4) Fig. 4... - Page 19 6 Lower the lift until the resident reaches the seat. (See Fig. 5) Fig. 5 7 Remove the sling. (See Fig. 5) 8 If needed, secure the resident in the Carino with the safety belt. (See Fig. 5) 9 Raise the chair so the resident’s feet are free from the foot plate of the active lift.
-
Page 20: Transfer
Method 1 The Carino is pushed from the back and the resident’s feet are placed on the foot supports. (See Fig. 1) Method 2 Fig. 2 The Carino is pushed at a comfortable height from the front and the resident does not use foot supports or leg rests. -
Page 21: Transfer To The Shower
Follow these 7 Steps. NOTE Fig. 1 To ease the process, undress the resident before entering the Carino chair. 1 Apply the brakes. 2 Undress the upper part of the residents body. (See Fig. 1) 3 Raise the chair to a comfortable height. -
Page 22: After The Shower
After the Shower Drying and Dressing A. Independent Residents (8 Steps) 1 Apply the brakes. 2 Dry all parts of the resident within reach with a towel. Don’t forget the back of the legs. (See Fig. 1-2) 3 Dress the lower part of the body, as far as possible. (See Fig. - Page 23 7 Fold away the foot supports. 8 Bring the active lift (standing and raising aid) in a frontal position close to the Carino so the resident’s feet reach the foot plate of the active lift. (See Fig. 6) 9 Apply back support sling of the active lift.
-
Page 24: Transfer To The Toilet
Transfer to the Toilet The Carino can be used regardless of whether the toilet is attached to the wall or to the floor. Preferably a toilet with a relatively long seat is recommended. See the measurements below on matching toilet chairs: min 700 (27 1/2") - Page 25 To Use the Toilet with Carino, Follow these 10 Fig. 1 Steps. 1 Place the Carino with the resident close to the toilet. (See Fig. 1) 2 Raise the chair to a comfortable height for the caregiver. (See Fig. 2) •...
-
Page 26: Home Care Use
Home Care Use Using the Carino For Distributors and Renters Before using Carino in home environment make When transporting Carino to the customer with a sure that: (See Fig. 1-2) van: • • Make sure the lift is properly secured during WARNING transport. - Page 27 Fig. 1 36" (900 mm) 36" (900 mm) 87" (2200 mm) Fig. 2 28" (700 mm) 28" (700 mm) Floor drain Movable shower mixer-tap and long shower hose (2500 mm) with trigger handle Free passage 39 sq. ft Height- and 36"...
-
Page 28: Battery Instructions
To prolong the life of the battery, charge it at regular intervals, i.e. every night. • If the Carino is used frequently, it is recommended to use two batteries, one in operation and one as a stand-by in the charger. -
Page 29: Cleaning And Disinfection Instructions
• Arjo General Purpose Disinfectant If you have any questions regarding disinfecting the • Arjo Disinfectant Cleanser IV Carino, or wish to order disinfectant fluid, contact ArjoHuntleigh Customer Service. See section, Parts • Arjo All Purpose Disinfectant and Accessories. •... - Page 30 Removing visual residue (Step 1-3 of 21) 1 Detach pillow, cushions and safety belt. 2 Clean the Carino from visible residue using a cloth soaked in water or if more suitable by spraying/showering water using a brush and/or wipe with a clean cloth. Start from the top and move downwards.
- Page 31 17 Spray or shower water (approx. 25°C ) and wipe with a clean Fig. 2 cloth to remove all traces of the disinfectant on the Carino . The cloth should occasionally be rinsed in running water during removal of disinfectant .
-
Page 32: Care And Preventive Maintenance
Care and Preventive Maintenance Caregiver Obligations Carino is subject to wear and tear and the following actions must be performed when specified to make sure that the product remains within its original manufacturing specification • WARNING To avoid malfunction resulting in injury, make sure to conduct regular inspections and follow the recommended maintenance schedule. -
Page 33: Disinfect
Carino knowledge and by following the instructions in this IFU. Every day • Disinfect. Carino has to be disinfected immediately after every use. ArjoHuntleigh disinfecting agents should be used in recommended concentrations. Fig. 2 • Visual check the exposed part of the lifting strap (See Fig. -
Page 34: Check Hand Control And Cable
Release the emergency stop button. Test automatic safety stop. Push the down button and pull up against the motion with your hand under the chair. The downward motion should stop. Fig. 7 Yearly Service Carino according to the Preventive Maintenance Schedule (Qualified Personnel Action/Check). - Page 35 WARNING To avoid injury and/or unsafe product, the maintenance activities must be carried out at the correct frequency by qualified personnel using correct tools, parts and knowledge of procedure. Qualified personnel must have documented training in maintenance of this device. QUALIFIED PERSONNEL Action/Check Every YEAR Clean rollers inside covers...
-
Page 36: Troubleshooting
Troubleshooting NOTE All Caregiver Obligations are to be checked when performing the Qualified Personnel Service. PROBLEM ACTION The chair keeps raising and lowering Activate the red emergency stop button and pull the after the hand control button is released. battery out - remove the resident from the hygiene chair and contact qualified personnel. - Page 37 Intentionally left blank...
-
Page 38: Technical Specifications
Medical equipment type B Fuse T5AL 250V Component weights 1.45 kg (3.2 lbs.) Battery • • Allowed Combinations The Carino integrate with the following ArjoHuntleigh Sara 3000, Sara Plus and Sara lite products No other combinations are allowed... - Page 39 This requirement applies in the European Union. Do not dispose these products as unsorted municipal waste. You can return your device and accessories to ArjoHuntleigh or you can contact your local authorities for advice on disposal.
- Page 40 Dimensions...
- Page 41 Ø1370 (53 7/8”) Ø1082 (42 5/8”) 424 (16 5/8”) 624 (24 5/8”)
-
Page 42: Labels On The Carino
EN/IEC accordance with EN/IEC 60601- 60601-1-2. • ArjoHuntleigh is not aware of any reciprocal Read the IFU before use electromagnetic interference between Carino and other electrical products. • The battery has been tested according to: Contact your local ArjoHuntleigh EN/IEC 60601-1 and UL 2054. - Page 43 24Vdc 2,5Ah NEA 0100-083 YYMM NiMH ArjoHuntleigh AB Verkstadsvägen 5 241 38 Eslöv, SWEDEN 8418556 D Made in Sweden Battery label Lifting strap label MODEL: BOC100X-01 Carino 600 mm 23 5/8" Safe Working Load 140 kg / 309 lbs 24 V DC...
-
Page 44: Approvals And List Of Standards
Medical electrical equipment needs special precautions regarding EMC (Electromagnetic compatibility) and needs to be used according to the EMC information below. The Carino is intended for use in the electromagnetic environment specified below. The customer or the user of the Carino should assure that it is used in such an environment. - Page 45 The customer or the user of Carino can help prevent electromagnetic interference by maintaining a minimum distance between portable and mobile RF communications equipment (transmitters) and the Carino by maintaining a distance of not less than 1 meter to any part of Carino, including cables, if the transmitters output power rating exceeds 1 W.
-
Page 46: Parts And Accessories
Parts and Accessories Battery charger and battery Safety belt Back pillow and neck pillow Bed pan with lid Toilet adapter Seat cushion... -
Page 47: Arjohuntleigh Addresses
Free: +1 800 072 040 Fax: +33 (0) 3 20 28 13 14 Fax: + 61 89337 9077 E-mail: info.france@arjohuntleigh.com POLSKA ArjoHuntleigh Polska Sp. z o.o. BELGIQUE / BELGIË HONG KONG ul. Ks Piotra Wawrzyniaka 2 ArjoHuntleigh NV/SA ArjoHuntleigh (Hong Kong) Ltd... - Page 48 GETINGE GROUP is a leading global provider of products and systems that contribute to quality enhancement and cost efficiency within healthcare and life sciences. We operate under the three brands of ArjoHuntleigh, GETINGE and MAQUET. ArjoHuntleigh focuses on patient mobility and wound management solutions. GETINGE provides solutions for infection control within healthcare and contamination prevention within life sciences.
Need help?
Do you have a question about the Carino and is the answer not in the manual?
Questions and answers