Table of Contents
Advertisement
Quick Links
FM/AM 2 BANDS DIGITAL TUNING RADIO
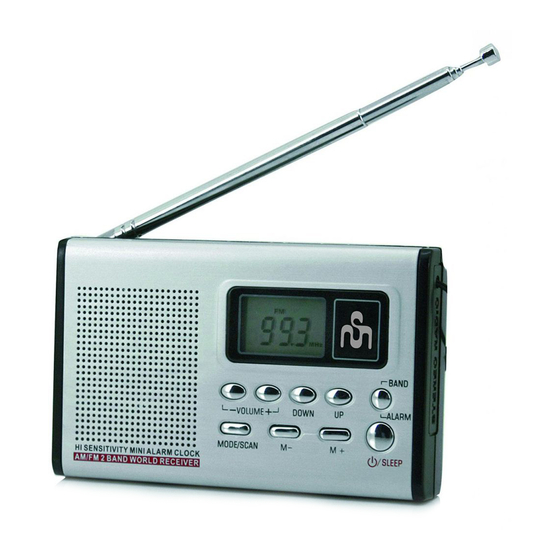
APPEARANCE DIAGRAM AND FUNCTION
INDICATION
1. Display screen
2. Hand belt
3. Volume-
4. Volume+
5. Down tuning button / time-button
6. Up tuning button / time+button
7. Band conversion button /
alarm setting button
8. Power switch button / sleep function button
9. Storage address+
10. Storage address-
11. Store channel button / time mode button
LCD EXPLANATION
1. Frequency unit indication of FM
2. AM frequency unit indication
3. Frequency / time indication
4. Alarm power on indication
5. Sleep function indication
6. FM band indication
7. AM band indication/
forenoon time indication
8. Afternoon time indication
9. Channel storage address indication
10. Channel storage indication
11. Scan storage indication
12. Volume indication
INSTALL THE BATTERY
1. This device uses two AAA batteries.
Please install the batteries into the
battery box according to the polarity
indicated on the radio.
2. Please replace the batteries in time
if the volume distorts or is too small
when listening.
Advert:
1. The old and new battery or the battery of different types should not be used together.
2. Don't try to charge, heat or break down the battery in order to prevent the leakage of
electrolyte or explosion.
3. If the radio is not used for a long time, please take out the battery in case that the
electrolyte corrodes the elements inside the product.
4. When the batteries leak electrolyte, it must be dried up with soft cloth before
replacement of new batteries.
output of DC 3V 300mA. The anode and cathode of the plug is
Note: When the user buys external power adapter for this radio, please choose the
OPERATION INSTRUCTION FOR RADIO
1. Conduct short press on the power
2. Press band conversion button
3. Conduct short press on
4
. Conduct long press on down tuning button
5. Press the volume -button
6. Please use the earphone to listen in order not to affect other people to have a
7. When you don't want to listen, please press the
8. This device is set with detachable back hasp to facilitate arrangement.
Note:
when pressing the power button. Otherwise, it enters the sleep state.
1. The magnetic antenna inside the radio is used to listen to the AM. Rotating the
2. To listen to FM radio, please pull out the telescopic antenna and obtain the
12. Telescopic antenna
13.
Back buckle
14. Battery slot
15. External power jack
batteries are loaded, the clock will run from 12:00
16. Earphone jack
1. Under the power-off state, if the indicator for
2. Press the
3. After the time system is set, press
4. After the hour time is set, press time mode button (11) once to set the time of
Note:
1. When the time of hour is set, it must be set when the hour number flashes.
2. When the time of minute is set, it must be set when the minute number flashes.
3. This device adopts 12-hour system. AM on the display screen represents the time in the
TIME SETTING FOR POWER ON BY ALARM
1. Under the power off state, press
2. Under the power off state, press the
3. Under the power off state, press the
4. If the alarm is due, the radio receives the band frequency before power off
USE OF EXTERNAL POWER SUPPLY
This radio uses the power adapter with stabilized external power supply and
stabilized power supply with load voltage less than 3V . Pay attention to the polarity
so as not to damage this radio.
"
the display screen displays the band frequency before switching off last time.
"
"
(7) to switch the program of FM/AM.
"
down
tuning button (5) or
make search of channels towards the high end or the low end manually.
"
make search of channels towards the high end or the low end automatically.
"
"
"
(3) or volume+button (4) to adjust the volume
of radio.
"
rest. Insert it into the earphone jack (16) (the speaker inside the radio will be
disconnected automatically) and you can listen with the earphone.
switch off the radio and the display screen displays the clock information.
Press the power
switch
button to turn on the radio. It should not exceed two seconds
USE OF ANTENNA
radio body can achieve best receiving effect.
optimal receiving effect by changing the length and direction of the antenna .
CLOCK SET
This device adopts 12/24-hour system. After
"
"
alarm power-on
is on the display screen,
"
"
press
alarm setting button
(7) to cancel.
"
"
time mode button
(11) once, the
12/24 hour system flashes. At the flashing state,
"
"
"
press
time +button (6) or time-button (5)
to select 12 or 24 hour time system.
"
hour number flashes. At the state when the
"
"
"
time +button (6) or
time-button (5) to set the time of hour.
"
minute with the method same to that of setting the hour.
morning and PM represents the time in the afternoon.
"
alarm setting
"
button
(7) and the display screen displays the
"
"
alarm indication
and alarm. this indicates
that the radio enters the state of power-on by
alarm.
"
button
(11) once and the indication for alarm
"
"
"
"
power on
and hour number on the
screen displays. Under the state flash, press
"
"
"
time +button (6) or time-button (5) to set
the hour time for alarm power-on.
"
"
indication for alarm power on
displays. set method same to set the hour time for alarm power-on.
automatically .
.
"
switch button
(8) to switch on the radio and
"
"
"
up
tuning button (6) to
"
"
"
(5) or up tuning button (6) to
"
"
"
"
power switch button
(8) to
"
"
.
"
"
time mode button (11) once again and the
"
"
hour
number flashes, press
"
"
"
"
"
"
"
time mode
"
"
"
time mode button
(11) twice, and the
"
"
and minute number on the screen
Advertisement
Table of Contents

Related Manuals for SOUNDMASTER TR3


Summary of Contents for SOUNDMASTER TR3
- Page 1 USE OF EXTERNAL POWER SUPPLY FM/AM 2 BANDS DIGITAL TUNING RADIO This radio uses the power adapter with stabilized external power supply and output of DC 3V 300mA. The anode and cathode of the plug is Note: When the user buys external power adapter for this radio, please choose the stabilized power supply with load voltage less than 3V .
- Page 2 5. The radio will power off automatically after listening for 60 minutes. But the alarm Note: 1. Every band of this radio can store 20 channels, if the channels exist in the number from indication is not canceled; the power-on will be repeated on the same time every 0 to 19, the new frequency stored according to the above method will overwrite the day.
Need help?
Do you have a question about the TR3 and is the answer not in the manual?
Questions and answers