
Related Manuals for CDA VK970BL


Summary of Contents for CDA VK970BL
- Page 1 VK970BL Compact Combination Microwave Oven Installation, use and maintenance www.cda.eu...
-
Page 2: Table Of Contents
Contents: Important Important safety warnings Methods to help prevent damage to your appliance/kitchen Before first use Control panel Microwave functions Heating functions Combi functions Defrost functions Auto programmes Rapid preheating 20 Safety key lock Care and maintenance 23 Installation 24 Installation diagrams 25 Installation diagrams 26 Mains electrical connection Technical information... -
Page 3: Important
Keep the oven door closed whilst grilling. Appliance information: Please enter the details on the appliance rating plate below for reference, to assist CDA Customer Care in the event of a fault with your appliance and to register your appliance for guarantee purposes. Appliance Model... - Page 4 EU Declarations of Conformity: This oven has been designed, constructed and marketed in compliance with safety requirements of EU Directive 2014/35/EU (LVD) and requirements of EU Directive 2014/30/EU (EMC). Parts intended to come into contact with food conform to 1935/2004/ IMPORTANT INFORMATION FOR CORRECT DISPOSAL OF THE PRODUCT IN ACCORDANCE WITH EU DIRECTIVE 2012/19/EU.
-
Page 5: Important Safety Warnings
Important safety warnings • This appliance can be used by children aged from 8 years and above and persons with reduced physical, sensory or mental capacities, or lack of experience or knowledge provided they receive supervision and have been given instruction concerning use of the appliance in a safe way. - Page 6 • Do not use a microwave power level or time setting that is higher than necessary. Follow the information provided in this instruction manual. • Never use the microwave to dry food. • Never defrost or heat food with low water content (e.g. bread) at too high a microwave power level or for long.
- Page 7 Microwave energy will escape from appliances that do not have any casing. NEVER REMOVE THE CASING. For any repair work, contact CDA Customer Care (details on rear cover of this manual). WARNING! RISK OF ELECTRIC SHOCK •...
- Page 8 • Alcoholic vapours may catch fire in the hot cooking compartment. Never prepare food or beverages containing large quantities of alcohol or small quantities of those with a high alcohol content. Open the appliance door with care. • Foods with peel or skin may burst or explode during, or even after, cooking.
-
Page 9: Methods To Help Prevent Damage To Your Appliance/Kitchen
Methods to help prevent damage to your appliance/kitchen: • Avoid microwaving metal items. • Never pour water into the cooking compartment. Wipe up any spillages as soon as possible and do not let water or spillages flow into the turntable spigot area. •... -
Page 10: Before First Use
Before first use Setting the time Once connected to the mains power supply, the time display will flash ‘00.00’. Use the sensors to set the current time between 00.00 and 23:59. Each press of either sensor will adjust the time in 1 minute increments. -
Page 11: Control Panel
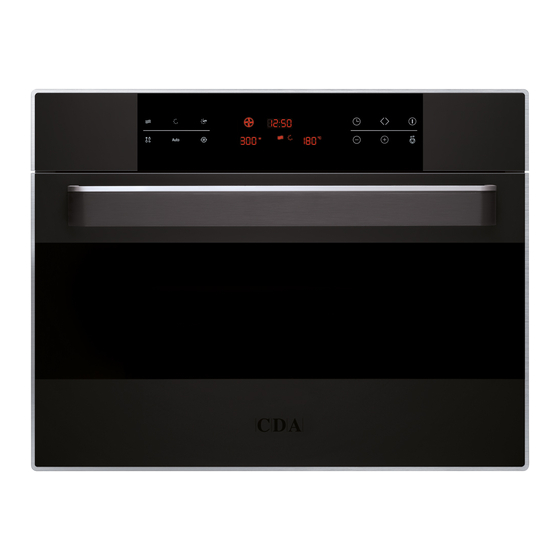
Control panel 烟灰色透明视窗 Fig. 1 A - Microwave function sensor G - Defrost function sensor B - Heating function sensor H - Auto programme sensor C - Combi function sensor J - Rapid preheating sensor D - Clock sensor K - Parameter selector (minus) E - Switch parameter sensor L - Parameter selector (plus) F - Start sensor... -
Page 12: Heating Functions
• The cooking duration will be set automatically to 1 minute. To alter the time, press the sensor. Use the sensors to set the desired duration. Each press of either sensor will adjust the time in 10 second increments. Holding the sensor will, after a few seconds, adjust the time in 1 minute increments. - Page 13 • Pizza setting - Best for pizzas and similar items. • Grill - Ideal for steaks, sausages or bread • The cooking duration will be set automatically to 10 minutes. To alter the time, press the sensor. Use the sensors to set the desired duration.
-
Page 14: Combi Functions
Functions - Combi Use the combi function sensor to select from the following options (alongside the power options are recommended uses): • Microwave & fan oven - Great for cooking most dishes quickly and evenly. • Microwave & grill with fan - Baked casseroles and grilled dishes. -
Page 15: Defrost Functions
adjust the temperature, press the switch parameter sensor until the temperature is flashing. Use the sensors to set the new temperature. This can be done at any time. Changing the microwave power The microwave power will be set automatically to 300W. To adjust the power, press the switch parameter sensor until the microwave power is flashing and then use the... - Page 16 • The time will adjust according to weight increments and is not adjustable. • Press the start sensor to commence defrosting. Please note: When using programme d01 an acoustic signal will sound. This is an indicator that the contents being defrosted needs to be turned.
-
Page 17: Auto Programmes
accelerate the aforementioned settling stage. Auto programmes The auto programmes create the optimum settings for a variety of dishes/meals. Use the auto programme sensor to select from the following options: Programme no. Item Category Vegetables Fresh vegetables P 01** Side dishes Potatoes-peeled/cooked P 02** Side dishes... -
Page 18: Rapid Preheating
With the desired programme selected, press the switch parameter sensor . Use the sensors to finely adjust the item’s weight. The cooking time will adjust accordingly. Press the start sensor to begin cooking. If you need to adjust the weight again (e.g. it was entered incorrectly), simply press the switch parameter sensor before the programme has started and adjust accordingly. - Page 19 Fan oven Microwave & fan oven Grill with fan Microwave & grill with fan Pizza setting Microwave & pizza setting Engaging rapid preheating Set up your function as per the relevant section. Then touch the rapid preheating sensor . The symbol should illuminate on the display. If it does not, check that you have selected from one of the above functions and not an ineligible one.
-
Page 20: Safety Key Lock
Safety key lock This appliance features a safety key lock which can be engaged to help prevent inadvertent activation. Activating the safety key lock No cooking time should be set and no function should be active for the safety key lock to be activated. To activate it, touch and hold the stop sensor for approximately 3 seconds. -
Page 21: Care And Maintenance
Care and maintenance Interior lighting If the bulb in your appliance should fail, please contact CDA Customer Care to arrange a service visit. The bulb and appliance must not be serviced by anyone except a CDA authorised service agent. IMPORTANT •... - Page 22 Cleaning stainless steel Stainless steel can be effectively cleaned by simply using a dilute solution of water and mild detergent and drying to a shine with a clean cloth. Proprietary stainless steel cleaners are available. We recommend a clean microfibre cloth for cleaning stainless steel surfaces.
-
Page 23: Installation
Installation When correctly installed, your product meets all safety requirements laid down for this type of product. However, special care should be taken around the rear or the underneath of the appliance as these areas are not designed or intended to be touched and may contain sharp or rough edges that could cause injury. - Page 24 Ventilation openings behind. Min. 250cm² min 45 Back panels open Ventilation area in the base. Min. 250cm² Fig. 3 Ideal ventilation provisions min 45 - the more air that can circulate, the better. Ventilation grid/opening Cupboard/unit feet Fig. 4...
- Page 25 Back panel Ventilation area in the base. open Min. 250cm² Fig. 5 Door clearance Appliance dimensions & unit measurements Fig. 6 Fig. 7 • Ensure the appliance is fully inserted into the cutout. • Do not kink the mains lead or leave it in contact with the sides or back.
-
Page 26: Mains Electrical Connection
Mains electrical connection Warning! This appliance must be earthed This appliance is supplied with a 3 core mains cable; the wires are in accordance with the following code: Green and Yellow = Earth Blue = Neutral Brown = Live We strongly recommend that the appliance is connected by a qualified electrician, who is a member of the N.I.C.E.I.C. -
Page 27: Technical Information
should be marked on the outlet. • Assembly and electrical connection should be carried out by specialised personnel. • When installing this product we recommend you seek the help of another individual. • The mains isolation switch must be accessible after installation. Technical information Mains electrical voltage: 240Vac, 50Hz... - Page 29 NOTES:...
- Page 30 NOTES:...
- Page 31 NOTES:...
- Page 32 For more information please contact: The Sales Department on 01949 862 010 or email sales@cda.eu Customer Care Department. The CDA Group Ltd, Harby Road, Langar, Nottinghamshire, NG13 9HY T: 01949 862 012 F: 01949 862 003 E: customer.care@cda.eu www.cda.eu...
Need help?
Do you have a question about the VK970BL and is the answer not in the manual?
Questions and answers