Table of Contents
Advertisement
Quick Links
Download this manual
See also:
User Manual
Advertisement
Table of Contents

Related Manuals for SKY-WATCHER Star Adventurer Mini


Summary of Contents for SKY-WATCHER Star Adventurer Mini
- Page 1 Star Adventurer Mini User Guide Astrophotography Time-Lapse � hotography DSLR Camera Control .;-... ® · Skv-waiclier Quite Possibly The Most Compact and Versatile Camera Tracking Platform in the Known Universe! l3e, -:z.ul.
- Page 2 SAM comes with built-in WiFi Multi-language support and the free Star Adventurer mini Console App for Android and iOS platforms. SAM is easy to set up and easy to operate in all of its modes. The more you use...
-
Page 3: Table Of Contents
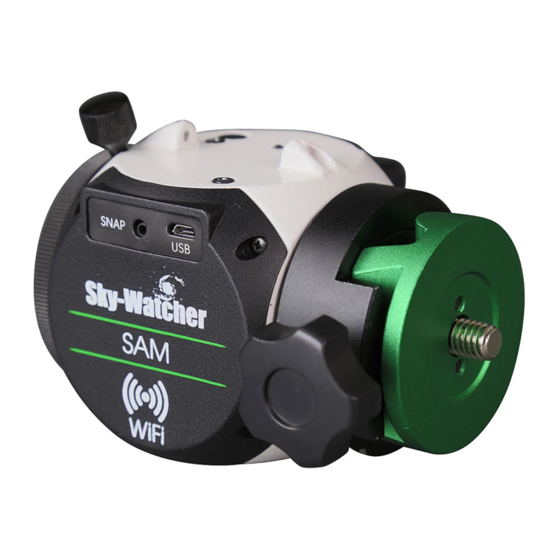
1: Power Button SAM's Parts Diagram Polar Alignment in the Southern Hemisphere 2: Power LED Indicator 3: WiFi LED Indicator Star Adventurer mini Console f o r Astrophotog- Optional Accessories 4: Polar View Finder Overview and Preliminary Setup raphy 5: Knurled Tripod Connector... -
Page 4: Optional Accessories
SAM Included and Optional Accessories SAM Optional and Included Accessories Please Note: Included accessories may vary by dealer. Please Note: Included accessories may vary by dealer. DSLR Control Cable Controls the shutter of your DSLR. Available for Canon, Nikon, Olympus and Sony cameras. -
Page 5: Overview And Preliminary Setup
Start the Star Adventurer mini Console: Once WiFi is connected plication and how to control SAM using the free control app. you can run the Star Adventurer mini Console to access its many features. See specific details in the relevant sections. -
Page 6: Attaching Sam To Your Tripod
Once SAM is attached to your tripod, and your camera gear is attached to SAM, You can make time-lapse videos using SAM to control the shutter only (no you are ready to start making videos with the Star Adventurer mini Console. panning), or to pan continuously while firing the shutter of your camera at intervals set by you. -
Page 7: Keep It Simple To Start
Time-Lapse Parameter Details Regular and Long-Exposure Time-Lapse Parameters parameters that you can set to create your time-lapse video, with a few more that can be seen by scrolling Following is a complete list of the parameters you can set. Note that because The major difference between Regular-Exposure Time... -
Page 8: Time-Lapse Progress Screen
Swing Range (Deg): Use to create an interesting Swing Range �:30 PM .. ooo Bell 9 Time-Lapse Progress Screen Bell? swing or pendulum effect for your time-lapse video. When used, 1:30PM < ( Back Regular-Exposure Time-lapse SAM will pan to the limit of the that you set, then Swing Range Regular Exposure lime-lapse... -
Page 9: Astrophotography And Astra Time-Lapse
connection to create much longer exposures-like a minute or two-or Astrophotography and Astro Time-Lapse ten! With a sufficiently long exposure, your camera will collect enough light to reveal hidden details that are much too faint for our eyes to see. Astrophotography But then, quite literally, you'll see the second problem! Astrophotography refers to photography of the night time sky. - Page 11 Connect the SNAP camera control with the next exposure once the has elapsed. Photo Interval cable between SAM and your camera. Point your camera at your subject, then proceed to set up SAM via the Star Adventurer mini Console.
-
Page 12: Astrophotography Progress Screen
-· Photos: Enter the number of photos you wish to acquire of the subject. Using the Star Adventurer mini Console For Astro Time-Lapse 1:30PM ••ooo Bell 9 1:30 PM You can use advanced image processing methods to combine multiple Astrophotography... -
Page 13: Astra Time-Lapse Progress Screen
Once your tripod, SAM and camera gear are set up and all of your Star Adventurer Mini User Guide task parameters are set, just press Run to initiate the task. This will bring up your Progress Screen.·... -
Page 14: Manual Control Of Sam
To turn on the LED just quickly press SAM's on/ time-lapse video. off button, or set the LED to on using the Star Adventurer mini Console. WiFi Auto-Off: Tap to choose a delay to automatically turn of WiFi to preserve power. -
Page 15: Wifi Network
Factory WiFi Settings. Note: You will need to re-establish your WiFi SAM acts as a wireless access point so that you can connect to it via the STA SSID connection after restoring SAM to its factory WiFi settings. Star Adventurer mini Console. STA SSID STA Password AP Mode SSID:... - Page 17 HOOO Bel( 9 1:30 PM camera gear (ball head, camera). NOTE: If you are using the optional < Setting Up the Polar Scope Fine-Tuning Mounting Assembly you can perform the polar alignment Polar Clock Utility Back Location Ni/¥1 m d::iH:IJI- procedure with all of your gear already mounted.
- Page 18 4.82V SynScanWiFLa1281e Performing a Coarse Polar Alignment in the Southern Hemisphere Polar Clock Utility. Bring up the Star Adventurer mini Console and tap on the Polar Scope The goal of the coarse polar alignment is to get your aimed near...
-
Page 19: Calibrating The Polar Scope
Note how the orientation of the reticule changes when Appendix II: Calibrating the Polar Scope Polar Scope is rotated 180 degrees. For the highest precision it may be necessary to align the reticule in your Po/or Scope before performing a polar alignment. This simple calibration procedure will ensure that your polar alignments are done to the highest possible level of precision. - Page 20 Continuing from Step 3 above, note the deviation of your target from the central The three reticule adjustment Appendix Ill: The Optional Equatorial Wedge screws are equally spaced around cross hair. To align your retic ule you need to it so that 1/2 of the error is move the perimeter of the polar scope If you plan to do a lot...
- Page 21 SAM Has Many Possible Configurations Appendix IV: The Fine-Tuning Mounting Assembly SAM can be configured with your ball mount, tilt/pan head, camera and The Fine-Tuning Mounting Assembly provides more convenience and tripod in many ways. For Regular and Long-Exposure Time-Lapse videos all control for mounting your photographic payloads.
- Page 23 Appendix VII: SAM Product Specifications Notice Product Type Ultra compact equatorial tracking platform Sky-Watcher reserves the right to change the specifications of the hardware and software described in this manual at any time and without prior notice. Regions For Northern and Southern hemispheres Sky-Watcher cannot be held liable for any damage resulting from the inappropriate use of this product.
Need help?
Do you have a question about the Star Adventurer Mini and is the answer not in the manual?
Questions and answers