Table of Contents
Advertisement
Quick Links
User Manual
AF-100S
With many user friendly features,
AF-100S is ideal for use by Police at Traffic
Roadblocks or Officer in various workplaces
where the alcohol level of employees needs
to be controlled with a quick test.
-
Active mode
- Passive mode
- Display of alcohol level
- Settable alarm limit
- Calibration reminder
- LED signal lamp
- Display of battery level
- Rechargeable battery
- Replaceable blow cap
Please read the user's manual carefully before use.
Advertisement
Table of Contents

Related Manuals for Alcofind AF-100S


Summary of Contents for Alcofind AF-100S
- Page 1 User Manual AF-100S With many user friendly features, AF-100S is ideal for use by Police at Traffic Roadblocks or Officer in various workplaces where the alcohol level of employees needs to be controlled with a quick test. Active mode - Passive mode...
- Page 2 Important Safety Information Before using the device, read all instruction manual carefully and perform the test. The device should be recalibrated every 6 months by trained service personnel. The use without periodic calibration service may result in incorrect results. Moving the device away from in front of the subject until the sample is taken can cause inaccurate readings.
-
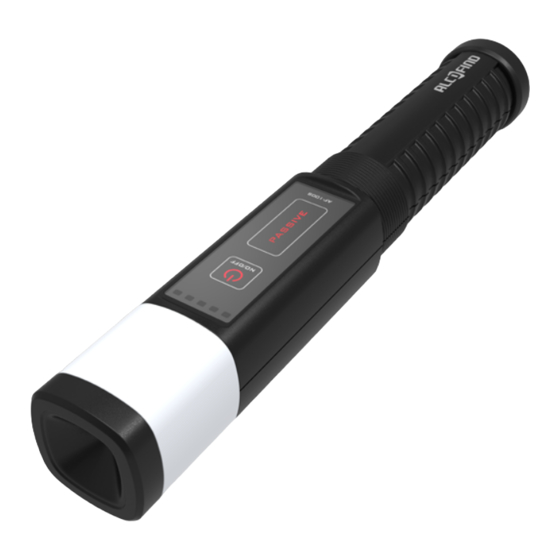
Page 3: Name Of Each Part
CONTENTS - Three blow caps - AF-100S - Hand strap - Micro USB cable - User manual NAME OF EACH PART Blow cap Signal lamp Status light Level indicator On/Off button Signal lamp Passive button button USB slot <Front> <Back>... - Page 4 REMOVING THE BLOW CAP Due to the sanitary reasons, it is highly recommended to periodically replace a Blow Cap with new one, or to re-use after washing the Blow Cap. Step 1. Pull up and pull out the Blow Cap gently from the device.
- Page 5 Step 2. Bend the opposite side of Blow Cap up and fit the part in the device. Step 3. Fit the other parts of Blow Cap in the device in the same way as the Step 2. Step 4. Ensure every parts of the Blow Cap is closed tightly.
-
Page 6: Charging The Battery
Step 1. Open the cover of the USB slot in the bottom. Step 2. Connect the USB cable to the AF-100S's USB slot, and then plug the end of the USB cable into the USB Power. Step 3. The ON/OFF button will be blinking when the charger is connected and charging begins. -
Page 7: Operation
NOTE - Wait at least 30 minutes after drinking, eating or smoking before testing. Not observing this waiting period can cause inaccurate readings and damages to the sensor. Step 1. To turn on the AF-100S, press and hold the ON/OFF button until the Blue and Red LEDs appear on the Status Light. - Page 8 Five purple LEDs will be displayed when the total number of tests is under 999 times. THE REMAINING CALIBRATION DATE A red LED will flicker when 7 days left to the recalibration. A red LED will be displayed when a month left to the recalibration.
- Page 9 NOTES - The Level Indicator displays the remaining battery power during operation as the default. Step 3. The countdown will begin automatically as follows. When the AF-100S is ready for testing after the countdown, the status light will display a Blue LED and a Red LED on the bottom.
- Page 10 Step 4. Blow a sufficient breath sample through the blow cap until there is a double beep sound. NOTES - To get the correct result, the blowing should be done 5cm directly in front of the Blow Cap. - In ready mode, user can draw the breath sample forcibly by pressing the PASSIVE button.
- Page 11 WARN When the test result is When the test result is When the test result is 41~60% of alarm limit. 61~80% of alarm limit. 81~100% of alarm limit. FAIL When the test result is When the test result is When the test result is 101~150% of alarm 151~200% of alarm more than 201% of...
- Page 12 - If the result is "PASS", the AF-100S will move on to the ready mode automatically for the next test. - If the result is "WARN" or "FAIL", the AF-100S will show the result for 10 seconds, and then move on to the ready mode automatically.
- Page 13 Step 2. Change the alarm level by pressing LIGHT button. ALARM LEVEL 1 0.010%BAC 0.10‰ 0.05mg/l ALARM LEVEL 2 0.020%BAC 0.20‰ 0.10mg/l ALARM LEVEL 3 0.030%BAC 0.30‰ 0.15mg/l ALARM LEVEL 4 0.040%BAC 0.40‰ 0.20mg/l ALARM LEVEL 5 0.050%BAC 0.50‰ 0.25mg/l Step 3.
- Page 14 Step 2. Press LIGHT button to finish it and move on the countdown. SETTING SIGNAL LAMP AF-100S offers seven different signal lamps and user can select a different signal lamp through this mode. Step 1. Press and hold down ON/OFF and LIGHT buttons together for 5 seconds.
-
Page 15: Specification
SPECIFICATION Sensor Fuel cell sensor The status light - 10 LEDs for the display of the test results The level indicator - 5 LEDs for the display of the total Display test number, the remaining calibration date, and the remaining battery level 10 seconds Warm up time *Warm-up time may vary depending on the temperature. -
Page 16: Warranty
WARRANTY The manufacturer warrants the product to be free from defects in workmanship or material(excluding calibration) under normal use for 1(one) year from the date of purchase. The manufacturer's obligation under this warranty is limited to replacing, adjusting or repairing the unit at manufacturer's option, if returned along with proof of purchase.
Need help?
Do you have a question about the AF-100S and is the answer not in the manual?
Questions and answers