
Related Manuals for Dell Vostro 3470


Summary of Contents for Dell Vostro 3470
- Page 1 Dell Vostro 3470 Setup and specification guide Regulatory Model: D13S Regulatory Type: D13S003...
- Page 2 A WARNING indicates a potential for property damage, personal injury, or death. © 2018 Dell Inc. or its subsidiaries. All rights reserved. Dell, EMC, and other trademarks are trademarks of Dell Inc. or its subsidiaries. Other trademarks may be trademarks of their respective owners.
-
Page 3: Table Of Contents
Contents 1 Set up your computer.............................5 2 Chassis................................9 System front view................................9 System back view................................10 3 Technical specifications..........................11 Dimensions and weight..............................11 System information................................11 Processor...................................12 Operating system................................12 Memory....................................12 Ports and connectors...............................13 Communications................................14 Video....................................14 Audio....................................14 Storage....................................15 Storage combinations.............................. - Page 4 Deleting or changing an existing system setup password..................27 5 Software..............................29 Supported operating systems............................29 Downloading drivers................................ 29 Intel chipset drivers..............................29 Serial IO driver................................30 USB drivers..................................31 Network drivers................................31 Realtek Audio................................31 Serial ATA drivers............................... 32 6 Getting help..............................33 Contacting Dell................................. 33 Contents...
-
Page 5: Set Up Your Computer
Set up your computer Connect the keyboard and mouse. Connect to your network using a cable, or connect to a wireless network. Connect the display. Set up your computer... - Page 6 NOTE: If you ordered your computer with a discrete graphics card, the HDMI and the display ports on the back panel of your computer are covered. Connect the display to the discrete graphics card. Connect the power cable. Press the power button. Set up your computer...
- Page 7 Follow the instructions on the screen to finish Windows setup: Connect to a network. b Sign-in to your Microsoft account or create a new account. Locate Dell apps. Set up your computer...
- Page 8 Table 1. Locate Dell apps Register your computer Dell Help & Support SupportAssist — Check and update your computer Set up your computer...
-
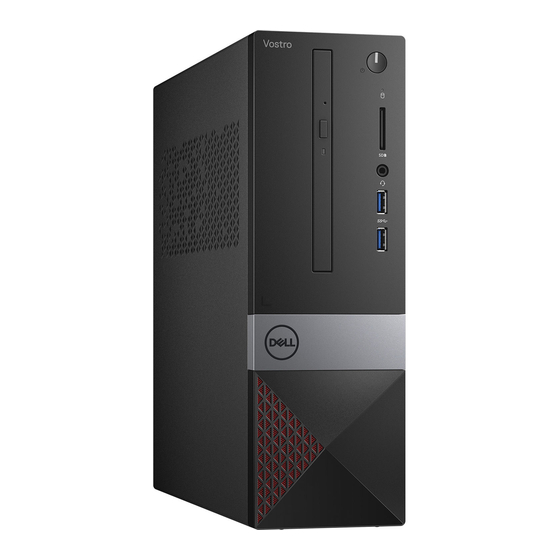
Page 9: Chassis
Chassis System front view Power button/power status LED Hard drive activity light Memory card reader Universal audio/microphone connector USB 3.1 Gen 1 ports (2) Optical drive Chassis... -
Page 10: System Back View
System back view Line-in port Line-out port Microphone port VGA port HDMI port USB 2.0 ports (4) Service tag Expansion card slots Power connector port Power diagnostics light Power supply diagnostics button Kensington security slot Network port Padlock ring Chassis... -
Page 11: Technical Specifications
Technical specifications NOTE: Offerings may vary by region. The following specifications are only those required by law to ship with your computer. For more information about the configuration of your computer, go to Help and Support in your Windows operating system and select the option to view information about your computer. -
Page 12: Processor
PCIe bus 100 Mhz External bus frequency DMI 3.0-8GT/s Processor NOTE: Processor numbers are not a measure of performance. Processor availability is subject to change and may vary by region/ country. Table 4. Processor specifications Type UMA Graphics Intel 8th Generation Celeron processor G4900 (2M Cache, up to 3.1 Intel UHD Graphics 610 with shared graphics memory GHz) Intel 8th Generation Pentium Gold processor G5400 (4M Cache, up... -
Page 13: Ports And Connectors
• 16 GB DDR4 2400 MHz (8Gx2) • 16 GB DDR4 2400 MHz (16Gx1) • 24 GB DDR4 2400 MHz (16Gx1 + 8Gx1) • 32 GB DDR4 2400 MHz (16Gx2) • 4 GB DDR4 2666 MHz (4Gx1) • 8 GB DDR4 2666 MHz (8Gx1) •... -
Page 14: Communications
Communications Table 8. Communication specifications Network adapter Realtek RTL8111H Gigabit Ethernet controller 10/100/1000 Mb/s Ethernet (RJ-45 ) Wireless • Intel 9462 1*1 ac + BT5 (802.11ac + Bluetooth 5.0,1X1) • Intel 9560 2*2 ac + BT5 (802.11ac + Bluetooth 5.0,2x2) •... -
Page 15: Storage
• Stereo headset/mic combo Storage Table 11. Storage specifications Type Form factor Interface Capacity Solid-State Drive (SSD) M.2 SATA 2280 SATA AHCI, Up to 6 Gbps Up to 512 GB Hard drive (HDD) 2.5 inch and 3.5 inch SATA AHCI, Up to 6 Gbps Up to 2 TB at 5400 RPM and 7200 RPM Storage combinations... - Page 16 • Silver EPEAT Registered (for selected configurations only). For specific country participation and rating, please visit www.epeat.net • CCC/CECP (China only) • ESPL/ 1 Million Hr MTBF (China only, Post-RTS) • In metro (Brazil only) Technical specifications...
-
Page 17: System Setup
If you wait too long and the operating system logo appears, wait until you see the desktop. Then, shut down or restart your computer and try again. NOTE: After the Dell logo appears, you can also press F12 and then select BIOS setup. Navigation Keys The following table displays the system setup navigation keys. -
Page 18: System Setup Options
Keys Navigation <Esc> Moves to the previous page till you view the main screen. Pressing <Esc> in the main screen displays a message that prompts you to save any unsaved changes and restarts the system. <F1> Displays the System Setup help file. System setup options NOTE: Depending on the computer and its installed devices, the items listed in this section may or may not appear. -
Page 19: System Configuration Screen Options
Option Description • Never Date/Time Allows you to change the date and time. System Configuration screen options Option Description Integrated NIC Allows you to configure the integrated network controller. The options are: • Disabled • Enabled • Enabled w/PXE: This option is enabled by default. SATA Operation Allows you to configure the internal SATA hard-drive controller. -
Page 20: Video Screen Options
Option Description • Rear Port 4 (w/RJ-45) * denotes a USB 3.0-capable port Audio This field enables or disables the integrated audio controller. By default, the Enable Audio option is selected. Miscellaneous Allows you to enable or disable the following devices: Devices •... -
Page 21: Secure Boot Screen Options
Option Description Password Change Allows you to enable the disable permission to the System and Hard Drive passwords when the admin password is set. Default setting: Allow Non-Admin Password Changes is selected. UEFI Capsule This option controls whether the system allows the BIOS updates through UEFI capsule update packages. This Firmware Update option is enabled by default. -
Page 22: Intel Software Guard Extensions Screen Options
Option Description • Audit Mode Expert Key Allows you to manipulate the security key databases only if the system is in Custom Mode. The Enable Custom Management Mode option is disabled by default. The options are: • PK (default) • •... -
Page 23: Power Management Screen Options
Option Description • • Intel SpeedStep Allows you to enable or disable the Intel SpeedStep feature. Enable Intel SpeedStep Default setting: The option is enabled. C-States Control Allows you to enable or disable the additional processor sleep states. C states Default setting: The option is enabled. -
Page 24: Post Behavior Screen Options
Option Description Default setting: The option is enabled.. Wake on LAN/ Allows you to enable or disable the feature that powers on the computer from the Off state when triggered by a WLAN LAN signal. • Disabled: This option is enabled by default. •... -
Page 25: Virtualization Support Screen Options
Virtualization support screen options Option Description Virtualization Allows you to enable or disable the Intel Virtualization Technology. Enable Intel Virtualization Technology (default). VT for Direct I/O Enables or disables the Virtual Machine Monitor (VMM) from utilizing the additional hardware capabilities provided by Intel®... -
Page 26: System Log Screen Options
If BitLocker is enabled, it must be suspended prior to updating the system BIOS, and then re-enabled after the BIOS update is completed. Restart the computer. Go to Dell.com/support. • Enter the Service Tag or Express Service Code and click Submit. -
Page 27: System And Setup Password
Click Run to install the updated BIOS settings on your computer. Follow the instructions on the screen. NOTE: It is recommended not to update the BIOS version for more than three revisions. For example: If you want to update the BIOS from 1.0 to 7.0, then install version 4.0 first and then install version 7.0. - Page 28 Select System Password, alter or delete the existing system password and press Enter or Tab. Select Setup Password, alter or delete the existing setup password and press Enter or Tab. NOTE: If you change the System and/or Setup password, re-enter the new password when promoted. If you delete the System and/or Setup password, confirm the deletion when promoted.
-
Page 29: Software
Ubuntu Downloading drivers Turn on the desktop. Go to Dell.com/support. Click Product Support, enter the Service Tag of your desktop, and then click Submit. NOTE: If you do not have the Service Tag, use the auto detect feature or manually browse for your desktop model. -
Page 30: Serial Io Driver
Serial IO driver Verify if the drivers for Touchpad, IR camera, and keyboard and are installed. Software... -
Page 31: Usb Drivers
Figure 1. Serial IO driver USB drivers Verify if the USB drivers are already installed in the computer. Network drivers Install the WLAN and Bluetooth drivers from the Dell support site. Table 19. Network drivers Before installation After installation Realtek Audio Verify if audio drivers are already installed in the computer. -
Page 32: Serial Ata Drivers
Table 20. Realtek audio Before Installation After Installation Serial ATA drivers Install the latest Intel Rapid Storage driver for best performance. Using the default Windows storage drivers is not recommended. Verify if the default serial ATA drivers are installed in the computer. Software... -
Page 33: Getting Help
Dell product catalog. Dell provides several online and telephone-based support and service options. Availability varies by country and product, and some services may not be available in your area. To contact Dell for sales, technical support, or customer service issues: Go to Dell.com/support.
Need help?
Do you have a question about the Vostro 3470 and is the answer not in the manual?
Questions and answers