
Related Manuals for Alpine Saunas RWH300 Series


Summary of Contents for Alpine Saunas RWH300 Series
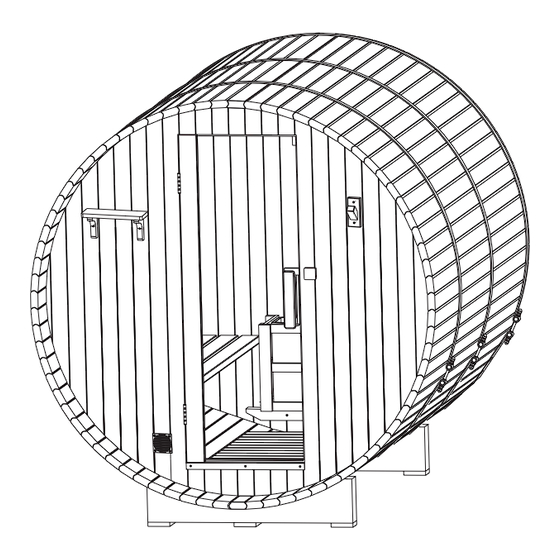
- Page 1 Barrel Outdoor Sauna Finland Pine edar Series without anopy Finland Pine edar Series with anopy IMPORTANT Watch Assembly Video in conjunction with this manual YouTube Link www alpinespas co nz assembly...
-
Page 2: Table Of Contents
Contents Sequences and contents of sauna assembly Page Instructions before use … … … … … … … … … … … … … … … … … … … … … … … … … … 1.Base assembly … … … … … … … … … … … … … … … … … … … … … … … … … … … .Front and back wall assembly …... -
Page 3: Instructions Before Use
Instructions before use 1. A member of the high blood pressure, heart disease, high blood pressure do not sauna. Who has a cold should not be sauna. because the sauna room hidden cryptococcus bacteria can enter human body through respiratory tract, such as easy to cause pneumonia, etc. - Page 4 : Introduction Instructions before assembly 1.At least two people are required to assemble the sauna. 2,Assembly location: check whether the ground or platform is horizontal, and slight slope will not affect the assembly and use of sauna, but if the slope is evident, a pad is needed to keep the sauna level. 3,All screw heads to assemble sauna must be completely inserted into wood toavoid scratching skin during use.
- Page 5 Wooden components of sauna Quantity Quantity Name Name Base Stave Inside floor Cup holder Inside bench Robe hook Front Wall Backrest (Optional) Heater fence Outside bench Sauna Heater (Optional) 3~9kw Outside Floor Steel strip Back Wall Magazine rack Decoration board - 5 -...
-
Page 6: Base Assembly
Tools: 1.Base assembly step: Base The length of A depends on When using the plastic feet, no 1 to 3 base blocks. The distance need to use the pad under the base among bases can be distributed freely and equally by customers. Align Apply silicone reach 1*1cm... - Page 7 Back wall The accessories of front wall ST5*30 Stainless steel sheet Right part of ST5x50 front wall Middle part of Left part of front Air intake hole front wall wall Front wall assembly Front wall ST5 50 Air outlet hole Right part of ST5 50 front wall...
-
Page 8: Stave Assembly
Stave assembly Apply silicone reach 1*1cm Front wall (back wall) Stave(30pcs with screw holes) ST5*50 Center line Apply silicone reach 1*1cm Center line 1pcx85mm(Top) Stave without screw holes 60pcsx95mm (Total) Stave with screw holes 2Pcsx80mm or 75mm(x1)+ 85mm(x1) Right Wrong 1Pc x 95mm (Bottom) - 8 -... - Page 9 4. Steel strip assembly step Steel strip Bolt Long steel strip place upside The steel strip lock should be in symmetry (namely at 4 O'clock or 8 O' clock) Short steel strip place at bottom ! The two stainless steel The position of the steel strip bands in front and back must in the middle must be 58mm...
-
Page 10: Bench Assembly
5 Bench assembly (1)Place bench straight on the bracket of front and back walls to make screw holes of the bench on the bracket of front and back wall, and fasten the benches by screws. Note: no need to assemble outside bench for the sauna series without canopy) St5x40 Bench inside For series... - Page 11 6. Magazine rack /Heater and lamp base assembly Sauna heater fence Magazine rack Magazine rack Heater fence ST5 30 ST5X30 The installation location refer to page 12. Sauna heater holder Sauna heater Sauna heater fence ST5*50 Please refer to heater instructions for heater Please refer t o heater installation manual for...
- Page 12 Installation of other accessories for reference : heater fence, cup holder, robe hook, floor (230)mm Cup holder Robe hook Outside Floor - 12 -...
-
Page 13: Instructions
Instructions : Maintenance instructions ℃ ℃ (1) Turn on sauna heater, setting desired temperature, normally 60 (in the area between bench surface and your head). Start with low temperature and increase it according to endurance of your body when you are in a sauna for the first time. - Page 14 Instructions for Assembly Bitumen Roof Canopy on Sauna - 14-...
- Page 15 Tools for assembly bitumen roof Prepare the following tools before assembly 1 . Tools you need to prepare Tape Power Drill × Pencil ×1 × Glass Silicone Sealant Gun× 1 Bitumen roof canopy instructions accessories: Standard component Standard component 1/3 Standard component 1/2 Standard component 1/4 6 screws required...
- Page 16 Linking part installation Combination ST4X20+Washer of a hexagon ST4X20+Washer ST4X20+ asher Gap covered by overlapping Asphalt Shingles on the ST3*30 Right A 1 Parts indicated Wrong B 2 Parts indicated - 16 -...
-
Page 17: Recommendations And Suggestions
10.Recommendations and suggestions for sauna (1)It is recommended to paint (wood wax, tung oil) on external wooden parts of sauna to prevent corrosion, crack and tarnish. (2)Suggestions: after assembling sauna, wash interior twice a day for 2-3 days. (3)It is suggested to lay a carpet before the door to prevent abrasion and dirt. (4)Pay attention to maintenance, electricity and fire of sauna.
Need help?
Do you have a question about the RWH300 Series and is the answer not in the manual?
Questions and answers