MikroTik RB912UAG-2HPnD Quick Setup Manual And Warranty Information
Routerboard 900 series
Hide thumbs
Also See for RB912UAG-2HPnD:
- Quick manual (31 pages) ,
- Manual (5 pages) ,
- Quick setup manual and warranty information (4 pages)
Table of Contents
Advertisement
Quick Links
RouterBOARD 900 series
Quick Setup Guide and Warranty Information
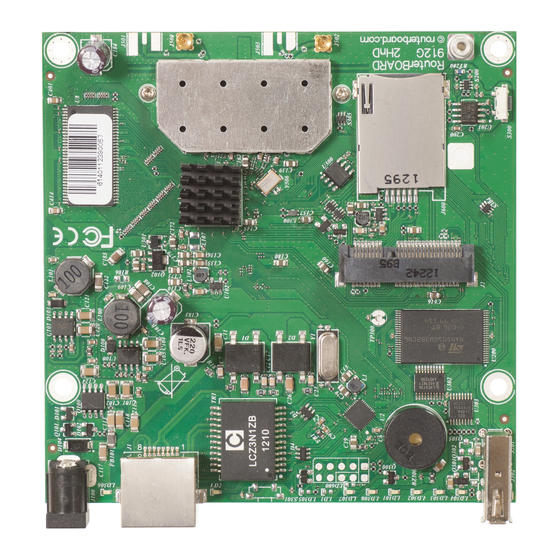
RB900 is a RouterBOARD device family with a built-in 802.11 wireless device and one Ethernet port. Several mod-
els are available with 5GHz or 2GHz 802.11n or 5GHz 802.11ac wireless, with SFP slot, and miniPCIe slot.
First use
•
Connect antenna cables to the built in Wi-Fi connectors
•
Device accepts 8-30V with a passive PoE powered Ethernet cable or with a power connector to the Power
Jack
Powering
The board accepts power with the following modes:
Passive 8-30V PoE to ethernet port. Higher voltage needed to compensate for power loss on long cables;
•
at least 18V suggested.
Direct input to the power jack 8-30V (select models only)
•
Booting process
RouterOS is the operating system of all RouterBOARD routers. Please see documentation here:
This device doesn't come fitted with a Serial Port connector, so initial connection has to be done via the Ethernet
cable, using the MikroTik Winbox utility. Winbox should be used to connect to the default IP address of
192.168.88.1 with the username admin and no password.
In case you wish to boot the device from network, for example to use MikroTik Netinstall, hold the RESET button of
the device when starting it until the LED light turns off, and Groove will start to look for Netinstall servers.
In case IP connection is not available, the Winbox utility can also be used to connect to the MAC address of the
device. More information in the documentation.
Extension Slots and Ports
One Ethernet port (With Auto MDI/X so you can use either straight or cross-over cables for connecting to
•
other network devices). The Ethernet port accepts 8-30V DC powering from a passive PoE injector.
Built-in 802.11b/g/n WiFi card (AR9342) with one or two MMCX connectors
•
Only RB912UAG-2HPnD/RB912-5HPnD/RB922UAGS-5HPacD/RB922UAGS-5HPacT:
•
miniPCI-e slot for either a 802.11 Wireless card, or a 3G modem (when a 3G modem is used in miniPCIe
slot, USB port will become inactive. In RouterOS you can select which of the 3G modems you want to use,
USB or miniPCIe). SIM slot is available for miniPCIe 3G cards.
•
Only RB922UAGS-5HPacD/ RB922UAGS-5HPacT:
One SFP port for 1.25GBit modules, DDMI support
Buttons and Jumpers
•
RouterOS reset jumper hole – resets RouterOS software to defaults. Must short circuit the metallic sides of
the hole (with a screwdriver, for example) and boot the device. Hold screwdriver in place until RouterOS
configuration is cleared.
•
Reset button – Holding this button during boot time will make the RouterBOARD look for Netinstall servers.
Release the button after the LED light goes out.
Operating System Support
Currently tested operating system is MikroTik RouterOS (starting from version v6.30).
See www.routerboard.com for more information. Contact support@mikrotik.com for support questions.
http://mt.lv/help
26 Oct 2016
Advertisement
Table of Contents

Subscribe to Our Youtube Channel
Related Manuals for MikroTik RB912UAG-2HPnD


Summary of Contents for MikroTik RB912UAG-2HPnD
-
Page 1: First Use
192.168.88.1 with the username admin and no password. In case you wish to boot the device from network, for example to use MikroTik Netinstall, hold the RESET button of the device when starting it until the LED light turns off, and Groove will start to look for Netinstall servers. -
Page 2: Federal Communication Commission Interference Statement
15.204. The installer should configure the output power level of antennas, according to country regulations and per antenna type. Professional installation is required of equipment with connectors to ensure compliance with health and safety issues. See www.routerboard.com for more information. Contact support@mikrotik.com for support questions. 26 Oct 2016... -
Page 3: Ce Declaration Of Conformity
οδηγιών: Συνδέστε τον προσαρµογέα τροφοδοσίας για να ενεργοποιήσετε τη µονάδα. Ανοίξτε 192.168.88.1 σε ένα πρόγραµµα περιήγησης στο Web για να διαµορφώσετε το προϊόν. Περισσότερες πληροφορίες στο http:// wiki.mikrotik.com See www.routerboard.com for more information. Contact support@mikrotik.com for support questions. 26 Oct 2016...
Need help?
Do you have a question about the RB912UAG-2HPnD and is the answer not in the manual?
Questions and answers