Advertisement
Quick Links
Operations Manual
W-Gun
Series MIG Guns
™
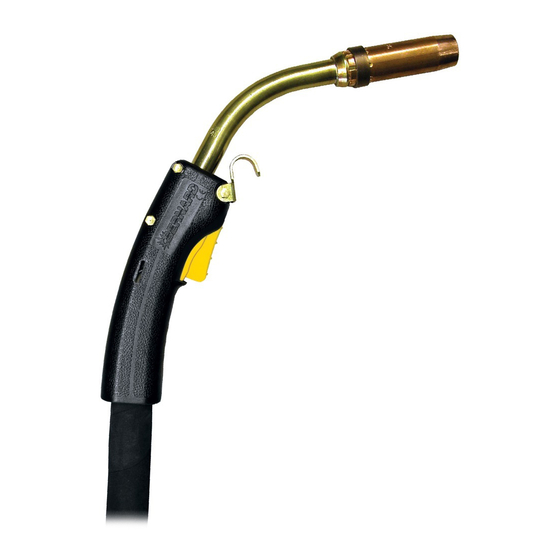
600 Amp W-Gun shown with one
piece HD straight handle with
rubber overmold.
Bernard
A Division of Miller Electric Mfg. Co.
449 West Corning Road, Box 667
Beecher, Illinois 60401 USA
See BernardWelds.com
for detailed specs and
replacement parts information.
Phone: 1-855-MIGWELD (644-9353)
+1-519-737-3030
Fax: 708-946-6726
For more information, visit us at BernardWelds.com
600 Amp W-Gun shown
with curved handle and
hang up hook.
(US & Canada)
(International)
Issued Oct. 2014 • Index No. WCMAN-1.3
All Guns are Not Created Equal.
A MIG gun should be durable, easy to
use and customized to your specific
application. Our MIG guns put you in
control: you choose the options you need
and we'll build a gun to last. We even
ship most of our guns within 24 hours.
Flexible cable assembly with reinforced syn-
thetic rubber hoses prevents water leakage and
provides increased water flow and reduced gas
leakage.
Newly designed back end and water block with
interchangeable direct plugs and trigger leads
connect to wire feeders and machines from major
manufacturers and allow for simple maintenance.
Multiple handle and trigger options to increase
operator comfort.
Heavy duty water-cooled necks are offered in
multiple length and bend configurations to allow
for optimal weld accessibility and improved
operator comfort.
Contact tip options include Centerfire
and Quik Tip
and are available in wire sizes from
TM
.023" (0.6 mm) to 3/32" (2.4 mm).
, Elliptical
TM
Advertisement

Summary of Contents for Bernard 600 Amp W-Gun
- Page 1 All Guns are Not Created Equal. A MIG gun should be durable, easy to use and customized to your specific 600 Amp W-Gun shown with one application. Our MIG guns put you in piece HD straight handle with control: you choose the options you need rubber overmold.
-
Page 2: Safety Precautions
SAFETY PRECAUTIONS Some probability of CYLINDERS MAY death or serious injury EXPLODE Some probability of Where compr essed gases are to be used at the job site, special precautions ELECTRIC SHOCK should be used to prevent hazardous situations. death or serious injury CAN KILL Always secure cylinders in an upright position to a fixed support so that they can- Arc welding e... - Page 3 Wear suitable clothing to reduce risk of burns to exposed skin. Wear durable, flame-resistant clothing with closed, opaque weaves. This reduces chance of ‘sun’ burn, contact burns, and accidental ignition of clothing that could occur. Some probability of 3.1.1 Do not wear wet or damp clothing. death or serious injury FUMES &...
-
Page 4: Emf Information
180 days after the sale by an authorized Buyer. Should you experience problems with installation or performance, Bernard reserves the right to repair, replace or refund the purchase please refer to the “Troubleshooting Guide” in this manual. price of non-conforming product. Product found not defective will be Before installing, compare the equipment received against the invoice returned to the Buyer after notification by Customer Service. - Page 5 With Bernard’s flexibility, 8c. Quik Tip – Remove tip with a 1/4 turn counterclockwise. An many applications can be accommodated with field installed options, unobstructed electrode path has now been established.
- Page 6 End User Stocking Recommendations: Section 3. Contact Tip Nozzles ........5 for every 1 gun in service Bernard has designed its contact tips to allow rapid installation and Tips ........... 30 for every 1 gun in service adjustment. Gas Diffusers ......4 for every 1 gun in service A.
- Page 7 page 4 C. Installation II Legacy Straight Handle Firmly secure gas diffuser with an appropriate wrench in a clockwise A. Removal rotation. Always reinstall gas diffuser insulator to decrease the chances Remove switch and screws from handle (See Figure 2). Remove of short circuiting.
- Page 8 page 5 III HD Straight Handle next section for specific conduit installation instructions. Install and tighten power cable and return hose fittings to 35 in-lbs to prevent A. Removal leakage. Avoid twisting power cable and return hose fittings during installation. Install handle and liner. Remove switch and screws from handle (See Figure 4).
- Page 9 FIGURE 7 II Euro Direct Plug Section 10. Direct Plug A. Removal I Bernard Quick Disconnect Remove liner from gun assembly. Follow the steps required to remove A. Removal the complete cable assembly from the rear water block. Inlet and outlet hoses can be removed from rear water block by cutting Oetiker Remove liner from gun assembly.
- Page 10 page 7 B. Service Note: For OXO direct plugs, rigid strain relief must be held gently in Test contact pins for continuity when trigger is engaged. Lubricate vise while using the appropriate wrench in a counterclockwise rotation o-rings with silicone lubricant. Inspect all components for cracks, to remove the power pin.
- Page 11 1. Replace with proper size. 2. Electrode eroding contact tip. 2. Inspect and/or change drive rolls. 3. Exceeding duty cycle. 3. Replace with properly rated Bernard gun. 5. Erratic arc 1. Worn contact tip. 1. Replace. 2. Buildup inside of liner.
- Page 12 See ‘Maintenance & Repair’ (Section 8). 9. Gun running hot 1. Exceeding duty cycle. 1. a. Replace with properly rated Bernard gun. b. Decrease parameters to within gun rating. 2. Loose or poor power connection. 2. a. Clean, tighten or replace cable grounding connection.


Need help?
Do you have a question about the 600 Amp W-Gun and is the answer not in the manual?
Questions and answers