Table of Contents
Advertisement
Advertisement
Table of Contents

Related Manuals for Optima Scale OPF-P


Summary of Contents for Optima Scale OPF-P
- Page 1 OPF-P Counting Scale USER’S MANUAL optimascale.com...
-
Page 2: Table Of Contents
TABLE OF CONTENTS Features Contact Us Safety Precautions Preparations and Set Up Display and Key Description Operating Instructions Battery Alarms User Settings 8-10 Communication Protocols Troubleshooting Specifications Scale Settings 13-14 Calibration... -
Page 3: Features
FEATURES • Provides the highest level of counting accuracy • Up to 21 PLU’s for storing sample weights so they can easily be retrieved • 30,000 displayed resolutions • 3 displays - Weight - Unit Weight - Count • Truly portable - with both AAC adapter and rechargeable battery that lasts 100 hours •... -
Page 4: Safety Precautions
SAFETY PRECAUTIONS • To avoid damaging the battery do not keep charger plugged in once battery is fully charged. • Only use the provided adapter to charge this unit. • The provided battery should be replaced when it no longer holds a charge of over 12 hours. -
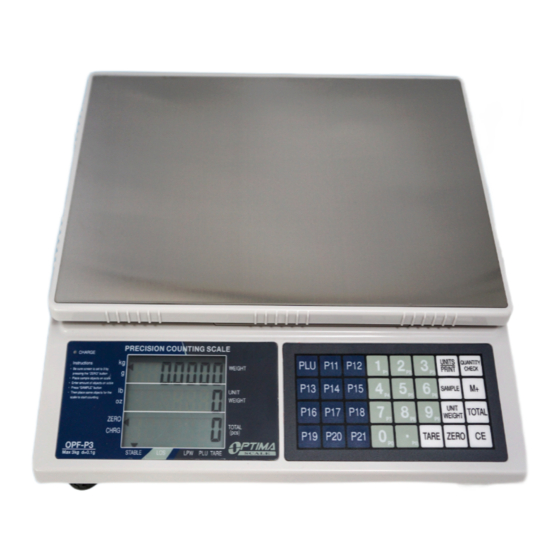
Page 5: Display And Key Description
DISPLAY AND KEY DESCRIPTION LCD DISPLAY KEYBOARD UNITS In the weighing mode there are 4 units available (kg, g, lb, oz) QUANTITY This is for setting an upper and lower limitation alarm SAMPL Setting the counted sample numbers on the platform into the scales memory In accounting mode: Accumulate counting In setting mode: save settings and shift to the next function selection In weighing mode: setting the unit weight data... -
Page 6: Operating Instructions
OPERATING INSTRUCTIONS Power On • Turn on the power by flipping the switch located on the underside of the scale to the right. Once on, the scale will show the voltage and au- to-check by counting down from 0-9 sequentially Zeroing •... - Page 7 Accumulation • Accumulation mode keeps track and adds your totals together for you • Press [M+] to accumulate the current quantity to the total quantity • Then press [UNIT WEIGHT] key to go back to the normal counting mode • From there you can use the scale again and when you want to add your total to the accumulation press [M+] (up to 99 totals can be accumulated) •...
- Page 8 PLU Counting Function To Use PLU keys: If you’re going to be using the same object repeatedly you can save your sample as a PLU key. • To use, you must be in weighing mode (make sure the symbol is not on PLU, if you are, press [PLU] key to exit PLU mode) •...
-
Page 9: Battery
BATTERY • When appears on the display, you are requested to recharge the scale for 12 hours. When the scale is recharging the mark will be flashing and will disappear after recharging has finished • Charging Light Indication: When the scale is charging the charge light will turn Red. -
Page 10: User Settings
USER SETTINGS User Setting Mode: In weighing mode, press both [CE] and [ZERO] to shift enter the User Setting Mode Selection of Anti-Shake • In order to get faster responding speed or higher weighing stability, the setting can be revised from a range of (1-7) the default set at 2 •... - Page 11 Selection of Zero Display Range • The range is 0-6 with default set at 2. This selection doesn’t affect the zero value but the indication • In User Setting Mode, select “ZDSP?” • The flashing number on the second line shows the present setting value •...
- Page 12 Selection of PLU Function • There are two modes for PLU setting: ON & OFF • In User Setting Mode, select “PLU?” • The flashing number on the second line shows the present setting value • Press [ZERO] or [TARE] to change the value •...
-
Page 13: Communication Protocols
RS232 COMMUNICATION PROTOCOLS The balance uses RS232UART signal, one frame consists of 10 Bit Format Bit1 Bit2 Bit3 Bit4 Bit5 Bit6 Bit7 Bit8 Bit9 Bit10 BIT1: Startbit Bit2~9: Databit Bit10: Stopbit All Data is in ASCII Code Connection Standard RS2329 pin interface: 2# -TXD (sending), 3#-RXD (receiving), 5#- GND (ground), can be connected with PC directly. -
Page 14: Troubleshooting
TROUBLESHOOTING “ADL---” - the weight is under the set division “ADH---” - the weight is over the set capacity, please remove all weight “AD-OVER” - the weight is over the scale’s capacity, please remove all weight from the scale immediately! •... -
Page 15: Scale Settings
SCALE SETTINGS Scale Settings Mode: In weighing mode, press both [CE] and [TARE] at the same time to enter the Scale Settings Mode. In this mode they keys mean: [M+]: Save and enter the next function [TARE]: Select value [ZERO]: Select value [CE]: Clear value [UNIT WEIGHT]: Back to the weighing mode Password... -
Page 16: Calibration
Linearity Correction • The display will read “LIN” • Press [ZERO] or [TARE] to toggle this mode On or OFF (Linearity correction needs to be turned off to continue to calibration mode) • There is a range of ( - 6-6) for correcting the linearity error. •...
Need help?
Do you have a question about the OPF-P and is the answer not in the manual?
Questions and answers