
Subscribe to Our Youtube Channel
Related Manuals for i-CAT FLX V Series


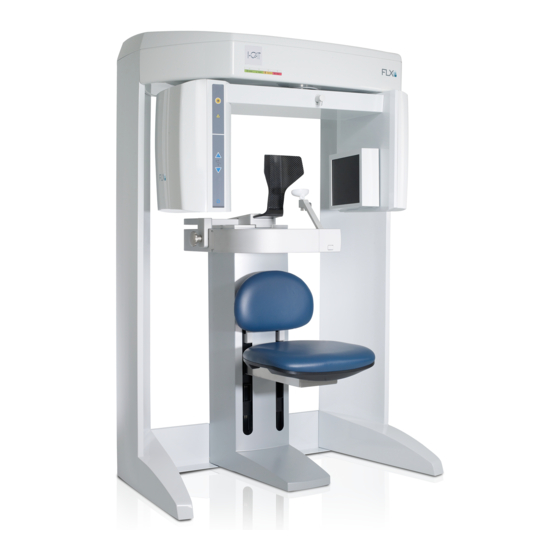
Summary of Contents for i-CAT FLX V Series
- Page 1 C o n e B e a m 3 D + 2 D P a n o r a m i c D e n t a l I m a g i n g S y s t e m Use r Man u a l...
- Page 2 Copyright © Dental Imaging Technologies Corporation 2013 - 2016 This manual contains original instructions by Dental Imaging Technologies Corporation for the safe use of the i-CAT FLX imaging system and were originally drafted, approved and supplied in English. Dental Imaging Technologies Corporation reserves the right to make changes to both this manual and to the products it describes.
-
Page 3: Table Of Contents
ABLE OF ONTENTS Chapter 1 - Introduction Welcome to Your New i-CAT FLX V-Series Imaging System ........1-1 Description ........................1-2 i-CAT FLX Imaging System ..................... 1-2 Operator Control Box ...................... 1-3 Patient Emergency Stop Control ..................1-4 SmartScan STUDIO Software ..................1-4 TxSTUDIO Treatment Planning Software ............... - Page 4 FLX User Manual Chapter 5 - Positioning the Patient Patient Positioning For CT Scans - At A Glance ............5-1 Patient Positioning For PAN Scans - At A Glance ............. 5-2 Patient Positioning - in Detail ..................5-3 Patient Chair .........................
- Page 5 Table of Contents Chapter 7 - Opening Images Introduction ......................... 7-1 Locate Exam Images in SmartScan STUDIO Manager ..........7-1 Locate Exam Images in DEXIS .................. 7-2 Locate Exam Images in a Practice Management System .......... 7-2 Store and Retrieve Images on a PACS ..............7-3 Monitor Image Storage from SmartScan STUDIO to a PACS .........
- Page 6 FLX User Manual 032-0329-EN Rev K...
-
Page 7: Chapter 1 - Introduction
Your new i-CAT FLX V-Series imaging system is an upgradeable system which provides three product options for scanning size depending on the needs of your practice: the i-CAT FLX V8, i-CAT FLX V10, and i-CAT FLX V17. Along with low dose imaging, easy workflow, and consistent patient positioning, the i-CAT V-Series enables you to select a product option that best fits your needs without compromising image quality. -
Page 8: Description
As with all new clinical tools, training is necessary for the practice to become proficient with the i- CAT system. In addition to training with a certified i-CAT instructor, we recommend that you and your clinical team review this manual for a thorough understanding of how to use i-CAT technology to its potential in your practice, both safely and effectively. -
Page 9: Operator Control Box
• PAN - Optional Conventional Digital Panoramic Feature • i-CAT FLX Imaging System with Touch Screen Operator Control Box The operator control box must be located outside of the patient environment, and can be placed on a desktop or wall-mounted. The site layout must provide a means for audio and visual communication between the operator and patient during scanning. -
Page 10: Patient Emergency Stop Control
Indications for Use/Intended Use Devices of the i-CAT family consist of an X-ray system that uses a cone beam with a rotational sequence, providing two dimensional images and three dimensional volume reconstructions of the head area, which includes ENT and maxillofacial areas (such as TM Joint studies, mandible &... - Page 11 Introduction CAUTION U.S. Federal Law (USA) restricts the sale of this device to or on the order of a dentist or other licensed practitioner. NOTE: You represent and warrant that you will, at all times, comply with all laws, including the HIPAA regulations directly or indirectly applicable to you or your organization that may now or hereafter govern the gathering, use, transmission, processing, receipt, reporting, disclosure, maintenance, and storage of patient information and use your best efforts to cause all persons or...
- Page 12 FLX User Manual 032-0329-EN Rev K...
-
Page 13: Chapter 2 - Getting Started
Chapter Workflow At A Glance The i-CAT FLX imaging system and the software tools SmartScan STUDIO, DEXIS or SmartScan STUDIO Manager, and TxSTUDIO enable you to quickly capture patient exam data and view images for treatment planning. The main steps of the workflow are: Schedule a Patient Exam •... -
Page 14: Scanner Startup
FLX User Manual Scanner Startup The scanner and scanner controller are powered independently, Both must be on to function properly and are available for use immediately after startup. No warm up is required. Power Up 1. Power up the scanner: press the ON button on the operator control box. -
Page 15: Chapter 3 - Scheduling A Patient Exam
Scheduling a Patient Exam Chapter Introduction Depending on your site’s workflow, you may use SmartScan STUDIO Manager, DEXIS software, Practice Management (PM) software, or SmartScan STUDIO Modality Worklist software to schedule patient exams. Using SmartScan STUDIO Manager to Schedule a Patient Exam Using SmartScan STUDIO Manager at the clinical workstation, you can schedule a new patient for an exam or select an existing patient to schedule a new exam. -
Page 16: Schedule An Existing Patient For A New Exam
FLX User Manual 4. Select . The exam request is sent to SmartScan STUDIO and is displayed in the Scheduled Exams list on the touch screen. Schedule an Existing Patient for a New Exam 1. At the clinical workstation, start SmartScan STUDIO Manager. -
Page 17: Schedule An Existing Patient For An Exam
Scheduling a Patient Exam 5. Click (Extra-oral). 6. Click . A pop-up message displays that patient is scheduled for acquisition. 7. Click OK to dismiss pop-up. Schedule an Existing Patient for an Exam 1. At the clinical workstation, start DEXIS. 2. - Page 18 FLX User Manual 1. Start SmartScan STUDIO MWL. 2. Query for scheduled patients by entering one or more of the following: Patient ID, Accession Number, Last Name, First Name, Scheduled Procedure Start Date Range (From – To), Modality (CT/DX/PX/ None), Station Name, Procedure Code.
- Page 19 Scheduling a Patient Exam Message Action Modality Worklist Querying Requested Query was completed successfully. performed successfully. Retrieving records, Please wait... PACS MWL retrieving the results of Query requested. Deleted. Selected server configuration deleted from the settings. PACS MWL was unable to perform C-ECHO request for C-ECHO failed.
- Page 20 FLX User Manual 032-0329-EN Rev K...
-
Page 21: Chapter 4 - Selecting A Protocol
Selecting a Protocol Chapter Dose Control It is important to put the patient’s health first when selecting a protocol for the scan. Keep the following in mind when selecting a protocol: Multiple low dose scan settings • provide responsible patient- focused care. -
Page 22: Default Favorites
FLX User Manual Default Favorites Default protocol favorites are pre-loaded in SmartScan STUDIO for CT and PAN scans. i-CAT FLX V17 Favorites Volume Size Voxel Scan Time CT Favorite Name (Diameter x Height) (mm) (Seconds) (mGy cm 3D Ceph 16 x 13 623.9... - Page 23 Selecting a Protocol i-CAT FLX V17 Favorites Volume Size Voxel Scan Time CT Favorite Name (Diameter x Height) (mm) (Seconds) (mGy cm Maxilla - small 8 x 5 biased for maxilla Mandible - small UltraHD 8 x 5 0.125 26.9...
- Page 24 FLX User Manual i-CAT FLX V10 Favorites Volume Size Voxel Scan Time CT Favorite Name (Diameter x Height) (mm) (Seconds) (mGy cm Airway Quick Scan (Low Dose) 16 x 10 278.1 Airway i-clAIRity 16 x 10 4.8, reduced mA 79.6...
- Page 25 Selecting a Protocol i-CAT FLX V10 Favorites Volume Size Voxel Scan Time CT Favorite Name (Diameter x Height) (mm) (Seconds) (mGy cm Panoramic Standard 94 / 5 20.0 146.4 Panoramic - small Standard 84 / 5 18.3 i-CAT FLX V8 Favorites...
-
Page 26: Choosing The Best Scan Option For The Patient
FLX User Manual You can build a custom protocol for a CT scan and save it as a favorite, as described in • Build a Custom Protocol Workflow in SmartScan STUDIO (page 6-24). Default PAN protocols have both an enhanced and non-enhanced version. The •... - Page 27 Cephalometrics for Large Skulls 0.3 Enhanced* 17.8 Expanded 3D Orthognathic Surgery V17 only: 17 Ceph Ears, Nose, Throat 0.3, 0.4 *suggested option NOTE: See the i-CAT website for information about the use of 3 Party software with the i-CAT. 032-0329-EN Rev K...
- Page 28 FLX User Manual 032-0329-EN Rev K...
-
Page 29: Chapter 5 - Positioning The Patient
Positioning the Patient Chapter Patient Positioning For CT Scans - At A Glance Position the patient for minimal movement and maximum image quality. To prevent patient movement: When possible, use the head support, strap and chin cup. • Stabilize patient’s feet with a foot stool if needed. •... -
Page 30: Patient Positioning For Pan Scans - At A Glance
FLX User Manual Patient Positioning For PAN Scans - At A Glance 1. Place chair in the upper slots so that chair back does not impede patient’s ability to sit with an erect posture. 2. If head support is installed, loosen locking knob and remove head support. -
Page 31: Patient Positioning - In Detail
Positioning the Patient Patient Positioning - in Detail Positioning the patient properly and minimizing patient movement are the keys to optimal scan results. Several scanner features can be used to assist with patient positioning to ensure that all intended anatomical attributes are in the field of view, including those of ENT interest. The figure below shows the location of these features and the order in which they are generally used to position a patient. -
Page 32: Patient Chair
FLX User Manual Patient Chair Patient Align Buttons Sensor Panel Gate Chair Mounting Slots There are two sets of mounting slots for the chair. Use the following table as a guideline for initial placement of the chair: Patient Height... -
Page 33: Gate
Positioning the Patient Gate The gate swings open to allow patient seating. The patient should be seated facing forward with hands in lap. NOTE: Closing the gate creates a pinch point. Keep hands and other body parts clear when closing gate. Close gate prior to scanning, making sure the magnet is secured in its locked position. -
Page 34: Head Support And Head Strap
FLX User Manual Head Support and Head Strap Head Support Locking Knob Head Support Head Support Adjusting Knob The head support slides forward or backward for head stabilization. The patient’s head should be supported firmly between the chin cup and head support. Loosen the head support adjusting knob, then use the knob to slide the head support forward or backward to move it into the proper position. - Page 35 Positioning the Patient To Install Velcro Pads: Velcro Pads 1. Loosen the locking knob and remove the head support. 2. Attach pads and, if necessary, trim to fit. 3. Insert head support and tighten locking knob. To Use the Head Strap: Attach one end of the head strap to one side of the head support.
-
Page 36: Alignment Light
FLX User Manual Alignment Light Sagittal Laser Light Alignment Light Button Crosshair Laser Light NOTE: Laser beams can cause optical damage. Do not stare into the laser beam. Instruct the patient to avoid looking into the beam. The use of optical instruments such as eyeglasses with large diopter or mirrors, increase eye hazard with this product. -
Page 37: Scouts And Dry Runs
Positioning the Patient Occlusal Plane Flat, Frankfurt Plane tilted up slightly. Position of Alignment Lights: Horizontal: Occlusal plane between the lips. Vertical: 1.5 inches in front of condyle (chin support adjusted to acquisition position). Scouts and Dry Runs NOTE: Scout scans and Dry Runs are described in detail in the Taking a Scan chapter. It is recommended that a Scout scan be performed to verify patient positioning. -
Page 38: Instruct Patients Prior To The Scan
FLX User Manual Instruct Patients Prior to the Scan Inform patients of what to expect during a scan so that they are prepared and avoid movement during the scan. NOTE: When working with pediatric patients, explain carefully the following instructions. -
Page 39: Chapter 6 - Taking A Scan
Taking a Scan Chapter Scanning Workflow in SmartScan STUDIO SmartScan STUDIO uses a simple touch screen interface that enables you to quickly take a scan for a patient exam. The typical workflow guides you through the following steps. Step Purpose Display Choose a Patient Exam (page 6-8) Choose a Protocol (page 6-9) - Page 40 FLX User Manual Perform a CT Scout Scan (page 6-14) Perform a PAN Scout Scan (page 6-21) Perform a Scan (page 6-17) Review Exam Images (page 6-18) Review PAN Image (page 6-22) Complete/Incomplete Exam (page 6-23) 032-0329-EN Rev K...
-
Page 41: Using Smartscan Studio Step-By-Step
Taking a Scan Using SmartScan STUDIO Step-by-Step Use the following step-by-step instructions for the desired workflow: Perform a CT Scan (page 6-3) • Perform a PAN Scan (page 6-5) • Build a Custom Protocol (page 6-7) • Perform a CT Scan 1. - Page 42 FLX User Manual 11. If patient position is not correct, re-position patient or use Front/Back slider control or up/down buttons to move panel into proper position. Press and repeat steps 7 - 10 to perform another scout. 12. If patient position is correct for scan, press 13.
-
Page 43: Perform A Pan Scan
Taking a Scan Perform a PAN Scan 1. Prepare the scanner for a PAN scan. Refer to Patient Positioning For PAN Scans - At A Glance. 2. In SmartScan STUDIO, select exam entry in scheduled exams list. 3. Press to access protocols. 4. - Page 44 FLX User Manual Ensure bite tip is horizontal and bite tip holder is vertical. • Ensure patient’s lips are together and both upper and lower teeth are in notches • of the bite tip. Ensure chin is not cut off or too low. Leave a 5 mm gap between the lower •...
-
Page 45: Build A Custom Protocol
Taking a Scan 18. If PAN scan is acceptable: Ensure scanner is reset. • Press the Push to Release lever on the head holder to open the arms. Do not • manually force arms open. Open gate. Ask patient to sit back out of bite stick and chin rest, open the gate gently and •... -
Page 46: Smartscan Studio Details
FLX User Manual SmartScan STUDIO Details Choose a Patient Exam Select a patient exam from the exam list. The list shows all exams currently scheduled. Exam requests are scheduled on a clinical workstation using SmartScan STUDIO or DEXIS. Touch and drag to scroll through the list as needed and select an exam entry. -
Page 47: Choose A Protocol
Taking a Scan Choose a Protocol V17 Option V10 Option V8 Option 032-0329-EN Rev K... - Page 48 FLX User Manual Select a protocol to use for the exam. Touch and drag to scroll through the options as needed. The scan parameters defined for the protocol are displayed in the header. The protocol menu includes both default and custom protocols. Default protocols are provided with SmartScan STUDIO.
- Page 49 Taking a Scan Continue with selected protocol. Go back and select another exam. A confirmation dialog box results. to confirm or to cancel and return to current exam. Create a custom protocol for a CT scan. Refer to Build a Custom Protocol Workflow in SmartScan STUDIO (page 6-24).
-
Page 50: Choose Type
FLX User Manual Choose Type Select a scan type. Dry Run (not available for PAN scans or Utilities) - rotates the gantry in the exact manner that is required for the selected protocol, but does not expose the patient to any radiation. Use a Dry Run to give the patient a demonstration of the machine motion and/or to check shoulder clearance. -
Page 51: Perform A Dry Run
Taking a Scan Continue with selected type. The scanner initializes. You have two minutes to press Scan on the operator control box before the scanner times out. If the scanner times out, the scan is incomplete. Begin the workflow again. Go back to select a different protocol. -
Page 52: Perform A Ct Scout Scan
FLX User Manual Perform a CT Scout Scan V17 Option V10 Option V8 Option 6-14 032-0329-EN Rev K... - Page 53 Taking a Scan Take a scout scan to check for proper patient positioning to ensure desired anatomy will be captured. Instruct the patient to hold still, swallow before the scan, take shallow breaths during the scan and close his or her eyes. If multiple scouts are taken during a patient session, the cumulative DAP value is displayed in the header under Total Exam DAP.
- Page 54 FLX User Manual Moves panel back or front. Can be used after a scout scan has been taken to adjust the field of view to ensure anterior or posterior anatomical attributes are captured without repositioning the patient. Slider position indicates where the next scan will be taken.
-
Page 55: Perform A Scan
Taking a Scan Perform a Scan Take a full scan when patient is properly positioned. Instruct the patient to hold still, swallow before the scan, take shallow breaths during the scan and close his or her eyes. Displays when an HD, Standard, or Enhanced CT scan is acquired. Toggle to view first and last frame of scan to check for patient movement. -
Page 56: Review Exam Images
FLX User Manual Review Exam Images V17 Option V10 Option V8 Option 6-18 032-0329-EN Rev K... - Page 57 Taking a Scan Review image to ensure a quality scan was acquired. Use controls as needed to help with visualization. Continue to Complete dialog box with options for next scan. Adjusts brightness of image directly above slider. Individual controls are provided for left and right image display.
- Page 58 FLX User Manual Select Coronal View. Drag indicator line in right viewport up or down to view axial slices in left viewport. Left Viewport Right Viewport Axial Coronal Drag indicator line in left viewport up or down to view coronal slices in right viewport.
-
Page 59: Perform A Pan Scout Scan
Taking a Scan Perform a PAN Scout Scan Take a PAN scout scan to check for proper patient positioning to ensure desired anatomy will be captured. Instruct the patient to close lips around the bite tip as if using a straw, swallow and hold, put the tongue to the roof of the mouth and hold for the duration of the exposure. -
Page 60: Review Pan Image
FLX User Manual Adjusts brightness of image. Adjusts contrast of image. Review PAN Image Review PAN image to ensure a quality scan was acquired. Use controls as needed to help with visualization. NOTE: If an enhanced PAN image has unexpected artifacts, try reprocessing the PAN image, which will remove the filter it was processed with. -
Page 61: Complete/Incomplete Exam
Taking a Scan Complete/Incomplete Exam Complete - Acquire workflow is completed for the exam. Incomplete - Acquire workflow did not complete for the exam. New Exam - Go to Scheduled Exams and select another exam. Confirmation dialog box results. to confirm or to cancel. -
Page 62: Build A Custom Protocol Workflow In Smartscan Studio
FLX User Manual Build a Custom Protocol Workflow in SmartScan STUDIO The Custom Protocol workflow enables you to build a custom protocol for CT scans by selecting the anatomy (diameter and height), resolution (voxel size), and dose for the protocol. -
Page 63: Choose Anatomy
Taking a Scan Choose Anatomy V17 Option V10 Option V8 Option 6-25 032-0329-EN Rev K... - Page 64 FLX User Manual Select anatomy for the scan protocol. The Volume Size header parameter highlights the selected value. Scan DAP is not displayed until the dose is selected on the Choose Dose screen. Options Available On Anatomy Diameter x Height (cm)
- Page 65 Taking a Scan 3D Ceph 16 x 13 Expanded 3D Ceph 23 x 17 Continue to Choose Resolution. Go back to Protocol menu. 6-27 032-0329-EN Rev K...
-
Page 66: Choose Resolution
FLX User Manual Choose Resolution Select resolution for the scan. Resolution options available depend on the anatomy chosen. The Voxel Size header parameter highlights the selected value. Scan DAP is not displayed until the dose is selected on the Choose Dose screen. -
Page 67: Choose Dose
Taking a Scan Choose Dose Select the dose for the protocol. The Scan Time, Exposure Time, kV, mA, and Scan DAP header parameters highlight the resulting values based on the options selected on all custom protocol screens. Options available vary based on custom protocol selections. NOTE: V8 systems are limited to 8cm diameter scan options. - Page 68 FLX User Manual HD - uses longer exposure time settings for high resolution image quality. For 23cm Diameter, 0.3 and 0.4 voxel scans (V17 option only): Standard - uses standard exposure time settings. Enhanced - uses longer exposure time settings for maximum image quality.
-
Page 69: Chapter 7 - Opening Images
Opening Images Chapter Introduction Depending on your site’s workflow, you may use SmartScan STUDIO Manager, DEXIS software, a Practice Management (PM) system, or SmartScan STUDIO Query/Retrieve (PACS) software to access patient exam images. Locate Exam Images in SmartScan STUDIO Manager 1. -
Page 70: Locate Exam Images In Dexis
Refer to your DEXIS Software Manual for additional information. 1. In DEXIS, locate patient, then click to open the Extra-oral display. 2. Double-click the i-CAT box to start TxSTUDIO and load patient exam. 3. View scan in TxSTUDIO. Locate Exam Images in a Practice Management System If your site uses a supported PM system to locate and retrieve images, the optional SmartScan STUDIO PM interface software must be installed. -
Page 71: Store And Retrieve Images On A Pacs
Opening Images NOTE: If exams are not being returned to your PM system as expected, make sure that the • Disable All PM Exam Output checkbox is not checked. If an error prevents completed exams from being returned to the PM system, you can •... -
Page 72: Monitor Image Storage From Smartscan Studio To A Pacs
FLX User Manual Monitor Image Storage from SmartScan STUDIO to a PACS 1. At the clinical workstation, start SmartScan STUDIO Manager. 2. Select Exam List and locate the study to be monitored. 3. In the PACS Status column, image status for a study is listed. Entries are:... -
Page 73: Retrieve Images From A Pacs
Opening Images Retrieve Images from a PACS 1. Start SmartScan STUDIO 2. Query for patient studies by entering one or more of the following: Patient ID, Accession Number, Last Name, First Name, Scheduled Procedure Start Date Range (From – To), Study ID. - Page 74 FLX User Manual Message Action Querying Failed. Please check PACS QR was unable to communicate with the Server. log for error. Please check logs for more details on error occurred. Contact local PACS administrator. Querying performed successfully. Requested Query was completed successfully.
-
Page 75: Using Txstudio
Opening Images Using TxSTUDIO Refer to TxSTUDIO Reference Manual for information on using TxSTUDIO. CAUTION At installation, TxSTUDIO was configured to save all workup data to the workstation or a common TxSTUDIO Cases folder. Do NOT save workup data to the ImageRoot folder, as this will overwrite the original scan data. - Page 76 FLX User Manual 032-0329-EN Rev K...
-
Page 77: Chapter 8 - Calibration And Maintenance
In SmartScan Studio, press to access the Utilities menu. The following are the most commonly-used options. Refer to the i-CAT FLX Technical Guide for information on the other Utilities menu options. Option... -
Page 78: Shutter Calibration
FLX User Manual Run Panel Calibration 1. Select PanelCal. 2. Ensure the field of view on the scanner is clear. 3. Press . The scanner initializes. 4. When prompted, press the Scan button on the operator control box. An audible alarm is sounded and the X-ray ON light is illuminated during radiation exposure. -
Page 79: Reprocessing An Exam
Calibration and Maintenance Run Shutter Calibration 1. Select ShutterCal. 2. Ensure the field of view on the scanner is clear. 3. Press . The scanner initializes. 4. When prompted, press the Scan button on the operator control box. An audible alarm is sounded and the X-ray ON light is illuminated during radiation exposure. -
Page 80: Using Favorites Manager
FLX User Manual It may be necessary to reprocess an exam if there is a problem with reconstruction of a scan that was acquired successfully. CT exams are reprocessed using the same settings with which they were acquired. PAN exams are reprocessed without the filter that may have been applied during initial processing. -
Page 81: Routine Cleaning
Calibration and Maintenance Routine Cleaning Routinely clean and disinfect all items which come in contact with the patient, using one of the products listed, or equivalent cleaner and disinfectant: 3® Opti-Cide Solution and/or Wipes from Biotrol International ® CaviCide from Metrex (DIN:02161656) Saturate with disinfectant and allow surface to remain wet for three minutes at room temperature F / 20 C), and then wipe dry using a clean paper or cloth towel. - Page 82 FLX User Manual 032-0329-EN Rev K...
-
Page 83: Chapter 9 - Shutdown
Shutdown Chapter Scanner Shutdown Log out 1. Press . This button is accessible from Scheduled Exams or at the conclusion of the scanning workflow. 2. On the logout confirmation dialog, press to close exam and log out. A menu displays with the following options: Acquire - Start the scanning workflow. - Page 84 FLX User Manual 032-0329-EN Rev K...
-
Page 85: Appendix A - Safety Guidelines
Safety Guidelines Appendix Radiation Safety The scanner provides a high degree of protection from unnecessary radiation. However, no practical design can provide complete protection nor prevent operators from exposing themselves or others to unnecessary radiation. It is important to restrict use and follow all applicable government radiation protection regulations. - Page 86 FLX User Manual Use of controls or adjustments or performance of procedures other than those • specified herein may result in hazardous radiation exposure. No modification of this scanner is allowed except by parties that are authorized by •...
-
Page 87: Safety Devices
CAUTION Failure to follow instructions below may result in minor or moderate bodily injury or damage to the device. To attain optimal image quality, instruct patients to close their eyes, use shallow • breaths, stay as still as possible, and not swallow during the scan. Explain this carefully to children. - Page 88 FLX User Manual with any parts of the scanner or items in the environment, or if the patient moves or needs immediate assistance for some reason. Emergency Removal of a Patient 1. Press an Emergency Stop button. 2. When you have determined that you can safely remove the patient, grasp and pull the gate outward.
-
Page 89: Appendix B - Status Indicators And Operational Messages
Manager and the Image Root folder. If a status check fails, the status indicator changes to a red X. Refer to i-CAT FLX Installation Manual for information on troubleshooting failed status indicator conditions. Contact Technical Support if an error persists. - Page 90 FLX User Manual Operational Messages SmartScan STUDIO may display system message in a dialog box. These messages may be informational only or may indicate the need to recover from an error. Follow instructions in the message dialog box. If problems persist after performing the indicated actions, call Technical Support.
- Page 91 Message Action Possible Cause A scanner fault was detected X-ray fault from X-ray (1000) controller. Follow instructions on dialog. Scanner reset required (1001) Platform needs to be homed. Scanner reset required (1002) Rotation needs to be homed. Beam limiter not initialized. A scanner fault was detected (1003) Panel position error.
- Page 92 FLX User Manual Message Action Possible Cause Call Technical Support. Problem creating recovery job. An error requiring special assistance has been encountered. Please call Technical Support. Call Technical Support. Patient information is missing. Patient information missing Please call Technical Support.
- Page 93 The phantom is not the correct Position the correct phantom. Wrong phantom or phantom is type, or is not positioned Refer to the i-CAT FLX not centered. properly. Installation Manual. The phantom is tilted or not Position the phantom correctly.
- Page 94 FLX User Manual 032-0329-EN Rev K...
- Page 96 Manufactured by: Imaging Sciences International LLC 1910 North Penn Road Hatfield, PA 19440 USA Tel: 1-215-997-5666 Fax: 1-215-997-5665 032-0329-EN Rev K 2016 August 1...
Need help?
Do you have a question about the FLX V Series and is the answer not in the manual?
Questions and answers