Table of Contents
Advertisement
Advertisement
Table of Contents

Related Manuals for Hover-1 Buggy


Summary of Contents for Hover-1 Buggy
- Page 2 Operation Manual HY-H1-BGY IMPORTANT: KEEP FOR FUTURE REFERENCE *Images used in this manual may vary slightly from the product and are for reference purposes only. Even if you have ridden a scooter for years, it is important for you and every rider to read this manual before using this product.
- Page 3 WARNING HELMETS SAVE LIVES! Always wear a properly tted helmet that complies with CPSC or CE safety standards when you ride your scooter. Incorrect Fitting: Correct Fitting: Forehead is exposed Make sure your helmet and vulnerable to covers your forehead. serious injury.
- Page 4 Section Two of this manual gives assembly and installation instructions for your Hover-1 Buggy. Section Three of this manual covers speci c safety and operating instructions for your Hover-1 Buggy. Even if you are an experienced rider, you should review this section before your rst ride.
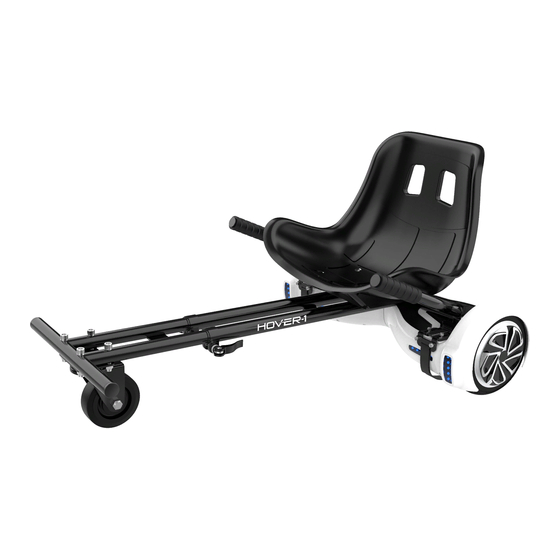
- Page 5 HOVER-1 BUGGY DIAGRAM 1. Seat 2. Handle Bars 3. Pedal Mounts 4. Adjustable Strap 5. Seat Frame 6. Locker 7. Frame 8. Foot Rests 9. Front Wheel SPECIFICATIONS Compatibility: Most self-balancing scooters Max Load: See max load of your self-balancing scooter Tire Size: 4”...
- Page 6 PARTS LIST (4) Small Foam pad (1) Seat (1) Wrench (1) Seat Frame (1) Allen Wrench (1) Frame (2) Locker (1) Right Handle Bar (2) 8*35 Screw (1) Left Handle Bar (2) Strap with velcro (4) M6*16 Screw (4) Spare strap (2) 8mm Nut with velcro...
- Page 7 Team at support@Hover-1.com. Someone will be in touch to walk you through these steps. Carefully follow the steps shown on the following pages for assembling the Hover-1 Buggy. Remove all Hover-1 Buggy contents from the box. Ensure all contents from the “Parts List” section are accounted for.
- Page 8 2. Locate the provided 8*35 Screw and 8mm Nut. Attach the left and right handle bars to the seat frame as shown below. Seat Frame 3. Insert the frame into the seat frame. Adjust the frame and the seat frame to your preferred size. Secure the frame in place using the locker.
- Page 9 4. Align the holes of the seat with the seat frame. Secure the seat in place by M6*16 screws using allen wrench. 5. Your Hover-1 Bubby is now completely assembled and should look like the below image.
- Page 10 Team at support@Hover-1.com. Someone will be in touch to walk you through these steps. Carefully follow the steps shown on the following pages for installing the Hover-1 Buggy onto your electric scooter. Read the remainder of this manual before riding your Hover-1 Buggy.
- Page 11 2. Secure your Hover-1 Buggy to your self-balancing scooter using both adjustable straps with Velcro. With the velcro side facing away from your scooter, attach one hook of each adjustable strap to the back of each pedal mount. 3. Wrap both adjustable straps under your self-balancing scooter and attach the second hook of each...
- Page 12 4. Adjust both adjustable straps so that they are secured tightly around your scooter. 5. Your Hover-1 Buggy should be properly installed onto your scooter as shown below.
- Page 13 It is important that you fully understand all elements of your Hover-1 buggy. If these elements are not used correctly, you will not have full control of your Hover-1 Buggy. Before you ride fast, or outside of a controlled environment, learn the functions of the various mechanisms on your Hover-1 Buggy.
- Page 14 PRE-RIDE HOVER-1 BUGGY CHECKLIST Ensure that your Hover-1 Buggy and scooter are in proper working order each and every time you ride. If a part of the Hover-1 Buggy does not function correctly, please contact our Customer Support Center. • Ensure your tire pressure is at the suggested PSI level for your scooter before riding.
- Page 15 SAFETY PRECAUTIONS The rst rule in safe riding is to use common sense. A Hover-1 Buggy is vulnerable; it cannot protect you in a crash, against impact, or loss of control the way driving a car can. A Hover-1 Buggy can tip over sideways or pitch you over the front wheel.
- Page 16 Brakes do not work as well under wet conditions as they do when dry. It is recommended that you do not ride your Hover-1 Buggy in wet weather, as there are electronic components in your scooter that may be damaged if...
- Page 17 2. Due to the particularity of the product, the assembly pieces are to be checked before every ride to avoid an accident while riding. 3. Do not make sharp turns as you may drift and over-turn the Hover-1 Buggy, which can result in injury to yourself and/or damage the unit.
- Page 18 RIDING YOUR HOVER-1 BUGGY Ensure your Hover-1 Buggy is fully assembled and correctly installed onto your scooter with all straps and screws secured in place. Ensure your scooter is properly maintained as well. Failure to do so may result in serious bodily harm or death and damage to the unit.
- Page 19 Manufacturer's warranty is non-transferable. And this warranty is limited to the original purchaser only. * You must be able to prove the date of original purchase of the Buggy with a dated receipt. * Warranty period begins on date of purchase, not date of rst use.
- Page 20 *The manufacturer will not take any responsibility if the failure of the unit has resulted from accident, abuse, misuse, or any unauthorized repair, modi cation or disassembly. * Modi cation and repair of the Buggy should be done by authorized and quali ed service personnel or manufacturer.
- Page 21 2) Hover-1 will try to diagnose and solve your problem. If it is determined that a warranty claim exists, you will be given an RMA number (Return Material Authorization) and will be asked to send the product to Hover-1.
- Page 22 If Hover-1 agrees to provide a service outside the warranty, the customer will be invoiced for all repair and transport costs. Hover-1 will not accept any packages that have not rst been approved by Hover-1 by means of an RMA (Return Material Authorization).
- Page 23 Facebook.com/hover1tranz @hypehover_1...
Need help?
Do you have a question about the Buggy and is the answer not in the manual?
Questions and answers