Advertisement
Advertisement
Table of Contents

Related Manuals for Hover-1 RIDER


Summary of Contents for Hover-1 RIDER
- Page 1 E L E C T R I C S C O O T E R OP ERATI O N M A NUA L HY - R IDR...
- Page 2 HELMETS SAVE LIVES! Always wear a properly tted helmet that complies with CPSC or CE safety standards when you ride your scooter. Correct Fitting: Make sure your helmet covers your forehead. Incorrect Fitting: Forehead is exposed and vulnerable to serious injury.
- Page 3 WARNING As with all mechanical components, the Hover-1 Rider is subjected to wear and high stresses. Di erent materials and components may react to wear or fatigue in di erent ways. If the design life of a component has been exceeded, it may suddenly fail possibly causing injuries to the rider.
- Page 4 INTRODUCTION This manual is designed to give you the information you need for the safe operation and maintenance of your Rider. Please read it thoroughly before riding your Rider. WARNING Make sure you read this complete manual before riding your Hover-1 Rider.
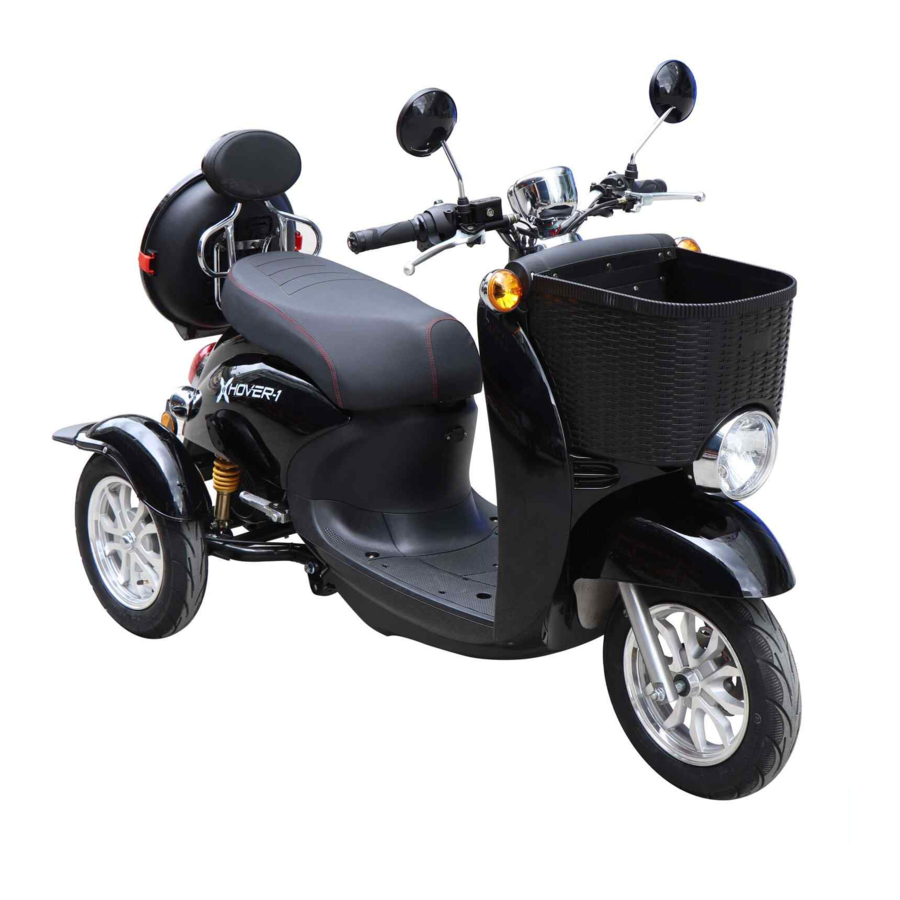
- Page 5 HOVER-1 RIDER DIAGRAM FEATURES/PARTS 1. Rear-view Mirror 2. Throttle 3. Storage Compartment 4. Seat 5. License Plate Holder 6. Shock 7. Front Brake Lever 8. Turn Signal 9. Charge Port 10. Meter Display 11. Rear-view Mirror 12. Rear Brake Lever 13.
-
Page 6: Specifications
5. Forward / Reverse Switch 11. Horn 6. Front Brake 12. Speed Adjustment Button 13. Throttle SPECIFICATIONS Model: Hover-1 Rider (HY-RIDR) Load: 286.6 lbs (129 kg) Max Speed: Up to 15 mph (24.1 km/h) Max Distance Range: Up to 27.96 miles (45 km) Max Incline Angle: 20°... -
Page 7: Controls And Display
IGNITION 1. TURNING ON SCOOTER Turn key clockwise to “START” to turn on scooter engine. 2. TURNING OFF SCOOTER To turn scooter o , turn the key to “OFF.” 3. OPEN SEAT Turn key to “OPEN” to unlock seat cover and open. 4. -
Page 8: Seat Compartment
SEAT COMPARTMENT Your Rider comes with a seat compartment for extra storage and to house your battery. To access the seat compartment simply put the key in the ignition and turn it to “OPEN.” Beneath the storage area, you will nd the: 1. - Page 9 2. Attach the rear-view mirrors by screwing the mirrors (with posts) into the grommets shown in the diagram below. CHARGING YOUR RIDER • Locate the charging port underneath the front end of the seat. • Lift the charging port ap to reveal the charging port.
- Page 10 CAUTION Only use the enclosed charging cable and charger to charge your Rider. Using any other unauthorized charger may damage your Rider. • Make sure that there is no dust, debris or dirt inside the port. • Locate the charge cable and plug the male end into a grounded wall outlet.
-
Page 11: Battery Care
• When charging the device, only use the enclosed Hover-1 charging cable assigned to this device. • Do not connect or attach the device or the battery to a power supply plug or directly to a car’s cigarette lighter. - Page 12 • Lithium-ion batteries are considered to be hazardous materials. Please follow all local, state and federal laws in regards to recycling, handling and disposing of Lithium-ion batteries. WARNING SEEK IMMEDIATE MEDICAL ATTENTION IF YOU ARE EXPOSED TO ANY SUBSTANCE THAT IS EMITTED FROM THE BATTERY.
-
Page 13: Before Riding
PRE-RIDE HOVER-1 Rider CHECKLIST Ensure that your Hover-1 Rider is in proper working order each and every time you ride. If a part of the Hover-1 Rider does not function correctly, please contact our Customer Support Center. • Always wear a helmet that meets CPSC or CE safety standards. In the event of an accident, a helmet can protect you from serious injury and in some cases, even death. - Page 14 Rider. • Ensure your tire pressure is at 30 psi (210kpa) before riding. • Ensure the battery is fully charged before riding your Rider.
-
Page 15: Safety Precautions
SAFETY PRECAUTIONS • If the Hover-1 Rider is not to be used for an extended period of time, you may need to recharge the battery every 2 months to maintain the battery life. • Ensure that the screws on the front and back tires are locked rmly before each ride. - Page 16 Hover-1 is not liable for tickets or violations given to riders who do not follow these regulations. • Always wear a helmet that meets CPSC or CE safety standards. In the event of an accident, a helmet can protect you from serious injury and in some cases, even death.
- Page 17 • Always keep both hands rmly on the handlebars. • Do not ride “double” with more than one adult rider on the seat. • Avoid riding in large groups, as this can force you to ride too close to other riders, making it di icult to see other vehicles and road hazards.
- Page 18 • Do not ride while intoxicated or while taking medications which can make you drowsy. • When approaching a descent, decrease your speed. • Do not abuse your Hover-1 Rider. Always look ahead to avoid and anticipate any upcoming obstacles. The distance of any upcoming obstacles will vary...
- Page 19 WARNING There may be additional risk to injury if you use your scooter incorrectly. This includes, but is not limited to: • Jumping your scooter • Riding over debris or obstacles • Performing stunts • Riding in o -road terrain •...
-
Page 20: Operating Conditions
OPERATING CONDITIONS FAILURE TO FOLLOW ANY OF THE FOLLOWING SAFETY PRECAUTIONS CAN AND MAY LEAD TO DAMAGE TO YOUR DEVICE, VOID YOUR MANUFACTURER WARRANTY, LEAD TO PROPERTY DAMAGE, CAUSE SERIOUS BODILY INJURY, AND CAN LEAD TO DEATH. OPERATING YOUR DEVICE Make sure the device is fully charged before the rst initial use. - Page 21 • Speed and Riding Style: Maintaining a moderate and consistent speed while riding produces maximum distance. Traveling at high speeds for extended periods, frequent starts and stops, idling and frequent acceleration or deceleration will decrease overall distance. WARNING Any scooter that does not work properly can cause you to lose control and fall.
- Page 22 RIDING YOUR RIDER After reviewing the pre-ride checklist, follow the steps below to begin riding your Rider. 1. Ensure parking brake is o . The Parking Brake is located on the left-hand brake. The tab holds tension in the brake lines to keep the unit stationary when not in use.
- Page 23 5. Turn the Throttle towards yourself slowly. The Hover-1 Rider will begin to move forward. 6. When the Hover-1 Rider begins to move forward, put your feet in front of you on the Foot Rest. Your speed will be determined by the...
- Page 24 7. To stop your Rider, release the throttle and squeeze to apply your Front & Rear Brakes with both hands slowly until you reach a complete stop. *Do not attempt to stop suddenly as this may lead to injury or damage to your brake discs.
-
Page 25: Care And Maintenance
• Do not let the device fall from high places, as doing so may damage the internal circuitry. • Do not attempt to disassemble the device. • Use only the charger provided by Hover-1. WARNING Avoid using water or other liquids for cleaning. -
Page 26: Warranty
WARRANTY For warranty information, please visit us at: www.hover-1.com Affix Serial Number Label Here: HOVER-1 COPYRIGHT © ALL RIGHTS RESERVED. DGL Group, Ltd. 195 Raritan Center Parkway. Edison, NJ 08837. USA. - Page 27 DESIGN Hover-1 Rider is designed to be easily controlled, providing a safe, stable form of travel. The built-in rechargeable battery allows you to power up whenever you travel . The ultra bright LED headlight and brake lights provide safety as you explore your surroundings. The Rider requires 13 hours of charging for a full charge.
Need help?
Do you have a question about the RIDER and is the answer not in the manual?
Questions and answers
I need front tire for hover1 where can I purchase one?