Table of Contents
Advertisement
Quick Links
Protecting Your Digital Assets
Forensic Labdock
User Manual
Features
• Easy attachment and write-blocked access to 2.5" and 3.5" IDE/PATA and SATA hard
drives.
• Write-blocked access to USB thumb drives (U5 model only).
• Access SAS drives via a RedPort
only).
• Convenient storage cubby keeps your drives out of the way during imaging. A quiet fan
keeps the cubby cool.
• Recognizes and reports the presence of a hidden area (HPA or DCO) on the hard drive.
Included software utility can be used to configure the Forensic LabDock to handle these
hidden areas in the way you prefer.
• Eight labeled LED indicators report real-time operational status.
TM
™
SAS write-blocked PCIe host bus adapter (S5 model
™
S5 and U5
Wiebetech Branding
ABCDEFGHIJKLMNOPQRSTUVWXYZ
Univers 73 Black Extended
abcdefghijklmnopqrstuvwxyz
Product Name:
2c85m76y
66c7m7y
PMS 711C
PMS 299C
Advertisement
Table of Contents

Related Manuals for CRU Forensic Labdock S5


Summary of Contents for CRU Forensic Labdock S5
- Page 1 Protecting Your Digital Assets Forensic Labdock S5 and U5 ™ User Manual Features • Easy attachment and write-blocked access to 2.5” and 3.5” IDE/PATA and SATA hard drives. • Write-blocked access to USB thumb drives (U5 model only). • Access SAS drives via a RedPort SAS write-blocked PCIe host bus adapter (S5 model ™ only). • Convenient storage cubby keeps your drives out of the way during imaging. A quiet fan keeps the cubby cool. • Recognizes and reports the presence of a hidden area (HPA or DCO) on the hard drive. Included software utility can be used to configure the Forensic LabDock to handle these hidden areas in the way you prefer. • Eight labeled LED indicators report real-time operational status. Wiebetech Branding ABCDEFGHIJKLMNOPQRSTUVWXYZ abcdefghijklmnopqrstuvwxyz Product Name: 2c85m76y 66c7m7y Univers 73 Black Extended PMS 711C PMS 299C...
-
Page 2: Table Of Contents
Forensic LabDock S5 and U5 User Manual TABLE OF CONTENTS 1 PRE-INSTALLATION STEPS 1 Pre-Installation Steps 1.1 PACKAGE CONTENTS 1.1 Package Contents The following list contains the items that are included in the 1.2 Identifying Parts complete configuration for this device. Please contact CRU if 1.3 LED Behavior any items are missing or damaged: 1.4 Warnings and Notices 2 Installation Steps Accessories Model Model 2.1 Configure HPA/DCO Mode Forensic LabDock 2.2 Install the Forensic LabDock Into Your Computer 4-pin Legacy Molex power cable 2.3 Connecting Hard Drives to the Forensic LabDock IDE cable for 3.5” drives (40-pin to 40-pin) 2.3.1 SATA Hard Drives SATA data/power connector 2.3.2 IDE (PATA) Hard Drives USB A-type to B-type cable with bracket 2.3.3 SAS Hard Drives (Available only on S5 models) USB B-type to 10-pin header cable 2.3.4 USB Thumb Drives (Available only on U5 models) -
Page 3: Led Behavior
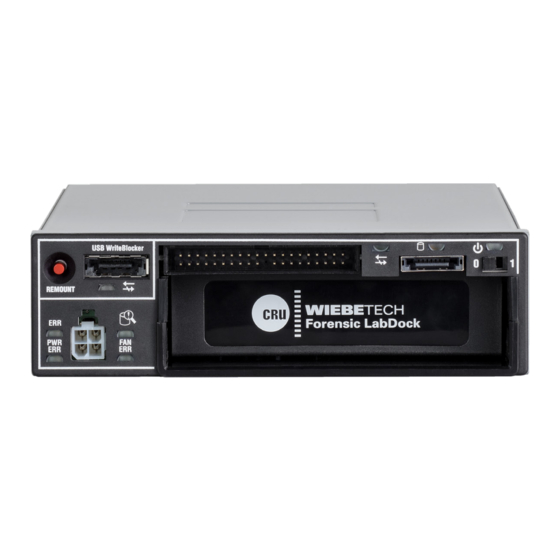
Forensic LabDock S5 and U5 User Manual REAR OF THE S5 FLDs MODEL 1.3 LED BEHAVIOR COLOR STATE DESCRIPTION SATA Data Connector SATA & PATA For Front SATA/IDE Firmware The Forensic LabDock Power Green Solid Connections Configuration Port is powered on. Solid or The attached drive is Drive Activity Amber Blinking being accessed. The attached drive has reached 131°F/55°C, Error Solid... -
Page 4: Installation Steps
Forensic LabDock S5 and U5 User Manual • Before starting any type of hardware installation, please ensure that all power switches have been turned off and all power cords have been disconnected to prevent personal injury and damage to the hardware. 2 INSTALLATION STEPS STOP! The Forensic LabDock requires a SATA data connection inside your computer. The U5 model also requires a USB data connection for the write-blocked USB port, and the S5 model requires a SAS connection to a RedPort SAS write-blocked PCIe host bus adapter (HBA). If you do not already have the necessary connectors inside of your computer, you must add an HBA card with the appropriate connectors into an empty expansion slot inside your computer. 2.1 CONFIGURE HPA/DCO MODE The Forensic LabDock gives you the ability to select the way hidden areas on hard drives (HPAs and DCOs) are handled. The Forensic LabDock will only notify you by default of the presence of these hidden areas by blinking the HPA/DCO LED indicator. Other modes allow you to view the information in these hidden areas. To change modes, follow the steps below. If the default behavior is satisfactory, continue to Section 2.2. a. Connect a USB cable from your computer to the “SATA & PATA Firmware Config only” USB port on the rear of the Forensic LabDock. You may find this easiest to do before installing the Forensic LabDock inside a computer. b. Connect a SATA power cable from the computer’s power supply to the rear of the Forensic LabDock. c. Flip the power switch to the 1 position to power the Forensic LabDock on. d. Download and install the Forensic Software Utility—a free software application designed for use with the Forensic LabDock: www.cru-inc.com/support/software-downloads/forensic-software-utility/ e. Open the Forensic Software Utility and navigate to the HPA/DCO Behavior tab. -
Page 5: Connecting Hard Drives To The Forensic Labdock
Forensic LabDock S5 and U5 User Manual For USB, there are three ways to connect: • If your motherboard has an available 10-pin USB header, use the “USB B-type to 10-pin header” cable. • Use a USB B-type to B-type cable to connect to a USB host card. • Use a USB B-Type to A-type cable and attach the A-type end to an available USB port on your com- puter. For SATA: • Connect a SATA data cable to the rear of the Forensic LabDock and the other end to an available port on your write-blocked RedPort SAS HBA card. STOP! Connecting the pass-through port to any host other than a RedPort card will result in the corre- sponding front panel port becoming read/write rather than write-blocked. e. Use the provided screws to secure the Forensic LabDock into the 5.25” drive bay. NOTE Using screws other than the provided mounting screws may put pressure on the drive cubby, making it difficult to insert and remove drives from it. Always use the provided mounting screws where pos- sible. Your Forensic LabDock is now ready to use! 2.3 CONNECTING HARD DRIVES TO THE FORENSIC LABDOCK 2.3.1 SATA Hard Drives a. Insert the hard drive into the cubby. Face the power and data connection side outward. -
Page 6: Sas Hard Drives (Available Only On S5 Models)
Forensic LabDock S5 and U5 User Manual 2.3.3 SAS Hard Drives (Available only on S5 models) a. Insert the hard drive into the cubby. Face the power and data connection side outward. b. Attach the included SATA data/power connector to the rear of the drive. c. Connect the 4-pin power cable on the SATA data/power connector to the power port on the front of the Forensic LabDock. d. Connect the eSATA data cable of the SATA data/power connector to the “SAS Pass Thru” port above the 4-pin legacy Molex power port on the front of the Forensic LabDock. e. Flip the power switch to the 1 position to power the Forensic LabDock on. 2.3.4 USB Thumb Drives (Available only on U5 models) a. Plug the device into the “USB WriteBlocker” port on the front of the Forensic LabDock. b. If the device has an On/Off switch, turn it on. -
Page 7: Hotswapping With Mac And Windows Operating Systems
Forensic LabDock S5 and U5 User Manual 3 HOTSWAPPING WITH MAC AND WINDOWS OPERATING SYSTEMS 3.1 MAC OS X Unmount the volume before powering down the Forensic LabDock by dragging the volume’s icon to the Trash, or by selecting the volume then pressing Command-E. Once the volume has disappeared, turn the Forensic LabDock off. If you are using a SAS or SATA device, CRU recommends using a SAS or SATA host bus adapter (HBA) card that supports hotswapping. Otherwise, Mac OS X will not support hotswapping with SATA devices. If you are connecting a USB device to the Forensic LabDock, swap out the new drive, turn the Forensic LabDock on, and Mac OS X will automatically detect the new drive. 3.2 WINDOWS OPERATING SYSTEMS 3.2.1 Hotswapping a SAS or SATA Device CRU recommends using a SAS or SATA host bus adapter (HBA) card that supports hotswapping in order to easily eject and remount drives. If you have a host bus adapter (HBA) card that supports hotswapping installed, unmount the volume... -
Page 8: Updating Firmware
6 FAQ 6.1 WHAT IS AN HPA AND A DCO? A Host Protected Area (HPA) and Device Configuration Overlay (DCO) are reserved areas on a hard drive that are not accessible by the BIOS or OS. Data can be hidden behind an HPA or DCO. CRU forensic devices can alert you if there is an HPA or DCO so that you are aware of it and can take the necessary steps to retrieve the hidden data. 6.2 WHY IS IT NECESSARY TO UPDATE THE FIRMWARE OF MY CRU FORENSIC DEVICE? Firmware relates to the programs and data that control electronic products. Firmware is enhanced over time, usually to add new features or increase compatibility. Updating firmware can improve the functionality and dependability of your product. If your CRU forensic device is using outdated firmware, CRU’s Configu- rator application can recognize this and implement up-to-date firmware on your device. See Section 4 of this manual for more information. 6.3 MY FORENSIC LABDOCK WORKS GREAT WITH SATA DRIVES BUT I AM HAVING COMPATIBILITY ISSUES WITH IDE/PATA DRIVES. -
Page 9: Technical Specifications
Forensic LabDock S5 and U5 User Manual present. Choose the setting with no slave present. There may be some drives that will not work with either of these settings. The next choice is “Cable Select” . If this does not work, try using no jumpers. If you’re unsure how to change the jumper configuration, check the manual that came: with your hard drive or the manufacturer’s website. Some drives also have the information printed on the label. 6.5 CONTACTING TECHNICAL SUPPORT Still need help? Please contact our Technical Support team through www.cru-inc.com/support. Or call us toll free at (800) 260-9800 or directly at (360) 816-1800. 7 TECHNICAL SPECIFICATIONS Product Models Forensic LabDock S5, Forensic LabDock U5 U.S. Patent No. 8,090,904 eSATA: up to 6 Gbps IDE/PATA: up to 133 MB/s Interface Types & Speeds USB (U5 Model only): up to 480 Mbps SAS (S5 Model only): up to 6 Gbps One (1) eSATA connector Front Data One (1) IDE/PATA connector Connectors One (1) USB/SAS combo connector (only USB is active on the U5 model; only SAS is ac- tive on the S5 model) One (1) write-blocked SATA connector Rear Data One (1) write-blocked USB connector (U5 model only) Connectors... - Page 10 The warranties set forth in this agreement replace all other warranties. CRU expressly disclaims all other warranties, including but not limited to, the implied warranties of merchantability and fitness for a particular purpose and non-infringement of third-party rights with respect to the documentation and hardware. No CRU dealer, agent, or employee is authorized to make any modification, extension, or addition to this warranty. In no event will CRU or its suppliers be liable for any costs of procurement of substitute products or services, lost profits, loss of information or data, computer malfunction, or any other special, indirect, consequential, or incidental damages arising in any way out of the sale of, use of, or inability to use any CRU product or service, even if CRU has been advised of the possibility of such damages. In no case shall CRU’s liability exceed the actual money paid for the products at issue. CRU reserves the right to make modifications and additions to this product without notice or taking on additional liability. FCC Compliance Statement: “This device complies with Part 15 of the FCC rules. Operation is subject to the following two conditions: (1) This device may not cause harmful interference, and (2) this device must accept any interference received, including interference that may cause undesired opera- tion. ” This equipment has been tested and found to comply with the limits for a Class A digital device, pursuant to Part 15 of the FCC Rules. These limits are designed to provide reasonable protection against harmful interference when the equipment is operated in a commercial environment. This equipment generates, uses, and can radiate radio frequency energy and, if not installed and used in accordance with the instruction manual, may cause harmful interference to radio communications. Operation of this equipment in a residential area is likely to cause harmful interference in which case the user will be required to correct the interference at this own expense. In the event that you experience Radio Frequency Interference, you should take the following steps to resolve the problem: Ensure that the case of your attached drive is grounded. Use a data cable with RFI reducing ferrites on each end. Use a power supply with an RFI reducing ferrite approximately 5 inches from the DC plug. Reorient or relocate the receiving antenna. FOR OFFICE OR COMMERCIAL USE Protecting Your Digital Assets For more information, visit the CRU web site. www.cru-inc.com Part Number: A9-000-0047 Rev 1.4 1000 SE Tech Center Drive, Suite 160, Vancouver, WA 98683...
Need help?
Do you have a question about the Forensic Labdock S5 and is the answer not in the manual?
Questions and answers