
Related Manuals for Raleigh Array

Summary of Contents for Raleigh Array
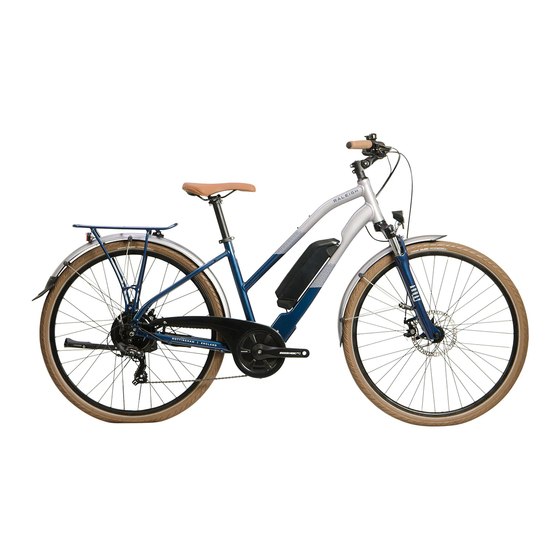
- Page 1 Electrical System Technical Manual Raleigh Array E-Bike Electrical System Technical Manual...
-
Page 2: Table Of Contents
Manual electric system Table of contents Parts overview ............................ 2 Handle bar control ........................... 2 Charger for battery pack under rear rack ................ 3 Handle bar control unit ........................4 Functions of the handle bar control unit ................4 Throttle .............................. -
Page 3: Parts Overview
Parts overview Handle bar control A Handle bar control unit B Throttle C Handbrakes Electrical System Technical Manual... -
Page 4: Charger For Battery Pack Under Rear Rack
Parts overview (continued) Charger for battery pack under rear rack A Charging point B Key C Docking station contact point D Charging plug E Charger F Indicator Electrical System Technical Manual... -
Page 5: Handle Bar Control Unit
Handle bar control unit Functions of the handle bar control unit Switch the peddling assistance on and off Use the on/off button (A) to switch the peddling assistance on and off. You can switch the peddling assistance on and off at any moment, even while cycling. - Page 6 Handle bar control unit (continued) Functions of the handle bar control unit Number of LEDs lit Indication state of charge On battery pack On display 80 - 100% 5x green 60 - 80% 4x green 40 - 60% 3x green 20 - 40% 2x green 0 - 20%...
-
Page 7: Throttle
Throttle The throttle (A) is on the left side of the handle bar control unit. The throttle can be used as soon as the peddling assistance has been switched on. The use of the throttle costs a lot of energy. This affects the range of the e-bike. -
Page 8: Battery Pack And Charger
Battery pack and charger Advice for charging All batteries lose power over time. This process is called ‘self discharge’. If the battery is discharged too much, deep discharge will occur. A deep discharge can cause permanent damage to the battery pack. In order to prevent this situation, follow the charge instructions carefully. -
Page 9: Charge The Battery Pack
Battery pack and charger Charge the battery pack 1. Connect the charger (A) to the mains voltage. 2. Connect the plug (B) of the charger to the contact point of the battery pack (C). 3. When you charge, the light (D) is red. When the battery pack is fully charged the light turns green. -
Page 10: Place Back The Battery Pack Under Rear Rack
Battery pack and charger Place back the battery pack under rear rack • Lock the battery pack (B) with the key (A) for fixing and to prevent theft. Range The range (i.e. the number of kilometres that you can ride with a fully charged battery pack) greatly depends on the pedal assistance setting you use. -
Page 11: Technical Data
Technical data Weight and performance Specification Li-ion battery pack, 36 V Battery pack 317 Wh 418 Wh Weight of battery pack 2.45 kg 2.6 kg Charging time 80% * 3 hours 4.5 hours Charging time 100% 4.5 hours 6.5 hours Capacity 8.8 Ah 11.6 Ah... -
Page 12: Guarantee Conditions And Legal Requirements
Guarantee conditions and legal requirements The supplier of the battery pack will give a guarantee for any material or construction faults concerning the battery pack if the following conditions are met: You only have a right to the guarantee if you can provide a certificate of guarantee or a receipt. The guarantee period commences on the day of purchase. - Page 13 Raleigh Array/Emotion – Removing front wheel and checking connections To allow the cabling on the Array models to be as neat as possible all the connections for the front of the bike (motor, throttle and display unit) are concealed in the down tube.
- Page 14 Alignment of the Raleigh Array chain ring sensor (Derailleur bike) 1. Check the sensor is positioned parallel to the chain ring. If the sensor is not parallel to the chain ring adjust accordingly. 2. Adjust the bracket by loosening the prop stand and sliding the bracket until the sensor is approximately 1mm away from the chain ring.
- Page 15 Alignment of the Raleigh Array chain ring sensor (Hub gear bike) 1. Check the sensor is positioned perpendicular to the chain ring. If the sensor is not perpendicular to the chain ring adjust accordingly. 2. Adjust the bracket by removing the prop stand, loosening the two fixing screws and sliding the bracket until the sensor is approximately 1mm away from the chain ring.
Need help?
Do you have a question about the Array and is the answer not in the manual?
Questions and answers