Table of Contents
Advertisement
Advertisement
Table of Contents

Related Manuals for Turbolock YL-99


Summary of Contents for Turbolock YL-99
- Page 1 USER MANUAL Model: YL-99...
- Page 2 For more information, please visit: www.turbolock.com Customer Service: 855-850-8031...
-
Page 3: Table Of Contents
Table Of Contents 5.4 Deleting The User Codes ........8 Section 1. Safety Warnings and Guidelines .... 3 Section 6. Passage Code Information & 1.1 Disposal at End of Life ........3 Instructions ............6 Section 2. Features & General Information ..... 4 6.1 General Passage Code Information ....6 2.1 Features ............ -
Page 4: Section 1. Safety Warnings And Guidelines
It is important that you follow all instructions and regard all notes that appear throughout this manual . Consult this manual before you attempt to use your TURBOLOCK YL-99 Digital Door Lock. If you have questions not answered by this manual, contact TURBOLOCK customer service. -
Page 5: Section 2. Features & General Information
• Low battery warning indication 2.2 General Information The YL-99 electronic lock is capable of storing up to 10 codes: 1 master code, 1 passage code, and 8 user codes. All codes are allocated a starting number or sequence number. The starting num- bers are as follows, ‘0’... -
Page 6: Section 3. Additional Information
Section 3. Additional Information 3.1 Battery Information The lock requires four ‘AAA’ alkaline batteries which are housed in the internal handle. The lock has a low battery indicator which, when unlocking the door, will sound a continuous beep followed by a single beep. New batteries should be installed as soon as possible after receiving any low battery indication. -
Page 7: Instructions
Section 4. Master Code Information & Instructions 4.1 General Master Code Information The following information applies to your YL-99’s master code: • The master code is the most important code in the series as it is needed to set up all other codes. -
Page 8: Setting The User Codes
• The sequence numbers for the user codes are ‘1-8’, therefore you must ensure the fi rst digit of each user code is any number from ‘1-8’. The remainder may be any combination of digits from ‘0-9’. • To unlock the lock with a user code, enter the code beginning with a number ‘1-8’ and press the ‘#’... -
Page 9: Deleting The User Codes
Section 6. Passage Code Information & Instructions After the passage code is set, the YL-99 may be set to passage mode by entering the passage code. In passage mode, all users can press any key to open the door without requiring a code. -
Page 10: Setting The Passage Code
• To unlock the lock, enter the code beginning with a number ‘1-8’ and press the ‘#’ key. The lock will emit sound and the green indicator will light up. While sound emits, the lock is unlocked and will return to the locked position immediately after the sound stops. •... -
Page 11: Entering Passage Mode
6.4 Entering Passage Mode In this mode, any digit ‘0-9’ may be used to open the lock. 1. Enter the Passage Code then press ‘#’. 2. After the beep stops and before the blue backlight goes off, press ‘*’ then ‘#’ in quick succession. The lock will emit several beeps to confirm Passage Mode is active. -
Page 12: Hard Reset
Once all user codes are erased, only the master code will be able to operate the lock. 7.2 Hard Reset If needed, a hard reset may be performed on the lock to erase all codes including the master code. After a hard reset, the master code will return to its default ‘0123’ and all other codes will have been erased. -
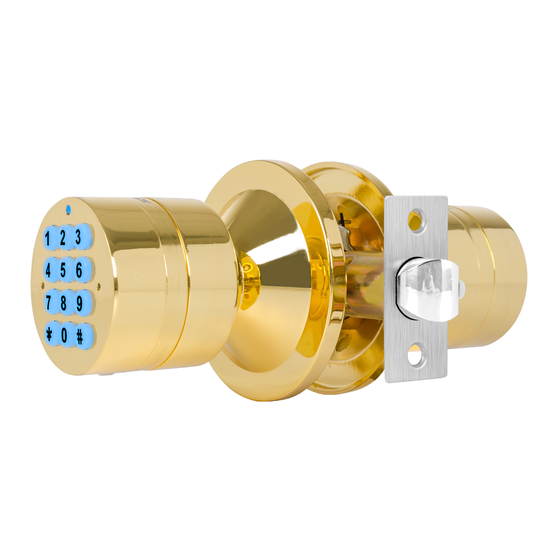
Page 13: Section 9. Lock Components
Section 9. Lock Components... -
Page 14: Section 10. Install Instructions
Section 10. Install Instructions Step 1. Mark Door Step 3. Install Latch Using template, Insert latch into hole and mark hole on both mark a line around edge sides of door at of latch plate and remove required backset, latch. (Fig. 3a) then mark latch hole on door edge. - Page 15 Step 4. Install Strike Step 6. Install Inside Knob Close door and mark horizontal centre of latch on to door frame. Mark vertical line where door edge meets frame and measure in half of door thickness to find vertical centre. hole in knob and guide (Fig.
-
Page 16: Section 11. Faq
In order to perform a hard reset, you must have access to the back of the door. (Refer to Section 7) If none of the above information resolves your issue, please visit our website at: www.TURBOLOCK.com or contact customer support: 855-850-8031. -
Page 17: Section 12. Warranty Information
Section 12. Warranty Information One Year Limited Hardware Warranty Your TURBOLOCK YL-99 Digital Door Lock (“Product”) includes a One Year Limited Hardware Warranty (“Warranty”). The Warranty covers product defects in materials and workmanship under normal use. This Warranty is limited to residents of the United States and Canada only and is available only to original purchasers. - Page 18 This Warranty does not cover any damage due to: (a) transportation; (b) storage; (c) improper use; (d) failure to follow the product instructions or to perform any preventive maintenance; (e) modifications; (f) unauthorized repair; (g) normal wear and tear; or (h) external causes such as accidents, abuse, or other actions or events beyond our reasonable control.
- Page 19 www.turbolock.com...
Need help?
Do you have a question about the YL-99 and is the answer not in the manual?
Questions and answers