Table of Contents
Advertisement
Quick Links
Download this manual
See also:
Installation Manual
Advertisement
Table of Contents

Subscribe to Our Youtube Channel
Related Manuals for VOGELS PFW 6870


Summary of Contents for VOGELS PFW 6870
- Page 1 PFW 6870 Video Wall Pop-Out Module INSTALLATION INSTRUCTIONS 9541-000-Z00-01...
-
Page 2: Table Of Contents
PFW 6870 Contents Weight Limit................................2 Warning Statements..............................2 Installation Tools............................... 3 Parts List................................... 3 Features................................... 5 Installing the Mount..............................6 Introduction..............................6 Installing Optional Model Specific Spacers ......................8 Installing the Mounting Brackets..........................9 Selecting the Mounting Hardware. -
Page 3: Installation Tools
1/4˝ Drill Bit ½˝ Socket Socket Wrench Level Phillips Head Screwdriver Parts List PFW 6870 Video Wall Pop-Out Module Assembly Components One-Latch Mounting Base Left and Right Mounting Bracket (Qty 1) (Qty 1 Each) 5 /16˝ Flat Washers Universal Washers Thread Depth Indicator 3/16"... - Page 4 PFW 6870 Parts List (cont’d) Mounting Hardware M4 x 12mm Screw M6 x 12mm Screw (Qty 6) (Qty 6) M4 x 16mm Screw M6 x 16mm Screw (Qty 6) (Qty 6) M4 x 25mm Screw M6 x 25mm Screw (Qty 6)
-
Page 5: Features
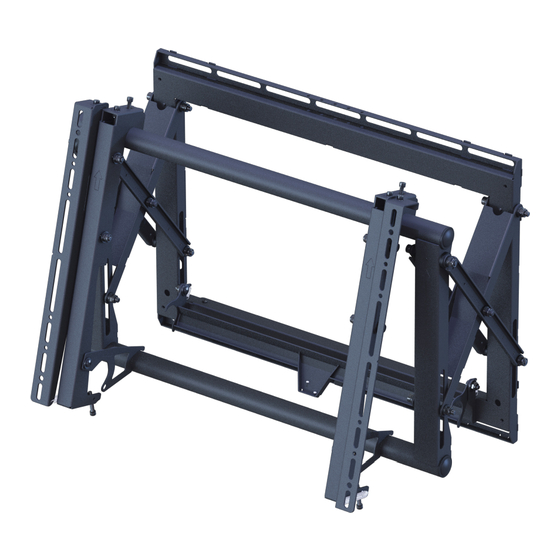
PFW 6870 Features The PFW6870 Video Wall Pop-Out Module is a customizable video wall mounting system featuring multi-monitor stacking, open design, custom spacers and scissor mount extension. It has an extending scissor mount for easy installation, cable management and servicing. Spacers are custom designed for specific flat-panels. -
Page 6: Installing The Mount
PFW 6870 Installalation Introduction Directional Mounting Arrow The Directional Mounting Arrow stamped into the PFW 6870 mount indicates which edge is the top. Mounting Safety Two people are recommended to install the mount. Step 1 You must secure the mount to two (2) wall studs with four (4) lag bolts (2 lag bolts for each stud found). - Page 7 PFW 6870 Installalation Step 4 1) Place the mount against the wall and align it with the pilot hole. 2) Insert one (1) ˝ x 3˝ lag bolt and one (1) ˝ washer into the upper right pilot hole. 3) Use a socket wrench and a ½˝ socket to tighten the lag bolt.
-
Page 8: Installing Optional Model Specific Spacers
5. To install multiple rows, place spacer between previously installed PFW 6870s on the bottom row. Make sure the spacer is plumb and level, mark the corners (or secure to the wall) to be sure of where the PFW 6870 should be and secure your mount to the wall. -
Page 9: Installing The Mounting Brackets
PFW 6870 Installing the Mounting Brackets Selecting the Mounting Hardware 1) Insert a small straw or toothpick into the threaded inserts found on the back of the flat-panel. 2) Use a pencil to mark the depth of the threaded insert on the small straw or toothpick. -
Page 10: Universal Washer Installation
PFW 6870 Installing the Mounting Bracket (cont’d) Universal Washer Installation Vogel's’ Universal Washers are designed to accommodate the various M4, M5, M6 and M8 hole M5, M6 sizes required by flat-panels. Do not place excessive pressure on the back of the flat-panel, as this may damage your flat-panel. -
Page 11: Attaching The Mounting Brackets To The Flat-Panel
PFW 6870 Installing the Mounting Brackets (cont’d) Attaching the Mounting Brackets to the Flat-Panel This section presumes that you have read and understood thes "Selecting the Proper Mounting Hardware" section. 1) Place your flat-panel screen-side down on a soft, flat surface. -
Page 12: Locking Safety Screw Installation
(1 per Bracket) Do not overtighten the locking safety screws. Proceed to the “Post-Installation Adjustments” below. Post-Installation Adjustments The PFW 6870 has a set of post-installation adjustments on each mounting bracket (Figure 1). See Note Use Allen key (supplied) to fine-tune adjust. - Page 13 PFW 6870 Post-Installation Adjustments (cont'd) Tilt Left Left Control Right Control Tilt Right Left Control Right Control Tilt Up Left Control Right Control Tilt Down (from tilted-up position) Left Control Right Control Installation Instructions Page 13...
- Page 14 PFW 6870 Post-Installation Adjustments (cont'd) Level Up Left Control Right Control Level Down (from leveled up position) Left Control Right Control Rotate Left Left Control Right Control Rotate Right Left Control Right Control Page 14 Installation Instructions...
-
Page 15: Maintenance And Servicing
PFW 6870 flay Maintenance and Servicing 1) Push evenly in the front of the PFW 6870 to release the single latch spring lock(Figure 1). 2) Slowly pull the front of the PFW 6870 to extend the scissor arms (Figure 2). -
Page 16: Technical Specifications
PFW 6870 vvvvv Technical Specifications All measurements are in inches [millimeters]. 734.03 734.03 734.03 28.90 28.90 28.90 23.62 23.62 23.62 15.81° 15.81° 15.81° 494.51 494.51 494.51 463.50 463.50 463.50 466.80 466.80 466.80 19.47 19.47 19.47 18.25 18.25 18.25 18.38 18.38 18.38...
Need help?
Do you have a question about the PFW 6870 and is the answer not in the manual?
Questions and answers