Table of Contents
Advertisement
Quick Links
Advertisement
Table of Contents

Related Manuals for Siemens EH70S501E


Summary of Contents for Siemens EH70S501E
- Page 1 EN Instruction manual...
-
Page 3: Table Of Contents
Table of contents Important information ..... . . Before switching on your appliance ... . . Safety precautions . - Page 4 Table of contents Cooking timer ....... Automatic time limiter ..... . . Switching off input confirmation .
-
Page 5: Important Information
Important information Read these instructions carefully. Only after read ing these will you be able to operate the appliance correctly. Please keep the use and installation instructions in a safe place. If the appliance is passed to another per son, please enclose the instructions. Before switching on your appliance Transport damage... - Page 6 Cooking and heating food During their cooking, food such as stews, soups, sauces or drinks may heat up too quickly without any indication, spilling out of the cookware. It is therefore advisable to heat this type of food gently, selecting a suitable power level and stirring the contents before and during cooking.
- Page 7 Do not place metal objects Do not leave lids or other large metal objects on the on the induction hob hotplate. If the appliance is switched on by mistake, these objects will heat up very quickly and could cause burns. Taking care of the cooling This hob comes with a cooling fan mounted underneath.
-
Page 8: Reasons For Damage
Reasons for damage Never use the hob instead of the kitchen unit worktop as a support or work surface. Saucepan and pan bases Rough pan bases scratch the glass ceramic. Check your ovenware. It is very important that cookware placed on an acti vated hob has liquid or food inside of it. - Page 9 Examples of possible The following damage does not affect the damage performance or strength of your hob. Presence of stains Formed by spilled or melted sugar or food with a high sugar content. Scratches Due to salt, sugar, grains of sand or irregularities in the base of the saucepans.
-
Page 10: Familiarising Yourself With The Appliance
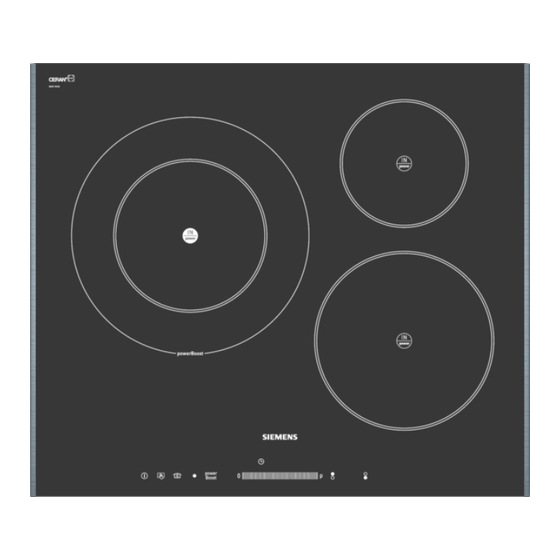
Familiarising yourself with the appliance This section describes the control panels, hotplates and displays. They are shown by appliance model. The instruction manual applies to various hobs. On page 2 you will find an overview of models with dimensions. The control panel Displays for heat setting 1 9 operational readiness -... -
Page 11: The Hotplates
Always keep the control panels clean and dry. Moisture and dirt may impair function. The Hotplates Select the appropriate hotplate. Single cooking zone The size of the pan should be the same as that of the hotplate. In the Suitable pans" section we recommend two types of pans for induction cooking. -
Page 12: The Cooking With Induction
The cooking with Induction What is induction cooking? Induction cooking constitutes a radical change in the traditional form of heating, given that the heat is generated directly in the pan, keeping the cooking surface cold. Therefore, it has a number of advantages over other cooking methods: Greater speed in cooking As the pan is heated directly and not the glass, the... -
Page 13: Main Switch With Childproof Lock
Only ferromagnetic pans are suitable for induction cooking. These can be of enamelled steel, cast iron or special stainless steel utensils for induction cooking. You must never use normal stainless steel, glass, ceramic, copper or aluminium pans. Check that your pans are attracted by a magnet to find out if they are suitable. -
Page 14: Childproof Lock
Childproof lock To prevent children from switching on the hotplates, you can secure the hob against being switched on inadvertently. The childproof lock remains permanently activated. Switch on the hob using the @ main switch. Activating the childproof lock Set all hotplates to heat setting 2. Switch off the hotplates, one by one, starting with the bottom right hotplate and anticlockwise. -
Page 15: Cooking
Cooking This section informs you how to set the hotplates. The table shows heat settings and cooking times for various meals. The tips that follow help you to save energy. Set the required heat setting in the control panel. Control panel Heat setting 1 = lowest power level Heat setting 9 = highest power level. -
Page 16: Table
Changing the heat setting Select the hotplate and set the new heat setting within 5 seconds. Select the hotplate and set it to 0. Switching off the hotplate The hotplate is switched off, and the residual heat display appears after approximately 5 seconds. Note If only one hotplate is in use, you can control it without first selecting it. - Page 17 Amount Heat setting 9 Ongoing Ongoing cooking cooking time Cooking Rice (with double the amount of water) 125 g 250 g 2 4 mins 2 3. 15 30 mins Rice pudding (500 ml 1 litre milk) 125 g 250 g 3 5 mins 25 35 mins Potatoes boiled in their skins...
-
Page 18: Tips On Saving Energy
Tips on saving energy Use saucepans and pots with thick, even bases. Uneven bases increase the cooking time. The correct saucepan size Select the correct saucepan size for each hotplate. The diameter of the bases of the saucepans and pots should match the size of the hotplate. -
Page 19: Powerboost Function
How to deactivate it Follow these steps: Select the hotplate. Touch symbol •. The C disappears in the visual display and the function will have been deactivated. Powerboost function Use this function to heat up the contents of the pan faster than if you use the maximum power level (j). -
Page 20: Using Powerboost Function In Hotplate 2
How to deactivate it Carry out the following steps: Select the cooking zone. Touch the programming zone situated next to the symbol P. The x will no longer be displayed. The Powerboost function has been deactivated. Using Powerboost function in hotplate 2 This function can only be activated when the outer zone is working and cooking zones 3 and 4 are not... -
Page 21: Timer Function
Timer function This function can be used in two different ways: - to switch a hotplate off automatically - as a cooking timer A hotplate is to switch off Enter a cooking time for the relevant hotplate. When the cooking time has elapsed, the hotplate switches automatically off automatically. -
Page 22: Cooking Timer
Touch the j symbol repeatedly until the correct 1 Changing the cooking time indicator starts to flash. Reset. Touch the j symbol repeatedly until the correct 1 Cancelling prematurely indicator starts to flash. Touch control panel 00. Notes If you would like to call up the remaining cooking time for a hotplate: touch the j symbol repeatedly until the 1 indicator for the relevant hotplate begins to flash. -
Page 23: Automatic Time Limiter
Automatic time limiter If a hotplate is in constant use for a long time without the setting being changed, the automatic time limiter will be activated. The hotplate heating is interrupted. An F and an 8 flash alternately in the hotplate indicator. -
Page 24: Control Panel Pause
Control panel pause If you wipe over the control panel while the hob is switched on, settings may be altered. To prevent this, your hob has a control panel pause function. Touch the à symbol. The control panel is locked for 20 seconds. You can now wipe over the control panel without altering any settings. -
Page 25: Cleaning Glass Ceramic
Cleaning glass ceramic Clean the hob after each use. This prevents food from being burnt into the hob surface. Cleaning agents Only use cleaning agents which are suitable for glass ceramic, e.g. CERA CLEAN, cera fix, Sidol for ceran + steel. Water marks can also be removed using lemon juice or vinegar. -
Page 26: Cleaning The Hob Surround
Cleaning the hob surround Only use warm soapy water. Do not use anything which is sharp or abrasive. The glass scraper is unsuitable. The hob surround could be damaged. Neither lemon juice nor vinegar should be used for cleaning the hob surround. This could result in matt patches. - Page 27 The powerboost function The powerboost function operates the hotplate with display flashes and then the most possible power. During long cooking times, switches off it is possible that the function will switch the hotplate off to protect the hob from overheating. You can continue to use the hob if the display is not flashing.
-
Page 28: Normal Operating Noises For The Appliance
Visual Fault Measure indication The power voltage is too Deactivate the hob. Wait a few seconds before connecting low. it again. If the indication continues, contact your electricity supplier. o2/o3 The cooking zone has It has been automatically deactivated to protect your hob. overheated. -
Page 29: Packaging And Old Appliances
Fan noise The electronics require a controlled temperature in order to function reliably. The hob is therefore fitted with a fan which runs at various speeds according to the temperature detected. The fan may also run on once the hob has been switched off if the temperature it detects is still too high. -
Page 30: Acrylamide In Foodstuffs
Acrylamide in foodstuffs Experts are currently discussing how harmful acrylamide is in food. We have compiled this information for you, based on the results of current research. Which foods are affected? Acrylamide is mainly produced in grain and potato products heated at high temperatures, such as potato crisps, chips, toast, rolls, bread, baked goods made from shortcrust pastry (biscuits, gingerbread, cookies). - Page 31 9000257145 (1W06N0) 00 8705...
Need help?
Do you have a question about the EH70S501E and is the answer not in the manual?
Questions and answers