Sign In
Upload
Download
Table of Contents
Contents
Add to my manuals
Delete from my manuals
Share
URL of this page:
HTML Link:
Bookmark this page
Add
Manual will be automatically added to "My Manuals"
Print this page
×
Bookmark added
×
Added to my manuals
Manuals
Brands
MAJORITY Manuals
Radio
A10-CAR-BLK
Instruction manual
MAJORITY A10-CAR-BLK Instruction Manual
Digital radio adapter
Hide thumbs
1
Table Of Contents
2
3
4
5
6
7
8
9
10
11
12
13
14
15
16
17
18
19
20
21
22
23
24
25
26
27
28
29
30
page
of
30
Go
/
30
Contents
Table of Contents
Troubleshooting
Bookmarks
Table of Contents
Table of Contents
What's in the Box
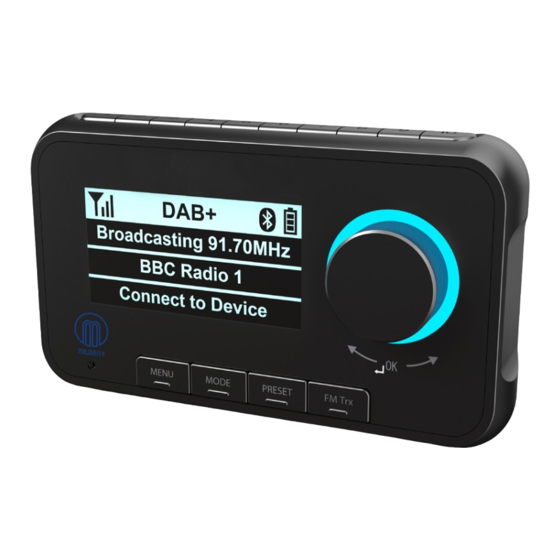
Diagram Control Functions
Support
Installation
Installing the Car DAB/DAB+ Radio Adapter
Navigation Controls
Begin Listening to DAB/DAB
DAB/DAB+ Options
DAB Station Information
Bluetooth Media Function
Bluetooth Contact Function
AUX-In Function
Settings: MENU Button Selection
Troubleshooting Guide
Specifications
Safety Information
Advertisement
Quick Links
1
What's in the Box
2
Installing the Car Dab/Dab+ Radio Adapter
3
Dab/Dab+ Options
4
Bluetooth Media Function
5
Troubleshooting Guide
Download this manual
Digital Radio Adapter
A10-CAR-BLK
Instructions Guide
Table of
Contents
Previous
Page
Next
Page
1
2
3
4
5
Advertisement
Table of Contents
Need help?
Do you have a question about the A10-CAR-BLK and is the answer not in the manual?
Ask a question
Questions and answers
Related Manuals for MAJORITY A10-CAR-BLK
Radio Majority Journey A10 Instruction Manual
Digital radio adapter (30 pages)
Radio MAJORITY Abbey BT Instruction Manual
Digital radio & alarm clock (27 pages)
Radio MAJORITY PETERHOUSE PET-NET-BLK Instruction Manual
(78 pages)
Radio MAJORITY Robinson 2IR User Manual
Internet radio and dab+ adaptor (194 pages)
Radio MAJORITY PEMBROKE Instruction Manual
Internet & digital radio (35 pages)
Radio MAJORITY PEMBROKE II Instruction Manual
Internet radio & music system (37 pages)
Radio MAJORITY Robinson 2IR Instruction Manual
Internet radio and dab+ adapter (204 pages)
Radio MAJORITY Touro User Manual
(132 pages)
Radio MAJORITY PEG-NET-BLK Instruction Manual
(35 pages)
Radio MAJORITY BARTON II Instruction Manual
Digital & fm radio (26 pages)
Radio MAJORITY BARD Instruction Manual
Internet radio music system (24 pages)
Radio MAJORITY Fitzwilliam 2024 User Manual
(42 pages)
Radio MAJORITY Knapwell User Manual
(24 pages)
Radio MAJORITY KINGS KNG-ALL-BLK Instruction Manual
Digital radio music system (38 pages)
Radio MAJORITY Eversden Instruction Manual
Digital shower radio (31 pages)
Radio MAJORITY SHELFORD II SEL-DAB-CRM-2 UK Instruction Manual
Portable digital & fm radio (24 pages)
This manual is also suitable for:
Journey a10
Table of Contents
Print
Rename the bookmark
Delete bookmark?
Delete from my manuals?
Login
Sign In
OR
Sign in with Facebook
Sign in with Google
Upload manual
Upload from disk
Upload from URL


Need help?
Do you have a question about the A10-CAR-BLK and is the answer not in the manual?
Questions and answers