Table of Contents

Related Manuals for Paitec ES5500


Summary of Contents for Paitec ES5500
- Page 1 ES5500 USER MANUAL Pressure Sealer This manual provides detailed information on how to operate and maintain your ES5500. Please read this manual before operating the machine in order to prevent any damage caused by improper handling. Rev. 140306...
- Page 2 Introduction Thank you for purchasing a Paitec USA product Copyright 2014 Any of the contents should not be copied, re-printed or translated by other languages without Paitec USA approval. ES5500 is the registered trademark of Paitec USA - 2 -...
-
Page 3: Table Of Contents
Contents ES5500 Specification ---------------------------------------------- Identifying the Parts --------------------------------------------- Unpacking the Machine --------------------------------------- How to Install the Folding Cassette ----------------------------- Folding Cassette Setting Guide -------------------------------- 9~10 OP Panel Guide ----------------------------------------------- 11~15 Handling of the Forms before Using --------------------------- Paper Jam Removal... -
Page 4: Es5500 Specification
Specification ES5500 Features (Pressure Sealer) Perfect Sealing Quality & Low Noise Level • The most advanced pressure sealing technology with lightweight, excellent sealing quality and extremely low noise levels. • Excellent Folding Quality Excellent folding quality, even with plain paper based on our advanced technology. -
Page 5: Identifying The Parts
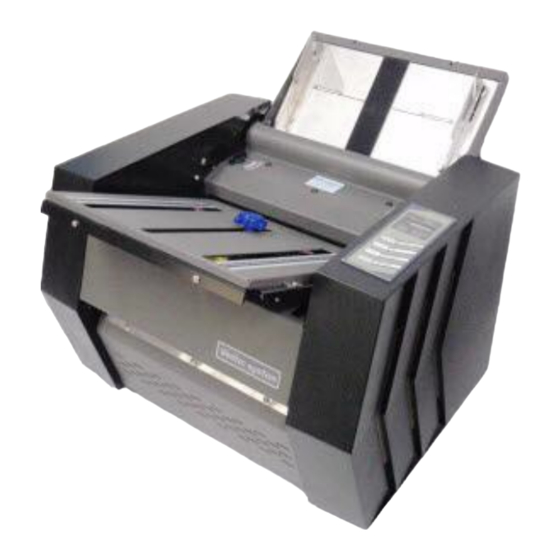
Identifying Parts ① Paper In-feed Guide Fold Adjustment Knob ④ Fold Roller ③ 1 Folding Cover Cassette ⑤ OP Panel ⑦ Output Fold Adjustment ③ 2 Fold Knob Cassette ② Power Socket ⑥ Power Switch - 5 -... - Page 6 Identifying Parts Paper Guide Load the paper into the paper hopper, make sure the paper side guides are nearly touching each side of the paper to guide paper squarely. (Prepare paper by making edges neat before loading) Power Socket Main power socket located on the back of the machine Folding Cassette After 1 folding is made in the 1...
-
Page 7: Unpacking The Machine
Unpacking the Machine Contents Please check the following parts are included in the box. Power Cable, 1 Fold Cassette, 2 Fold Cassette and User manual [Box open] [1st, 2 Cassette & Power cable] * Caution Power connection : Please refer to the label for electric information which is located at the back of the machine. -
Page 8: How To Install The Folding Cassette
How to install the Folding Cassette Adjusting the Fold Cassette Insert the 1 Cassette (pic. 1) on the front and 2 Cassette on the back (pic. 2) Turn the Knob to adjust the fold cassette to the desired paper size (Refer to fold assist label on top of the in-feed tray or in your Users Manual book.) [Pic.1 : 1 Cassette Assemble]... -
Page 9: Folding Cassette Setting Guide
Folding Cassette Setting Guide Folding Cassette Setting Guide How to set “Z-Fold” • Swivel the Knob to counter clockwise and move on 93mm. • Swivel the Knob to clockwise to tight and hold the position. • 2 Cassette is same as 1 Cassette. -
Page 10: Folding Cassette Setting Guide
Folding Cassette Setting Guide 1. Z Fold Setting (letter 8 ½” x 11”) Direction a. Move 1 cassette stopper to 93mm. b. Move 2 cassette stopper to 93mm. Tip1. If A side of paper is shorter, adjust the position of 1 cassette stopper to more longer. -
Page 11: Op Panel Guide
OP Panel Guide Operation Panel INFORMATION 1. An information menu is appeared when the [INFO] button is pressed on the ready state. In this menu, a couple of information about the machine is showed. 2. For moving back to the ready state, press the [INFO] button again. ◀... - Page 12 OP Button / Display Power On Start / Stop Ready Work… Start/Stop If the [Start/Stop] button is clicked one time the machine will be operated. And [Start/Stop] is clicked once more, the machine is stopped. Reset Ready Ready Reset [Reset] : Initialize the working counter & paper thickness . •...
- Page 13 OP Button / Display C Fold Mode C Fold on/off This button is for C fold mode. Beeper sound when it is settled C-fold mode and working count light is off. If you want to cancel for C Fold mode, please push [C fold] button again. DFD Mode Ready DFD (Double Feed Detection) on/off...
- Page 14 OP Button / Display Batch Mode Ready B100 Batch Mode on/off Press [Count] button for activating the batch count function. And press [Count] button once again for deactivating the function. Adjust Batch Count The batch count adjusting menu is appeared through holding the [Count] button. You can change the value by using the [Direction] buttons and confirm the count by holding the [Count] button again.
- Page 15 1) What is the “Information’ menu. In this menu, a couple of information about the machine is showed. And user can check the several settings and information about the ES5500 easily. 2) Menu a) Total Count : The total count of the machine b) Paper Thick : The sensitivity of the DFD function.
-
Page 16: Handling Of The Forms Before Using
Handling of the forms before using. TIP. Handling of the forms before using. 1. Please make the forms to well-arranged. 2. The form has to be set on the paper tray properly. 3. If too many sheets of form are set on the tray (over 150 sheets) it can make feeding problem. -
Page 17: Paper Jam Removal
Paper Jam Removal Paper Jam Removal The paper jam that is occurred in the Officemate 4D can be removed very easily. The machine is stopped automatically when the paper jam is occurred. And the paper jam can be removed by using the jam removal tool. The machine starts to operating when the [Start/Stop] button is pressed after removing the jam. -
Page 18: Handling The Error Message
Handling the Error Messages Handling the Error Messages Double Feed Feed [Detect double feed & [Open the cover and feed jam] remove the jam] Open Cassette Error] [Check 1 Cassette] Open Cassette Error] [Check 2 Cassette] - 18 -... -
Page 19: Operator Maintenance
Operator Maintenance Operator Maintenance Due to the pressure seal forms leaving paper dust, ink and toner residues, it is very important to occasionally clean the surface of the each roller to ensure optimum performance. In case of fold roller, remove 1 folding cassette and separate roller cover. - Page 20 http://www.paitec.com...
Need help?
Do you have a question about the ES5500 and is the answer not in the manual?
Questions and answers