Table of Contents
Advertisement
Advertisement
Table of Contents

Related Manuals for Tru-Test EC-09


Summary of Contents for Tru-Test EC-09
- Page 2 No part of this publication may be photocopied, reproduced, stored in a retrieval system, or transmitted in any form or by any means, electronic, mechanical, photocopying, recording or otherwise without the prior written permission of Tru-Test Limited. Product specifications may change without prior notice. For more information on other quality Tru-Test Group brands and products, visit www.tru-testgroup.com...
- Page 3 Introduction ....................1 Assembly instructions................... 2 Operating the plate meter ................4 Zero calibration ................... 6 Start up/self test ..................8 Entering the factory default formula ............. 9 Other formulas: ................... 9 Entering your own formula ................. 10 Using your plate meter ................11 Taking paddock readings (the pasture walk) ..........
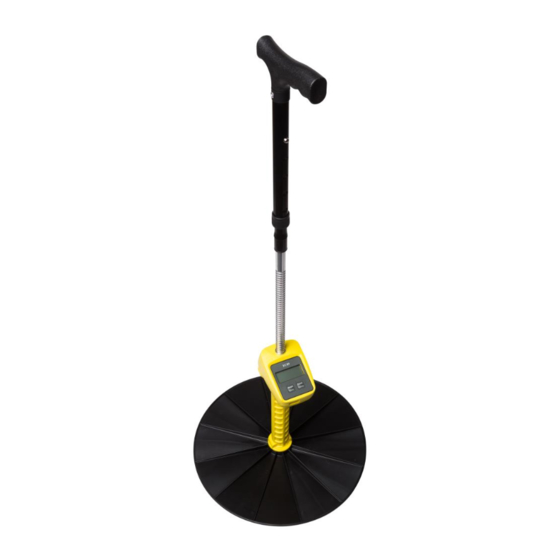
- Page 5 Congratulations on the purchase of your Tru-Test EC-09 Plate Meter (plate meter). This plate meter is a high precision engineered device for measuring the average height of pasture relative to density of the pasture. This is directly relative to the quantity of dry matter present (kilograms of dry matter –...
- Page 6 The plate meter is supplied in three parts: The heavy duty plastic plate sits on top of the pasture to establish average height and density. The area of the circle and weight of the plate have been carefully calibrated. The grooved rod allows pasture to be measured in 0.5 cm intervals (clicks). The yellow shaft includes the electronic meter.
- Page 7 With your other hand, screw on the plate, making sure that the smooth side of the plate is uppermost (ribbed side closest to the meter). Turn the plate meter the correct way up (plate down) and place it on the ground, The grooved rod will protrude out of the shaft.
- Page 8 The plate meter is switched on and off using the black switch at the back of the unit. Off is in the ‘down’ position. When the unit is off, there are no numbers displayed on the LCD screen. The various functions of the plate meter are accessed by the two buttons on the front of the unit, labelled ‘Height/Reset’...
- Page 9 These are activated by a short press of the button. The secondary functions ‘Reset’ and ‘Formula’ are activated by holding the button down until the function operates. When the unit is first switched on, the display will show the current formula in use and the calculated kg DM/ha based on that formula, and any readings in memory.
- Page 10 To ensure that the plate meter accurately measures the compressed height of pasture, the plate meter must be calibrated. This requires setting a base level of zero so measurements can be benchmarked against this. If the plate meter does not return to zero after each reading, it will not record the measurement - hence the plate meter will not beep.
- Page 11 Once the counter reads zero, move the plate meter up the full length of the shaft. The colon will disappear once it passes 9 and enters “clicks” mode. At the full height the display should read approximately “50” which is 50 half centimetres.
- Page 12 Switch on. The plate meter will beep and display the current formula setting. The formula will be displayed next with the ‘+’ part of the equation first (default 500) and then the ‘x’ part second (default 140). The display will then show the kg DM/ha calculation based on that formula and any readings stored in memory.
- Page 13 While the plate meter is switched on, hold down the ‘Formula’ button. The display shows ‘F_ _ d’ Press the ‘Reset’ button briefly. The display will then show (500) and then (140). The default formula has now been loaded and saved to memory. To better reflect the growth stages of pastures, these formulas were derived: Winter &...
- Page 14 Months Plate meter equations (Northern hemisphere) (Dairy pastures) Winter (October/March) Plate meter reading x 140 + 500 (factory default) April Plate meter reading x 115 + 850 Plate meter reading x 120 + 1000 June Plate meter reading x 140 + 1200 July Plate meter reading x 140 + 1200 August...
- Page 15 The “add” number is 4 digits long and can range from 0 to 9999. Starting with the first digit, press the “Formula” button to change this digit to a value from 0 to 9. Press the “reset” button when it is correct. NB, 850 for example would be entered as (0850).
- Page 16 The more regularly you take readings the better. Astute farmers will take readings weekly, sometimes more often during critical times of the year and less frequently during times of static conditions. The more samples taken per paddock the less margin of error. We recommend 20 to 40 samples per paddock but if you have bad conditions ie.
- Page 17 recalculated and displayed. The number of samples (readings) to be taken should range between 20 and 40 per paddock however this will be determined by the variance existing in the cover. You will hear 3 short beeps when you have completed 29 readings and one long beep when you reach 30.
- Page 18 Tru-Test recommends the use of Jenquip Pasture Management Software. This software is required in order to download data from the plate meter. It takes the information from your farm walk and produces ready-to-use reports. Jenquip Pasture Management Software is supplied with your plate meter on a USB stick.
- Page 19 Wash/wipe and dry the area around the bottom of the plate meter. Move the plate meter up or down the shaft so that all dirt and accumulated grass can be washed away. Apply some dry lubricant or light oil to the hinge assembly and to the inside of the hinge lock tube.
- Page 20 Check Resolution The plate meter is not turned on Turn on The battery is flat Replace the battery If you have just changed a battery you Service: Send the plate meter to your may have damaged the battery snap service agent clip to top of the battery.
- Page 21 Check Resolution Replace - Request a spare cog from The cog has wound off. your service agent. Potentiometer damaged. The Send the plate meter to your service Potentiometer is the shaft part that agent for repair. Note: drives the cog. Under no circumstances should you apply CRC or a light oil to the potentiometer.
- Page 22 Check Resolution The counter is like a calculator - it does Check the equation being used is not give false readings under normal correct and the calibration has been circumstances. correctly set. (Zeroed). Cover Equations Check which equation you are using. In New Zealand there are a number of standard equations published by various organisations.
- Page 23 Check Resolution Metal shaft is bent. Straighten or request a replacement part from your service agent. Grass or soil build-up inside case. Clean the plate meter. Flutes on steel shaft have become filled Clean the plate meter. with grass or soil. Check Resolution Buttons not clicking or activating.
- Page 24 For warranty and servicing information, see www.livestock.tru-test.com/product-warranty For all support, phone 0800 AGDATA (0800 243282)
Need help?
Do you have a question about the EC-09 and is the answer not in the manual?
Questions and answers