Table of Contents
Advertisement
Advertisement
Table of Contents

Related Manuals for Foscam E1


Summary of Contents for Foscam E1
- Page 1 User Manual User Manual V1.0...
-
Page 2: Table Of Contents
2.2. Connect Your Base Station to the Internet..............7 2.3. Download Foscam App....................8 2.4. Get a Free Foscam Account...................8 2.5. Add the Base Station to an Existing Foscam Account..........9 2.6. View Your Video Footage....................9 2.7. Place / Mount Your Camera..................10 2.7.1. - Page 3 4.12. Camera Settings......................43 4.12.1 Rename Your Camera..................43 4.12.2 View Camera Information................. 45 4.12.3 Change Speaker Volume..................47 4.12.4 Change Video Quality..................49 4.12.5 Turn On / Off the Camera LED................ 51 4.12.6 Turn On / Off the Voice Prompt................54 4.12.7 Upgrade Camera Firmware................56 4.12.8 Delete a Camera....................
-
Page 4: Security Warning
Security Warning Please change the password of your Base Station regularly, using a combination of numbers, letters and special characters. We recommend that you regularly update your camera and Base Station to the latest available software and firmware versions to help ensure the best experience for your system. -
Page 5: What's In The Box
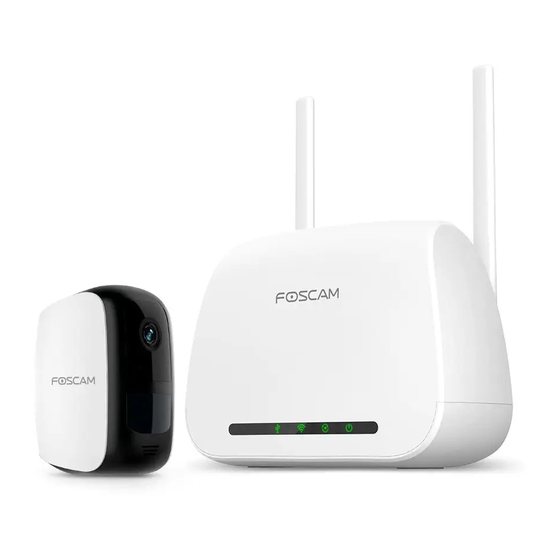
What's In the Box E1 Base Station Ethernet Cable E1 Base Station Power Adapter E1 Camera Camera USB Power Cable E1 Camera Power Adapter Rechargeable Battery Magnetic Wall Mount Mounting Screws & Anchors Single-sided Adhesive Tape... -
Page 6: Overview
1. Overview 1.1. Key Features HD Video: 2.0 Mega-Pixel, enjoy sharp, detailed video. Human Detection: The human detection feature lets you set the camera to send alerts only when human motion is detected. This cuts down inessential alerts such as those caused by pets, drapes under an AC vent, or foliage swaying in wind. -
Page 7: Physical Description
1.2. Physical Description Base Station Sync Button and LED Indicators Sync / Siren Off button Press the button to sync camera with Base Station. Press the button to turn off the siren manually. Green: The Base Station is connected to Green: Camera(s) are connected to the an external USB Storage Device. - Page 8 Base Station Rear Panel Camera Sync Button and LED Indicator Sync Button: Press the button to sync the camera with Base Station. Green Slow Blinking : Sync in process.. Solid Green Then Off: Sync process completed. Blinking Amber Rapidly: Fail to sync. Blinking Amber Slowly Then Off: The camera's battery level is low.
-
Page 9: Wireless Connectivity
1.3. Wireless Connectivity... -
Page 10: Set Up Your E1 System
2. Set Up Your E1 System 2.1. Install the Rechargeable Battery Into Your Camera a. Unlock the Rechargeable Battery compartment by pressing and holding the latch. b. The battery door will open automatically. c. Align the battery contacts. d. Insert the Rechargeable Battery. -
Page 11: Connect Your Base Station To The Internet
2.2. Connect Your Base Station to the Internet 1. Connect the Base Station to your router with an Ethernet cable. 2. Plug the Base Station Power Adapter into an electrical outlet. 3. Press the On/Off button, and wait until the power and Internet lights turn green. With a minute, the camera will connect to the Base Station automatically. -
Page 12: Download Foscam App
2.3. Download Foscam App To download the free Foscam App, simply scan the QR Code below. You can also search for "Foscam" in the App Store or Google Play store to download and install Foscam App as well. -
Page 13: Add The Base Station To An Existing Foscam Account
4. Follow the onscreen instructions. 2.6. View Your Video Footage When you launch the Foscam App, the devices page will display. To view and listen in on a live feed, tap Live on the camera feed image. View your camera's alert video recordings in the Foscam Cloud by tapping the timebar in the live page. -
Page 14: Place / Mount Your Camera
2.7. Place / Mount Your Camera 2.7.1. Place Your Camera on a Flat Surface You can place your camera on a flat surface (desk, shelf, Table, etc.) Apply the single-sided adhesive tape provided in the package to the bottom of the camera. -
Page 15: Charge Your Battery
2. Hang the Magnetic Wall Mount from the screw. 2.8. Charge Your Battery 1. Place the camera indoors. If the camera is currently mounted to a wall, remove it from the Magnetic Wall Mount. Note: If you are using the camera outside, bring it inside while charging the battery. -
Page 16: Sync Your Camera With The Base Station
2.9. Sync Your Camera with the Base Station When adding additional Foscam E1 cameras to your system, you will need to individually sync them to the Base Station. Please insert the Rechargeable Battery into the camera. Place the camera within 1 to 3 feet (30 to 100 centimeters) of the Base Station. - Page 17 A green LED on the camera will blink rapidly while syncing. The camera LED will then turn off , and the Sync Status LED of the Base Station will turn solid green, indicating that sync is successful and the camera is ready for viewing! Note: If the camera LED blinks an Amber color, then sync has failed.
-
Page 18: View Your Content
To view and listen to a live feed, tap Live on the camera feed image. To view your camera's alarm video recordings in cloud by tapping the timebar in the live page. 3.1. View the Devices Page When you launch the Foscam app, the devices page displays. Add Device Menu Siren On... -
Page 19: Watch Live
3.2. Watch Live You can view a livestream of your camera at any time. 1. Tap the Foscam icon on your mobile device. The Devices page displays. 2. Tap Live to view and listen to a live video. A row of live feed icons displays below the live stream image for the camera. - Page 20 Icons Back Speaker / Mute the audio Record video manually Snapshot Two-way audio Full screen More On this screen, you can listen to a livestream, record clips, take a snapshot, activate two-way talk or full screen. If you want to catch the smaller details, pinch the screen to zoom in.
-
Page 21: Record Clips From Live Video
3. To stop viewing and listening to the live feed, tap the Back icon. 3.3. Record Clips From Live Video To record a short clip of the event to the cloud. Tap the Foscam icon on your mobile device. The Devices page displays. - Page 22 Tap Live to view and listen to a live video. A row of live video icons displays below the live stream image for the camera. Tap Recording to start recording.
- Page 23 This icon turns blue to indicate that you are recording the live feed, and the recording item will be showed on the middle of the live Tap Recording to stop recording. The recording is saved in your Foscam cloud.
-
Page 24: Take A Snapshot From Live Video
3.4. Take a Snapshot From Live Video Tap the Foscam icon on your mobile device. The Devices page displays. Tap Live to view and listen to a live video. A row of live video icons displays below the live stream image for the camera. - Page 25 Tap Snapshot The snapshot is saved in Album.
-
Page 26: Talk And Listen
Also, you can view it in Sidebar > Album 3.5. Talk and Listen Tap the Foscam icon on your mobile device. The Devices page displays. -
Page 27: View Alerts
Tap Live to view and listen to a live video. A row of live video icons displays below the live stream image for the camera. Press and hold the button and speak. When the button is bright blue, two-way audio is ready. 3.6. - Page 28 Tap the Foscam icon on your mobile device. The Devices page displays. on the live video to view alerts.
-
Page 29: Cloud Recording
Storage. You can download recordings and save them to the external USB storage device for long-term storage. 3.8. View Recordings In Foscam Cloud View your video recordings in cloud by tapping Cloud History Tap the Foscam icon on your mobile device. - Page 30 Tap Cloud History to view and listen to a recorded video. Note: Days in which a video clip was recorded are indicated with an amber circle.
-
Page 31: Device Settings
4. Device Settings 4.1. Active / Deactivate 7 Day Cloud Storage Tap the Foscam icon on your mobile device. The Devices page displays. Tap Setting > My Plan > Active Now, the cameras are active. - Page 32 Tap Manage Cameras conform the active cameras.
-
Page 33: Turn On The Siren Manually
4.2. Turn On the Siren Manually WARNING: This may get loud and possibly damage your hearing if you are too close to the Base Station. Tap the Foscam icon on your mobile device. -
Page 34: Turn Off The Siren Manually
The Devices page displays. Tap Alarm > Yes to turn on the siren manually. 4.3. Turn Off the Siren Manually To turn off the siren when near the Base Station Press the Sync / Siren Off button on the top of the Base Station to stop the siren. Sync / Siren Off To turn off the siren remotely ... - Page 35 Tap the Foscam icon on your mobile device. The Devices page displays. Tap Close Siren to stop the siren.
-
Page 36: Rename Your Base Station
4.4. Rename Your Base Station Tap the Foscam icon on your mobile device. The Devices page displays. Tap Setting > Base Station Info... -
Page 37: View Base Station Information
The new name will be displayed in the app. 4.5. View Base Station Information You will view Base Station name, Model, UID, MAC ID and the firmware level. Tap the Foscam icon on your mobile device. The Devices page displays. - Page 38 Tap Setting > Base Station Info 3. You will view Base Station name, Model, UID, MAC ID and the firmware version on this page.
-
Page 39: Sync Time
4.6. Sync Time Tap the Foscam icon on your mobile device. The Devices page displays. Tap Setting > Sync Time The camera time is synced with the local time. -
Page 40: Adjust The Power Frequency
4.7. Adjust the Power Frequency If the camera video is flashing, please try to adjust the power frequency. Tap the Foscam icon on your mobile device. The Devices page displays. Tap Setting > Power Frequency... -
Page 41: Security Settings
Tap a setting. Your settings are saved. 4.8. Security Settings Security Warning: We recommend that you change the password of your Base Station regularly, using a combination of numbers, letters and special characters. Tap the Foscam icon on your mobile device. - Page 42 The Devices page displays. Tap Setting > Security Settings Change the Base Station username and password as below figure:...
-
Page 43: Upgrage Base Station Firmware
4.9. Upgrage Base Station Firmware Warning: We recommend that you regularly update your Base Station to the latest available firmware version to help ensure the best experience for your Base Station. Tap the Foscam icon on your mobile device. The Devices page displays. - Page 44 Tap Setting > Firmware Upgrage Tap Upgrage to upgrage the latest available firmware. After a Base Station firmware update, the Base Station reboots and connects to the Internet. Important: Please make sure the Base Station is powered on while it is updating and installing firmware.
-
Page 45: Restart Base Station
4.10. Restart Base Station Tap the Foscam icon on your mobile device. The Devices page displays. Tap Setting > Restart Base Station... -
Page 46: Delete Base Station
Tap Restart to restart Base Station. 4.11. Delete Base Station Tap the Foscam icon on your mobile device. The Devices page displays. -
Page 47: Camera Settings
Tap Setting > Delete Base Station Tap Yes to delete Base Station. 4.12. Camera Settings 4.12.1 Rename Your Camera Tap the Foscam icon on your mobile device. - Page 48 The Devices page displays. Tap Setting > Camera Settings > Select a Camera > Camera Info...
-
Page 49: View Camera Information
Enter a new name for the camera. The new name will be displayed in the app. 4.12.2 View Camera Information You will view camera name, Model, MAC ID and the firmware version. Tap the Foscam icon on your mobile device. The Devices page displays. Tap Setting >... - Page 50 Info...
-
Page 51: Change Speaker Volume
3. You will view camera name, Model, MAC ID and the firmware version. 4.12.3 Change Speaker Volume You can control the volume on your camera settings. Tap the Foscam icon on your mobile device. The Devices page displays. Tap Setting >... - Page 52 Speaker Volume...
-
Page 53: Change Video Quality
Your settings are saved. 4.12.4 Change Video Quality There are three options for you to choose. Decreasing the resolution of videos reduces the required WiFi bandwidth and battery life. Tap the Foscam icon on your mobile device. The Devices page displays. - Page 54 Tap Setting > Camera Settings > Select a Camera > Video Settings...
-
Page 55: Turn On / Off The Camera Led
Tap Image Quality, choose a setting. Your settings are saved. 4.12.5 Turn On / Off the Camera LED The LED on the camera lights in different colors. You can turn off this LED. - Page 56 Tap the Foscam icon on your mobile device. The Devices page displays. Tap Setting > Camera Settings > Select a Camera > Prompt Setting...
- Page 57 Tap the button on the right side of Status LED to turn on / off the camera LED. Your settings are saved.
-
Page 58: Turn On / Off The Voice Prompt
4.12.6 Turn On / Off the Voice Prompt The voice prompt is ON by default. You can turn off the voice prompt. Tap the Foscam icon on your mobile device. The Devices page displays. - Page 59 Tap Setting > Camera Settings > Select a Camera > Prompt Setting...
-
Page 60: Upgrade Camera Firmware
Your settings are saved. 4.12.7 Upgrade Camera Firmware Warning: We recommend that you regularly update your camera to the latest available firmware version to help ensure the best experience for your camera. Tap the Foscam icon on your mobile device. - Page 61 The Devices page displays. Tap Setting > Camera Settings > Select a Camera > Firmware Upgrade It will upgrade the firmware automatically if the firmware of camera is not the latest. Important: Please make sure the camera and Base Station are powered on, and do not move them while it is updating and installing firmware.
-
Page 62: Delete A Camera
4.12.8 Delete a Camera Tap the Foscam icon on your mobile device. The Devices page displays. Tap Setting > Camera Settings > Select a Camera > Delete Camera... - Page 63 Selecting Delete the history files of the camera to delete the history files.
-
Page 64: Forgotten Base Station User Name & Password
Tap OK to delete the camera. 4.13. Forgotten Base Station User Name & Password? To reset the Base Station user name and password, you had better unplug the network cable firstly. After that, press and hold down the RESET BUTTON about 5 seconds. Releasing the reset button, the password will turn to the factory default. -
Page 65: App Settings
5. App Settings 5.1. View the Live Video Only In WiFi Environment Tap the Foscam icon on your mobile device. The Devices page displays. Tap Sidebar > (App) Settings... -
Page 66: Push Messages
Tap the WiFi Only for Streaming On/Off button to enable the setting. 5.2. Push Messages When a trigger is detected, App can send you messages if the Push Messages of the Base Station is ON. 1. Tap Sidebar > (App) Settings... -
Page 67: Devices List Settings
2. Tap Push Messages , turn On button to set push messages function on Base Station 1. 5.3. Devices List Settings 1.Tap the Foscam icon on your mobile device. The Devices page displays. - Page 68 Tap Sidebar > (App) Settings > Devices List Settings Hold and drag a Base Station to the correct position on the list. Your settings are saved.
-
Page 69: Upgrade App
5.4. Upgrade App Tap the Foscam icon on your mobile device. The Devices page displays. Tap Sidebar > (App) Settings > App Upgrade... -
Page 70: Sign Out
Tap App Upgrade to upgrade the App version. 5.5. Sign Out Tap the Foscam icon on your mobile device. The Devices page displays. - Page 71 Tap Sidebar > Sign Out Tap the Yes to sign out the app.
-
Page 72: Appendix
6. Appendix 6.1. CE & FCC Electromagnetic Compatibility (EMC) FCC Statement This device compiles with FCC Rules PART 15C of the FCC Rules. Operation is subject to the following two conditions. This device may not cause harmful interference, and This device must accept any ... -
Page 73: Warranty
Distributors may sell products to resellers who then sell products to end users. No warranty service is provided unless the product is returned to an authorized return center in the region where the product was first shipped by FOSCAM or to the point-of-purchase, which may have regional specific warranty implications. - Page 74 Warranty is void if damaged by the use of parts not manufactured or sold by FOSCAM. Damage caused by improper installation of third-party products. Warranty is void if damaged for irresistible cause, such as earthquake, fire, lightning, ...
-
Page 75: Limitation Of Liability
Repair Service Out Of Warranty FOSCAM provide extra repair service for product that out of warranty, it is chargeable. The total fee contains device cost and service fee. Device cost (including accessories) is the standard uniform price provide by FOSCAM. -
Page 76: Statement
Internet network, computer viruses, malicious attacks of hackers, information damage or loss, and faults of computer system. Foscam company does not need to take any responsibility of the special, incidental or corresponding loss by the products of our company or any software provide by our company, including but not limited to operating loss, profit or purpose. - Page 77 Our company will reserve the right to improve and modify the product and corresponding manuals. The company reserves the right of final interpretation on our products.
-
Page 78: Obtaining Technical Support
While we hope your experience with the IP camera is enjoyable and easy to use, you may experience some issues or have questions that this User Manual has not answered. If you experience any issues with your FOSCAM devices, please first contact the FOSCAM resseler for assistance. If our reseller cannot provide service, please contact our service department: support@foscam.com.
Need help?
Do you have a question about the E1 and is the answer not in the manual?
Questions and answers