Keurig K200 SERIES Use & Care Manual
Hide thumbs
Also See for K200 SERIES:
- Use & care manual (16 pages) ,
- Use & care manual (4 pages) ,
- User manual
Advertisement
Quick Links
Download this manual
See also:
Use and Care Manual
K200 Series
Use & Care Guide
Get the most from your
new Keurig
®
brewer.
Before You Brew
Plug & Place
Rinse & Fill
Remove packing tape
Remove the water
from brewer and plug
reservoir lid, then lift the
into a grounded outlet.
reservoir straight up to remove it.
Rinse reservoir with fresh water
Place a large mug (12 oz.
and fill to the MAX line.
minimum) on the drip tray plate.
Replace water reservoir, making
sure the lock tabs engage with
the brewer. Replace lid.
NOTE: Do not use distilled water.
Power On
Cleansing Brew Setup
Press the power
Lift and lower the handle.
button. Lift the
Press the blinking brew
handle—remove and discard
button to start a cleansing brew.
the orange shipping disk.
Pour the hot water into the sink.
Lower the handle. Wait for
The one-time setup process is
now complete and you are ready
preheating to complete,
about 3 minutes.
to brew!
2.0
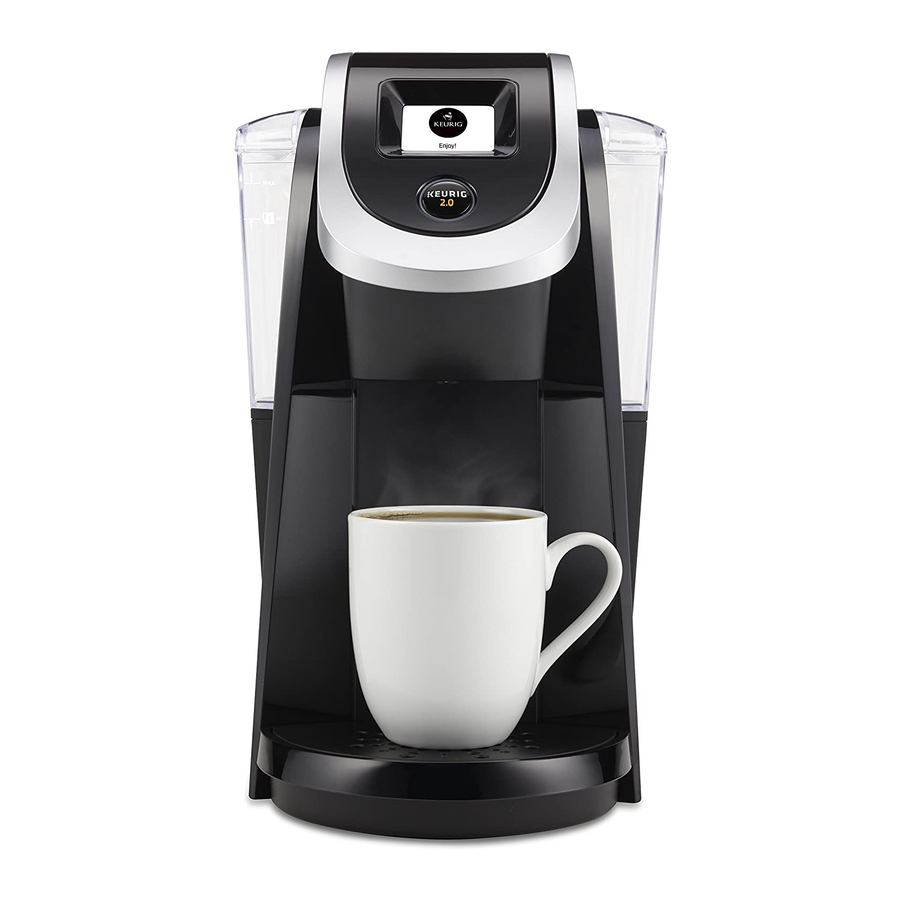
K200 Series Brewer
A.
Water Reservoir Lid
B.
Water Reservoir
C.
Top Housing
K
D.
Touch Screen/Power Button
E.
Brew Button
F.
Handle
L
G.
Brew Head
H.
Power Cord
M
I.
Drip Tray Plate
J.
Drip Tray
K.
Pod Holder
L.
Housing (K and L are the Pod Holder Assembly)
M.
Base
Brew Your First K-Cup® Pod
Place Mug
Lift & Insert
Place a mug on the
Lift the handle and
drip tray plate. If using
place a K-Cup® pod
a travel mug, remove the drip
in the K-Cup® pod holder.
tray and place the mug on the
Lower the handle completely
drip tray base.
to close the lid.
Hot Water: To dispense hot water into a
Do not remove the foil lid
mug, lift and lower the handle without
inserting a K-Cup® pod. Select your cup
on the K-Cup® pod.
size then press the blinking brew button
to dispense hot water.
NOTE: Between brew cycles, the brewer
may take about a minute to reheat.
Size & Strength
Brew & Enjoy
Select your brew size
Press the blinking
using the arrows on
brew button. The
the screen. Select STRONG
button will remain illuminated
if desired. (STRONG setting
while brewing, about 1 minute.
is for coffee.) Press HOT
The brewer will notify you when
COCOA/OTHER for select
the brew cycle is complete.
non-coffee beverages.
BREW BUTTON
Lift the handle and dispose
NOTE: Make sure to check instructions on
of the used K-Cup® pod. The
pod packaging.
brewer will be ready to brew
CAUTION: There is extremely hot water in
another cup in about a minute.
the K-Cup® pod during the brew process.
To avoid injury, do not lift the handle
NOTE: To stop the brewing process, press
during the brew process.
and hold the power button for one second.
Settings and Touch Screen Controls
Home Screen
Brew Settings
A. Settings Button
Select the KEURIG BREW setting that matches the number on the
pod lid for K-Mug® and K-Carafe® pods.
B. Power Button
A
B
C
Screen for K-Cup® Pods
A. STRONG (only available for
D
coffee)
B. HOT COCOA/OTHER (for
E
select non-coffee beverages)
F
C. Brew Size
G
D. Power Button
H
Screen for K-Carafe® Pods
A. KEURIG BREW Setting 1
B. Brew Size
I
C. Power Button
J
Brew Your First K-Carafe® Pod
Place Carafe
Lift & Insert
Make sure the Keurig®
Lift the handle and
Carafe is empty.
place a K-Carafe®
pod in the pod holder.
Remove the drip tray and insert
the Keurig® Carafe securely in
Lower the handle completely
its place.
to close the lid.
Do not remove the foil lid or
puncture the K-Carafe® pod.
Select Brew Size
Brew & Enjoy
Select the KEURIG
Press the blinking
BREW setting that
brew button. The
matches the number on the pod
button will remain illuminated
lid. Then select the number of
while brewing.
desired cups.
The brewer will notify you when
NOTE: Make sure the number on the
the brew cycle is complete.
touch screen matches the number on the
Lift the handle and dispose of
K-Carafe® pod in the pod holder.
used K-Carafe® pod.
CAUTION: There is extremely hot water
in the K-Carafe® pod during the brew
NOTE: To stop the brewing process, press
process. To avoid injury, do not lift the
and hold the power button for one second.
handle during the brew process.
Keurig Green Mountain, Inc.
33 Coffee Lane
Waterbury, VT 05676
1.866.901.BREW (2739)
* DEFAULT SIZE
Settings Menu
For all settings, press the BACK button to return to the settings menu or press the
HOME button to return to the home screen. Your settings will be automatically saved.
Access Settings
Choose Language
Explore everything your Keurig®
Press English, Spanish, or
SETTINGS
French to select the language.
Plus Series brewer has to offer
by accessing the Settings Menu.
From the home screen, select
the settings button.
Use the arrows to scroll through
the menu. To exit, press the
BACK button or HOME button.
High Altitude
To ensure your brewer works
properly at higher altitudes
(5,000 feet), ENABLE the high
altitude mode.
HOME
BUTTON
BACK BUTTON
Water Filter Reminder
If you are using a Keurig® Water
Filter, select ENABLE to activate
the water filter reminder.
P/N | Pièce n | Pieza n. DC0000001094 REV A 11/17
Advertisement

Related Manuals for Keurig K200 SERIES


Summary of Contents for Keurig K200 SERIES
- Page 1 Waterbury, VT 05676 Water Reservoir Lid Home Screen Brew Settings Water Reservoir A. Settings Button Select the KEURIG BREW setting that matches the number on the 1.866.901.BREW (2739) pod lid for K-Mug® and K-Carafe® pods. B. Power Button K200 Series Top Housing...
- Page 2 Do not dry the inside of the Keurig® Descaling Solution, and access to a sink. Do not use a paper care to ensure that you store your brewer in a safe and frost free hand, carefully insert a straightened paper clip into the holes.
Need help?
Do you have a question about the K200 SERIES and is the answer not in the manual?
Questions and answers