
Related Manuals for Apantac HDMI-IP-E

Summary of Contents for Apantac HDMI-IP-E
- Page 1 HDMI-8x8 HDMI-IP-E/R User Manual v1.1 APANTAC LLC, 7470 SW BRIDGEPORT ROAD, PORTLAND, OR 97224 INFO@APANTAC.COM, TEL: +1 503 968 3000, FAX: +1 503 389 7921...
- Page 2 All the registered trademarks referred to this manual are belonging to their respective companies. WARRANTY STATEMENT Apantac LLC (herein after referred to as “Apantac”) warrants to the original purchaser of the products manufactured by Apantac (the “Product,”) will be free from defects in material and workmanship for a period of three (3) year from the date of shipment of the Product to the purchaser.
- Page 3 Caused by improper use of the Product or inadequate maintenance and care of the Product; b) Resulting from attempts by those other than Apantac representatives to install, repair, or service the Product; c) Caused by installation of the Product in a hostile operating environment or connection of the Product to incompatible equipment;...
-
Page 4: Table Of Contents
6.2 Point to multi-point connection ................ 12 6.3 Multple transmitters to multiple receivers ............12 6.4 Monitoring the the HDMI-IP-E via VLC and other Software ......13 7.0 OSD (On Screen Display) ................14 8.0 Configuring the HDMI-IP-E via the web page ..........16 8.1 Down Scaling the output .................. -
Page 5: What's In The Box (When Sold In Pairs)
HDMI-IP-E and HDMI-IP-R 1.0 WHAT’S IN THE BOX (When sold in pairs) Note: HDMI-IP-E and HDMI-IP-R can also be sold separately Product Description HDMI-IP-E: HDMI to H.264 encoder/transmitter HDMI-IP-R: HDMI to H.264 decoder/receiver IR Emitter cables 12 V DC power supply with... -
Page 6: Key Features
Baud Rate 2400 up to 115,200 bps; data bits, 1 stop bit, no parity Weight 338 g Dimension (LxW-H) 120x75x33 mm APANTAC LLC, 7470 SW BRIDGEPORT ROAD, PORTLAND, OR 97224 INFO@APANTAC.COM, TEL: +1 503 968 3000, FAX: +1 503 389 7921... -
Page 7: Front/Rear Views
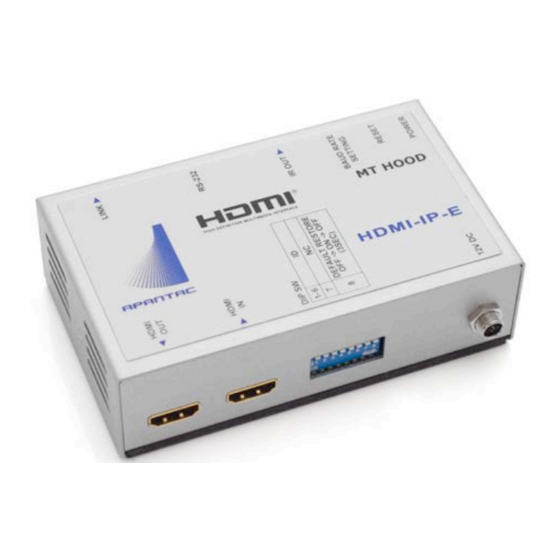
1080p 23.98/24/25/29.98/30/50/59.94/60 720p 50/59.94/60 2.2 Front/Rear Views HDMI-IP-E (Encoder) Figure 4-1 HDMI-IP-E front view 1. HDMI Loop out. (YCbCr 4:4:4) APANTAC LLC, 7470 SW BRIDGEPORT ROAD, PORTLAND, OR 97224 INFO@APANTAC.COM, TEL: +1 503 968 3000, FAX: +1 503 389 7921... - Page 8 Figure 4-3 HDMI-IP-R front view 1. HDMI Output 2. Multicast ID DIP Switch 3. Power (12 V DC 2A) Figure 4-4 HDMI-IP-R rear view APANTAC LLC, 7470 SW BRIDGEPORT ROAD, PORTLAND, OR 97224 INFO@APANTAC.COM, TEL: +1 503 968 3000, FAX: +1 503 389 7921...
-
Page 9: System Reset
1. LED power indicator 2. System reset 3. Baud rate setting DIP Switch 4. IR out 5. RS-232 6. LINK APANTAC LLC, 7470 SW BRIDGEPORT ROAD, PORTLAND, OR 97224 INFO@APANTAC.COM, TEL: +1 503 968 3000, FAX: +1 503 389 7921... -
Page 10: Dip Switches
HDMI-IP-E and HDMI-IP-R 3.0 DIP Switches 3.1 Baud Rate DIP Switch Settings Baud Rate PIN 1 PIN 2 PIN3 2400 4800 9600 19200 28800 38400 57600 115200 3.2 ID DIP Switch Settings PIN 1 PIN 2 PIN 3 PIN 4... -
Page 11: Ir Blaster/Receiver Cables
Plug it into the HDMI-IP-R’s “IR IN” port and place the IR receiver in a convenient location for the remote control IR Blaster Cable Plug it into the HDMI-IP-E’s “IR OUT” port and place the IR receiver in a convenient location for the remote control APANTAC LLC, 7470 SW BRIDGEPORT ROAD, PORTLAND, OR 97224... -
Page 12: Rs-232 Serial Pinout
6.1 Point to point connection 1. Turn off the HDMI source and HDMI Display 2. Connect the cable between the source and the HDMI-IP-E via the HDMI in port 3. Connect the HDMI cables between the Displasy and the HDMi-IP-E and HDMI-IP-R 4. -
Page 13: Point To Multi-Point Connection
6.2 Point to multi-point connection 1. Turn off the HDMI source and HDMI Display 2. Connect the cable between the source and the HDMI-IP-E via the HDMI in port 3. Connect the HDMI cables between the Displasy and the HDMi-IP-E and HDMI-IP-R 4. -
Page 14: Monitoring The The Hdmi-Ip-E Via Vlc And Other Software
Instead of using a HDMI-IP-R as the decoder of the the H.264 stream, software such as VLC can be used to decode the source and view it. Apantac does not gurantee the performances the above mentioned software. Please see Appendix A for examples on how to use VLC to the best of our knowledge. -
Page 15: Osd (On Screen Display)
There are built-in OSDs in the HDMI-IP-R’s HDMI output that provides various important information for the setup. The default IP addresses for both the HDMI-IP-E (Tx) and HDMI-IP-R(Rx), can be obtained from the OSD by simply plugging the HDMI-IP(Rx) HDMI output to the monitor. - Page 16 In order to get the default IP address of the HDMI-IP-R(Rx), the network (LINK) must be connected either directly to a HDMI-IP-E or a network switch. As you can see the IP address for the HDMI-IP-R (Rx) is now part of the OSD.
-
Page 17: Configuring The Hdmi-Ip-E Via The Web Page
Fig. 8-3: OSD Screen capture after the HDMI-IP-E(Tx) is connected to a network switch 8.0 Configuring the HDMI-IP-E via the web page Connect to the HDMI-IP-E (TX) via the webpage by typing its IP address in a browser. APANTAC LLC, 7470 SW BRIDGEPORT ROAD, PORTLAND, OR 97224... - Page 18 HDMI-IP-E and HDMI-IP-R Fig 8-1: The first portion of the web interface The video input information is not configurable, it is read directly from the HDMI-IP-E(Tx) Fig 8-2: Video Input and resolution settings The video Output Resolution can be configured.
-
Page 19: Down Scaling The Output
SD: 480i/576i, 480P/576P 8.1 Down Scaling the output The HDMI-IP-E has the capability of down scaling the input source to a lower resolution by setting the output with the pull down menu. Fig 8-3: FHD (1080P/i) source can be down scaled to HD (720P) or SD Figure 8-4: HD (720) source can be down scaled to SD 8.2 Setting the streaming bitrate... - Page 20 HDMI-IP-E and HDMI-IP-R 1. In order for the HDMI-IP-E(TX) and HDMI-IP-R (RX) communicate and find each other, the Multicast IP address must be set to the same. 2. When the webpage is first launched, the Multicast IP address is read back from the HDMI-IP-E/R (Tx/Rx)’s Multicast ID Settings.
- Page 21 Fig 8-8: The second portion of the web interface Change the User name and password from default the default username: “Admin” and password: “123456” APANTAC LLC, 7470 SW BRIDGEPORT ROAD, PORTLAND, OR 97224 INFO@APANTAC.COM, TEL: +1 503 968 3000, FAX: +1 503 389 7921...
-
Page 22: Change User Name And Password
8.4 Change User Name and Password Fig 8-9: Change user name and password 8.5 Communication Firmware Upgrade on HDMI-IP-E There are two sets of firware in the HDMI-IP-E(Tx) communicaton firm upgrade can be upgraded via the webpage 8.6 Set IP properties and DHCP Note: Default IP address for the HDMI-IP-E(Tx) can be changed via the webpage. -
Page 23: Set Baud Rate
DIP switch setting, until the Tx/Rx has been power cycled 8.8 Codec Firmware Upgrade on HDMI-IP-E There are two sets of firware in the HDMI-IP-E(Tx), the Encoder firmware can be upgraded via the webpage Fig 8-12: Codec firmware upgrade APANTAC LLC, 7470 SW BRIDGEPORT ROAD, PORTLAND, OR 97224 INFO@APANTAC.COM, TEL: +1 503 968 3000, FAX: +1 503 389 7921... -
Page 24: Configuring The Hdmi-Ip-R Via The Web Page
DHCP switch. If it is a point to point connection or the switch does not support DHCP, then the static IP address will be used APANTAC LLC, 7470 SW BRIDGEPORT ROAD, PORTLAND, OR 97224 INFO@APANTAC.COM, TEL: +1 503 968 3000, FAX: +1 503 389 7921... -
Page 25: Setting The Multicast Id And Ip Address
9.4 Set Baud Rate The Uart (RS-232) baud rate setting can be set by either the webpage or the DIP switch. The baud rate setting must be set the same for the HDMI-IP-E and HDMI-IP-R Fig 9-4: Set RS232 baud rate APANTAC LLC, 7470 SW BRIDGEPORT ROAD, PORTLAND, OR 97224 INFO@APANTAC.COM, TEL: +1 503 968 3000, FAX: +1 503 389 7921... -
Page 26: Appedix A - Using Vlc To Decode The Stream From Hdmi-Ip-E
: 1. Make sure designated ethernet interface’s IPv4 address and netmask settings are at the same subnet as HDMI-IP-E’s. You should be able to reach HDMI-1P-E via “ping xxx.xxx.xxx.xxx” command. 2. Make sure your firewall is turned off or VLC is in exception list of your firewall. - Page 27 HDMI-IP-E and HDMI-IP-R 4. Click on “Media” from the top-level pull-down menu 5. Click on “Open Network Stream” from “Media” sub menu APANTAC LLC, 7470 SW BRIDGEPORT ROAD, PORTLAND, OR 97224 INFO@APANTAC.COM, TEL: +1 503 968 3000, FAX: +1 503 389 7921...
- Page 28 HDMI-IP-E and HDMI-IP-R 6. Enter the Multicast address and port number of the HDMI-IP-E’s Multicast stream, please refer to section 8.3 for more information 7. Select the checkbox “Show more options” at the lower part of “Open Media” APANTAC LLC, 7470 SW BRIDGEPORT ROAD, PORTLAND, OR 97224...
- Page 29 HDMI-IP-E and HDMI-IP-R diaglog 8. Enter your recipient IP address for Multicast in “Edit Options” 9. Successfully decode the Multicast stream APANTAC LLC, 7470 SW BRIDGEPORT ROAD, PORTLAND, OR 97224 INFO@APANTAC.COM, TEL: +1 503 968 3000, FAX: +1 503 389 7921...
- Page 30 VLC in the command line shell with required options. 1. Open Terminal APANTAC LLC, 7470 SW BRIDGEPORT ROAD, PORTLAND, OR 97224 INFO@APANTAC.COM, TEL: +1 503 968 3000, FAX: +1 503 389 7921...
- Page 31 2. Then create an alias to the VLC program 3. Run “ifconfig” command to get your IP address for Multicast 4. Enter VLC command with options APANTAC LLC, 7470 SW BRIDGEPORT ROAD, PORTLAND, OR 97224 INFO@APANTAC.COM, TEL: +1 503 968 3000, FAX: +1 503 389 7921...
- Page 32 HDMI-IP-E and HDMI-IP-R 5. Successfully decode Multicast stream APANTAC LLC, 7470 SW BRIDGEPORT ROAD, PORTLAND, OR 97224 INFO@APANTAC.COM, TEL: +1 503 968 3000, FAX: +1 503 389 7921...
- Page 33 APANTAC LLC, 7470 SW BRIDGEPORT ROAD, PORTLAND, OR 97224 INFO@APANTAC.COM, TEL: +1 503 968 3000, FAX: +1 503 389 7921...
- Page 34 9. Please note that after Proxy, Multicast streaming will become Unicast. When second connection has been established, the first one will be dropped. APANTAC LLC, 7470 SW BRIDGEPORT ROAD, PORTLAND, OR 97224 INFO@APANTAC.COM, TEL: +1 503 968 3000, FAX: +1 503 389 7921...
- Page 35 3. Successfully receive the Multicast stream APANTAC LLC, 7470 SW BRIDGEPORT ROAD, PORTLAND, OR 97224 INFO@APANTAC.COM, TEL: +1 503 968 3000, FAX: +1 503 389 7921...
- Page 36 HDMI-IP-E and HDMI-IP-R APANTAC LLC, 7470 SW BRIDGEPORT ROAD, PORTLAND, OR 97224 INFO@APANTAC.COM, TEL: +1 503 968 3000, FAX: +1 503 389 7921...
Need help?
Do you have a question about the HDMI-IP-E and is the answer not in the manual?
Questions and answers