Table of Contents
Advertisement
Introduction ........................................................... 1
■
Key Features.......................................................... 2
■
Specifications........................................................ 3
■
Control Modes and cable Types .......................... 4
■
Packing Checklist ................................................. 5
■
Product Description.............................................. 6
■
Installation ............................................................. 7
■
Video Compensation ............................................ 9
■
Operation ............................................................... 10
■
LED Indicators....................................................... 11
■
Push Button: Switch to the control status ......... 13
■
Hotkeys Control .................................................... 15
■
Station Unit Hotkeys Control ............................... 16
■
Computer Unit Hotkeys Control .......................... 17
■
Cascade Configuration......................................... 18
■
Appendixes............................................................ 19
■
Please read this manual thoroughly and follow the
Installation procedures to prevent any damage to the KVM
switch or any connecting device
Table of Contents
Advertisement
Table of Contents

Related Manuals for Rextron EKU-222


Summary of Contents for Rextron EKU-222
-
Page 1: Table Of Contents
Table of Contents Introduction ............1 ■ Key Features............2 ■ Specifications............3 ■ Control Modes and cable Types ......4 ■ Packing Checklist ..........5 ■ Product Description..........6 ■ Installation ............. 7 ■ Video Compensation ..........9 ■ Operation ............... -
Page 3: Introduction
Introduction ------------------------ The KVM Extender consists of a Computer Unit and a Station Unit that is suitable to locate a keyboard/monitor/mouse set up to 150 meters away from a computer or KVM switch using an inexpensive Category 5 UTP (unshielded twisted pair) cable. It provides an ideal and convenient way to remotely access the computer which is located in a secure, clean or dirty, harsh environment. -
Page 4: Key Features
Key Features ------------------------ Connects the Computer Unit and Station Unit via Category 5 UTP cable Remotely locates the keyboard, mouse and monitor up to 150m from a computer Supports PS/2 and USB + PS/2 series for flexible choice Video compensation can be adjusted by hotkey to ensure the optimum signal quality for any length of cable within the limit. -
Page 7: Packing Checklist
Packing Checklist ------------------------ KVM Extender Station Unit x 1 KVM Extender Computer Unit x 1 Power Adapters – 9V DC, 600mA x 1 User Manual x 1 Food Pad x 2 sets KVM Cable (CBM180H or CBM180UH) x 1 or x 2... -
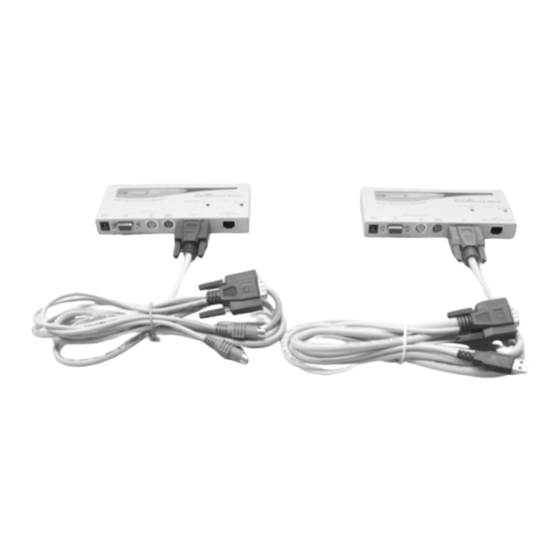
Page 8: Product Description
Product Description ------------------------ Figure 4: Indication and Connection... -
Page 9: Installation
Installation ------------------------ Connection Patterns EKP222 / EKU222 EKP-12S EKP-21P EKU-12S EKU-21P EKP212 / EKU212 EKP-12S EKP-11P EKU-12S EKU-11P... - Page 10 EKP221 / EKU221 EKP-21P EK-11S EKU-21P EKP211 / EKU211 EKP-11P EK-11S EKU-11P Figure 4: Connection patterns of KVM Extenders...
-
Page 11: Video Compensation
Video Compensation ------------------------ Before operating, you may like to conduct the Video Compensation first. In this case, the hotkeys are used to adjust the Equalization on the Remote Unit to get optimum video signal for various cable lengths. There are four segments of various lengths of CAT 5 cables can be chosen from. -
Page 12: Operation
Operation ------------------------ A keyboard and mouse must be connected to the Station Unit. And then the system conducts the emulation for local computer which can be controlled remotely. On the other hand, it does not need to use keyboard, mouse and monitor if you don’t want to control the computer locally. -
Page 13: Led Indicators
LED Indicators ------------------------ The LEDs on the KVM Extender are showing the latest status which indicates the linking, communication, and control situation between Computer Unit and Station Unit. Station Unit Model LED Status Control Description Station Unit controls its local PC. - Page 14 Computer Unit Model LED Status Control Description Computer Unit controls its local PC or KVM switches. In Remote: Off, Local: On this mode, the Station Unit can not take control of the Computer Unit remotely. EKP-21P Station Unit is remotely EKU-21P Remote: On, Local: Off taking control of the...
-
Page 15: Push Button: Switch To The Control Status
Push Button: Switch to the ----------------- control status There is a button on the panel of Computer Unit and Station Unit respectively, which can be pushed (switched) in sequence to select the operation modes. Button on Station Unit ( EKx-222 / EKx-221 ) The button on the panel of Station Unit can be pushed (switched) in sequence to select the following two modes: Com(Remote) - Page 16 Button on Computer Unit ( EKx-222 / EKx-212 ) While pressing the button, there are three modes can be chosen from and its sequence indicates as follows: Auto Com(Remote) → → Auto: 1. In this mode, the Remote and Local LEDs are flashing alternately.
-
Page 17: Hotkeys Control
To switch to this mode, press left Ctrl twice, hold Alt and press E key(press both keys simultaneously). This function is used to prevent from misunderstanding once the system is connected to Rextron’s KVM Switches. Thus, the user can choose either the control mode of KVM Extender or the number of computer connected to the KVM Switches. -
Page 18: Station Unit Hotkeys Control
Station Unit Hotkeys Control -------------- Hotkey Commands Function Description without optional With optional Toggle switch selects Loc *Ctrl + Ctrl + Ctrl + Ctrl + or Com mode Escape from hotkey mode Ctrl + Ctrl + Esc Ctrl + Ctrl + Esc One beep: hotkey control without pressing Ctrl + Ctrl + Alt+E... -
Page 19: Computer Unit Hotkeys Control
Computer Unit Hotkeys Control --------- Hotkey Commands Function Description without optional with optional Toggle switch selects Ctrl + Ctrl + Ctrl + Ctrl + Auto-Loc-Rem mode Escape from hotkey mode Ctrl + Ctrl + Esc Ctrl + Ctrl + Esc One beep: hotkey control without pressing Ctrl + Ctrl + Alt+E... -
Page 20: Cascade Configuration
Cascade Configuration ----------------- The KVM Extender can be connected to the KVM Switch in compliance with the “Cascade Configuration”. In this case, there are some connection patterns may be conducted in a certain situations. However, to prevent from any conflict via hotkey commands among the connections, the E key is added and followed behind the Ctrl + Ctrl, which will enable you to manage the KVM Extender straightly. -
Page 21: Appendixes
Appendixes ----------------- Cable Requirements The cable interconnected between Computer Unit and Station Unit normally used is Category 5(CAT5) terminated with RJ45 connectors. It’s easy to get them from the local stores or call your dealers for help. Besides, CAT5e or CAT6 are applicable to the KVM Extender. This CAT5 is not provided with the standard package mainly because it is subject to the different length you may required. - Page 22 Note: CAT5, CAT5e or CAT6 cables are applicable to the extender pair. The above diagram shows the RJ45 connector of a CAT5 cable with its metal contacts facing up.
-
Page 23: Limited Warranty
Limited Warranty IN NO EVENT SHALL THE DIRECT VENDOR'S LIABILITY FOR DIRECT INDIRECT, SPECIAL, INCIDENTIAL CONSEQUENTIAL DAMAGES, LOSS OF PROFIT, LOSS OF BUSINESS, OR FINANCIAL LOSS WHICH MAY BE CAUSED BY THE USE OF THE PRODUCT EXCEEDS THE PRICE PAID FOR THE PRODUCT.
Need help?
Do you have a question about the EKU-222 and is the answer not in the manual?
Questions and answers