Table of Contents
Advertisement
Advertisement
Table of Contents

Related Manuals for SatKing SK-3500


Summary of Contents for SatKing SK-3500
- Page 1 USER’S MANUAL...
-
Page 2: Table Of Contents
English CONTENTS 1. GUIDE ......................2 1.1 IMPORTANT SAFETY INSTRUCTIONS ..................2 1.2 UNPACKING ..........................2 1.3 PRODUCT OVERVIEW& ILLUSTRATION ................3 1.4 INSTALLATION OF METER .......................4 2. OUTLINE ......................5 3. THE MENU OSD INSTRUCTION ..............6 3.1 SATELLITE FIND ...........................6 3.2 LOOP SEARCH ..........................9 3.3 PROGRAM INFO ..........................9 3.4 ANGEL CALCULATION .......................9 3.5 MULTIMEDIA ..........................10... -
Page 3: Guide
1. GUIDE 1.1 IMPORTANT SAFETY INSTRUCTIONS Thank you for choosing our product. Before installation, we would like to remind you some notes, which is very important for operating safely and properly, as follows: • Be sure to read this user manual before starting your operation. • You must install the dish with correct direction and angle. -
Page 4: Product Overview& Illustration
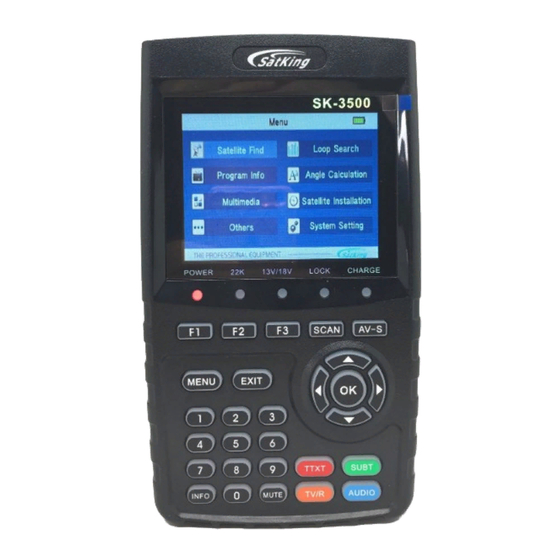
English 1.3 PRODUCT OVERVIEW& ILLUSTRATION Description FUNCTION LNB In Connect to satellite antenna cable AV OUT Connect to AV port for TV AV IN Connect to AV port for meter USB Port Connect to USB memory DC Slot Connect to adaptor input Power Switch Turn on/off meter Speaker... -
Page 5: Installation Of Meter
Description FUNCTION Show the main menu on the screen or jump back to 22 MENU previous menu in sub-menu setting conditions 23 EXIT Escape from present menu and save the settings 24 0-9 Number key to select channels or enter programming 25 INFO INFO key 26 MUTE... -
Page 6: Outline
English 2. OUTLINE • 3.5 Inch High Definition TFT LCD Screen • Fully DVB-S/DVB-S2, MPEG-2/MPEG4 compliant • MPEG-2 / H.264 Hardware decoding • Digital meter for signal strength and quality • Supports scan of Auto,Blind,Manual or NIT • Sound and Light Alarm for Locking Signal • Auto Calculate Angle of AZ ,EL • Supports DISEQC 1.0/1.1/1.2 ,0/22khz Tone • Speaker Integrated... -
Page 7: The Menu Osd Instruction
3. THE MENU OSD INSTRUCTION If you have installed and connected the cables to the receiver, pressing MENU to display the Main Menu. • Satellite Find • Loop Search • Program Info • Angle Calculation • Multimedia • Satellite Installation • Others • System Setting Press the keys of YZA B to move the cursor up or down in the menu... - Page 8 English 3.1.2 LOCAL FREQUENCY Press AB key into the LNB list. Use YZ key to move the cursor then press select the LNB of you want. 3.1.3 TRANSPONDER Press AB key into the TP list. Use YZ key to move the cursor then press to select the TP of you want.
- Page 9 3.1.10 DISEQC TYPE & INPUT If we select diseqc1.0/1.1, we can press AB key to set the port number. If select Unicable, we can press AB to select IF Channel, and use number key to input Center Frequency. 3.1.0.1 Quick Search In the Satellite Find interface, you can press enter the quick search.If you have set the Longitude and Latitude under the system setting,...
-
Page 10: Loop Search
English 3.2 LOOP SEARCH Select Loop Search, then press into the Loop Search.There will have 8 TP on your sight . Press to enter TP Edit, you can edit Satellite and Transponder. 3.3 PROGRAM INFO In the Program Info, you can check the information of the current TV. -
Page 11: Multimedia
3.5 MULTIMEDIA Select Multimedia, then press into the Multimedia. • Movie Press red key to change the folder file viewing to detailed list. Press green key to the mode option of play files and text encode, then press MENU return. Press orange key to change mode to big Icon browsing. - Page 12 English 3.6.1 SATELLITE SETTING In the all Satellites Setting: Press red key into the Transponder interface. Press green key into auto scan interface. Press YZ key to move the cursor, then press to change the satellite select or unselect. Press A B to set the single satellite setting. In the setting interface: 1.
- Page 13 Limit the motor move to east or to west. F1 Direction: Press AB key to move direction to west or east. F2 Store: Save the satellite position of A2 • Mode: G, Set Limit enable or disable Set the limit enable or disable. 8.
-
Page 14: Others
English Press YZ key to select the current satellite. • Edit Sat Press red key to edit satellite. NO.: Satellite number. W-E: Switch the satellite longitude west or east. Longitude: Use number key input value. Satellite Name: Press will open the keyboard, use the direction key input satellite name. - Page 15 3.7.1 TV CHANNEL EDITOR Select TV Channel Editor, then press into the CH List. • Edit Press red key into edit list, you can edit program name, move program, sort program, and skip program. • Lock Choose the program you want to lock, and press green key to finish the operation.
-
Page 16: System Setting
English 3.7.4 SYSTEM INFO There are some system information you can see. 3.8 SYSTEM SETTING • Country Setting Press AB key to change the country • OSD Language Press AB key to change the OSD Language. • TV Format Press AB key to change the TV Format. • Video Output If we connect HDMI interface, we can press AB key. - Page 17 • Flashlight Press A B key to switch Flashlight on/off. • Upgrade Will update the file into the USB, then insert the machine. Press to update interface, use the direction key to select update file, and press to update. Warning: Please don’t turn power off or pull out the USB, otherwise it will damage the machine’s software, and can’t boot again.
-
Page 18: Technical Specification
English 4. TECHNICAL SPECIFICATION TRANSMISSION STANDARDS DVB-S2/S, MPEG-2,MPEG-4,H.264 SATELLITE INPUT/DEMODULATION Connector Type F Type Input Frequency 950 to 2150 MHz - 65 to -25 dBm Signal Input Level Band Switch Control 22KHz LNB Supply 13V/18V, IMax 400mA Demodulation Type QPSK,8PSK Symbol Rate 2<Rs<45Mband(SCPC/MCPC) LCD FEATURES... - Page 19 Audio Output Mode Stereo, Mono,R/L DATA SERVICE PORT Connector Data Protocol USB2.0 interface File Management System NTFS,FAT32,FAT16 File Format wma,mp3,mp4,avi,jpg,jpeg,bmp,img MICROPROCESSOR Microprocessor 78346 Clock Frequency 550MHz SDRAM Memory DDR2 512Mbit POWER SUPPLY Li‐Ion Battery 7.4V/3000mAh Adapter OUTPUT :DC12V/1.5A, INTUPT: 100‐240VAC 50/60Hz Power Consumption Max.
-
Page 20: Trouble Shooting
English 5. TROUBLE SHOOTING Problem Possible Causes What To Do No display light up Power switch is not Check to make sure power on or run out of batteries on even on adapter No sound or picture, AV IN jack insert, but no but the front panel video input Pull out AV IN cable... - Page 21 USER’S MANUAL...
Need help?
Do you have a question about the SK-3500 and is the answer not in the manual?
Questions and answers