Honeywell S8610U Quick Reference Manual
Universal intermittent pilot gas ignition control
Hide thumbs
Also See for S8610U:
- User manual ,
- Installation instructions manual (25 pages) ,
- Quick reference manual (2 pages)
Table of Contents
Advertisement
Quick Links
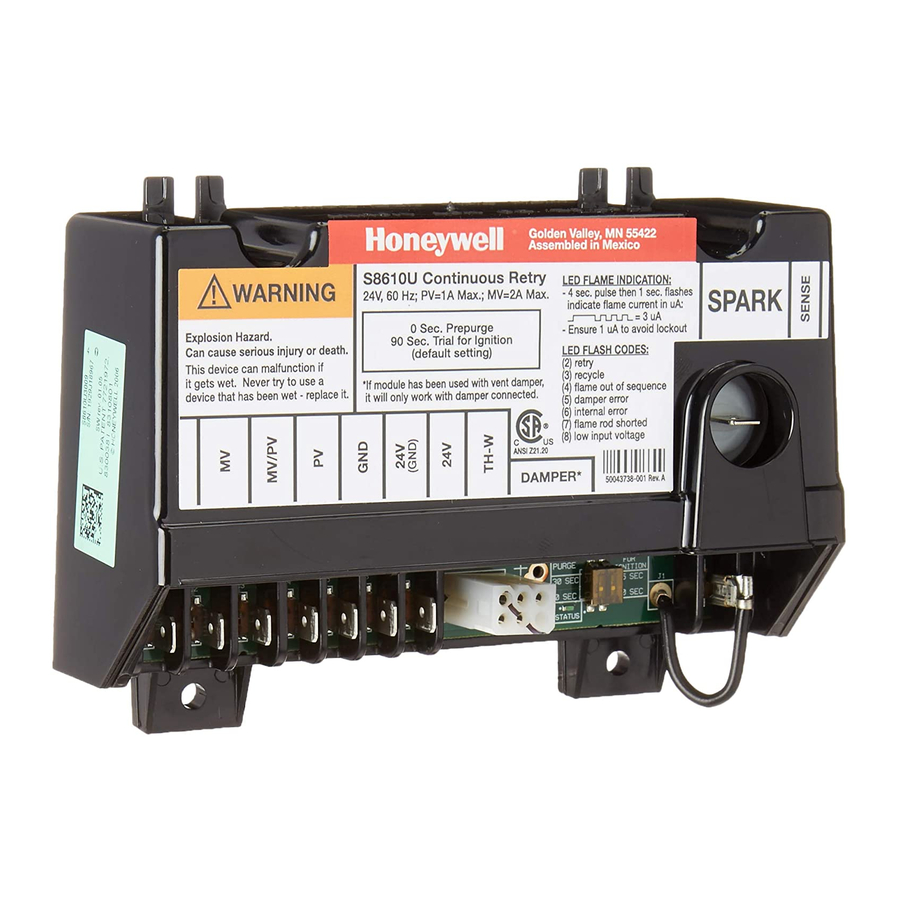
Table 1. Typical wiring connections.
Connector
Label
Size or Type
Description
MV
1/4 inch
Main Valve connection
MV/PV
1/4 inch
Common terminal for gas valves
PV
1/4 inch
Pilot Valve connection
BRN GND
1/4 inch
Burner Ground
24V GND
1/4 inch
Return path to transformer
24V
1/4 inch
Optional—24 Vac power connection for Vent
Damper
TH-W
1/4 inch
Connector for "Call for Heat" signal from
thermostat
P1
6-pin keyed
Connector for Vent Damper connection (used
plug
to control a connected damper in atmospheric
appliances)
P2 ECOM
3-pin
EnviraCOM™ communications connector
P4 (Jumper) Jumper
Provides a lockout for the DIP switch settings
SENSE
Wire with
Connects to the REMOTE SENSE connector
JUMPER
3/16 inch
for installations with a single spark rod (local
WIRE
quick
flame sensing)
connect
NOTE: For installations with remote flame
sensing (separate spark and sensor rods), this
jumper wire is clipped as close to the circuit
board as possible and the wire is discarded.
REMOTE
3/16 inch
Flame Sensor connector
SENSE
For single rod installations, connect the
SENSE JUMPER WIRE to this terminal
connector.
For dual rod installations, connect the flame
sense wire from the burner/igniter to this ter-
minal connector.
SPARK
1/4 inch
High voltage sparking electrode
SeTTingS and adjuSTmenTS
diP SwiTch (S1) SeTTingS
When replacing an existing ignition control with the S8610U,
refer to 69-1955 for the correct DIP switch settings.
Important
Do not power the ignition control prior to setting the DIP
switches.
The following timing parameters may be set with this 2-position
DIP switch.
PrePurge
To select Prepurge, set SW1 according to Table 2.
2
Trial for igniTion (Tfi)
To select the Trial for Ignition timing, set SW2 according to
Table 2.
Table 2. diP Switch (S1) Settings.
Prepurge
Trial For Ignition
SW1
SW2
None
90 seconds
OFF
OFF
30 seconds
90 seconds
ON
OFF
None
15 seconds
OFF
ON
30 seconds
15 seconds
ON
ON
NOTE: The default factory settings (all OFF) are in Bold in
Table 2.
P4 JUMPER
S1 DIP SWITCH
M23618
fig. 2. diP Switch (S1) and jumper (P4) location.
S1
ON
1
2
M23587
fig. 3. diP Switch (S1)—shown with factory default
settings (off) for Sw1 and Sw2.
3
led STaTuS and TrouBleShooTing
The ignition control module has two LEDs; one for flame sens-
ing and one for system status:
FLAME LED
M23619
STATUS LED
fig. 4. location of leds.
flame led (Yellow)
Indicates flame presence and strength. See Table 3.
STaTuS led (green)
Indicates system operation status and error conditions. See
Table 4 and the "Troubleshooting Guide" in 69-1955.
Table 3. Yellow led flame codes.
Yellow LED Flash
Recommended
Code
a
Indicates
Service Action
Heartbeat
Normal Flame Signal
Not applicable
2
Weak Flame Signal—
Perform routine main-
System will operate
tenance to assure opti-
reliably but flame signal
mum flame signal.
is less than desired.
NOTE: This indication
may flash temporarily
during or shortly after
lightoff on some
applications.
4
Table 3. Yellow led flame codes. (continued)
1
Marginal Flame
Check gas supply, pilot
Signal—System may
burner, flame sense
not operate reliably over
wiring, contamination
time.
of flame rod, burner
ground connection.
Service call
recommended.
NOTE: This indication
may flash temporarily
during or shortly after
lightoff on some appli-
cations.
OFF
Flame Signal below
Check gas supply, pilot
minimum threshold for
burner, flame sense
system operation.
wiring, contamination
of flame rod, burner
ground connection.
a
Flash Code Descriptions:
- Heartbeat: Constant 1/2 second bright, 1/2 second dim cycles.
- The flash code number signifies that the LED flashes X times at 2
Hz, remains off for two seconds, and then repeats the sequence.
Table 4. green led Status codes.
Green LED
Flash Code
Next System
Recommended
(X + Y)
Indicates
Action
Service Action
OFF
No "Call for Heat"
Not applicable
None
Flash Fast
Startup – Flame
Not applicable
None
sense calibration
Heartbeat
Normal operation
Not applicable
None
2
5 minute Retry
Initiate new trial
If system fails to
Delay
for ignition after
light on next trial
retry delay com-
for ignition, check
Pilot flame not
pleted.
gas supply, pilot
detected during trial
burner, spark
for ignition.
and flame sense
wiring, flame rod
contaminated or
out of position,
burner ground
connection.
3
Recycle – Flame
Initiate new trial
If system fails to
failed during run.
for ignition. Flash
light on next trial
code will remain
for ignition, check
through the igni-
gas supply, pilot
tion trial until
burner, flame
flame is proved.
sense wiring,
contamination of
flame rod, burner
ground
connection.
5
Table 4. green led Status codes. (continued)
4
Flame sensed out
If situation self
Check for pilot
of sequence.
corrects within 10
flame. Replace
seconds, control
gas valve if pilot
module returns to
flame present.
normal sequence.
If no pilot flame,
If flame out
cycle "Call for
of sequence
Heat." If error
remains longer
repeats, replace
than 10 seconds,
control.
control module
goes to Flash
code 6+4 (see
below).
5
Damper Error:
If damper error
Check damper
– Damper required
corrects, ignition
connection, damp-
but not present
control resumes
er wiring, and 24V
normal operation.
connection on
– Damper failed
control.
to open within 60
seconds
Replace damper if
necessary.
– Damper failed
to close within 60
seconds
7
Flame sense leak-
Control module
Check flame
age to ground.
remains in wait
sense lead wire
mode. When the
for damage or
fault corrects,
shorting. Check
control module
that flame rod is
resumes normal
in proper position.
operation after a
Check flame rod
one minute delay.
ceramic for cracks,
damage or
tracking.
8
Low secondary volt-
Control module
Check transformer
age supply.
remains in wait
and AC line for
mode. When the
proper input volt-
fault corrects,
age to the control.
control module
Check with full
resumes normal
system load on the
operation after a
transformer.
one minute delay.
6+2
5 minute Retry
Initiate new trial
Check gas supply,
Delay
for ignition after
pilot burner, spark
retry delay
and flame sense
– On every third
completed.
wiring, flame rod
retry on the same
contaminated or
"Call for Heat"
out of position,
burner ground
connection.
6
Advertisement
Table of Contents

Related Manuals for Honeywell S8610U


Summary of Contents for Honeywell S8610U
- Page 1 Indicates Service Action contaminated or operation after a transformer. out of position, When replacing an existing ignition control with the S8610U, Heartbeat Normal Flame Signal Not applicable burner ground one minute delay. refer to 69-1955 for the correct DIP switch settings.
- Page 2 If TH-R and TH-W are jumpered together, connect 25V (2) lead from S86 to TH-W on S8610U. On dual igniter and sensor models, remove jumper wire quick connect from S8610U Remote Sense terminal, then cut jumper wire at circuit 1985 Douglas Drive North 35 Dynamic Drive board and discard.
Need help?
Do you have a question about the S8610U and is the answer not in the manual?
Questions and answers