
Subscribe to Our Youtube Channel
Related Manuals for Seastar Solutions Autopilot Pump


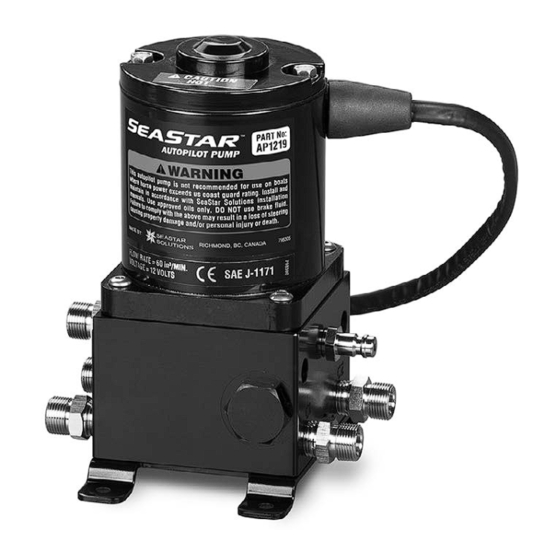
Summary of Contents for Seastar Solutions Autopilot Pump
- Page 1 OPERATING INSTRUCTIONS AND OWNER’S MANUAL w w w . s e a s t a r s o l u t i o n s . c o m FORTY Autopilot Pump ISO 9001...
- Page 2 Help protect your boating environment by ensuring that all used oil is disposed of properly. NOTICE Marine Canada Acquisition Inc. DBA SEASTAR SOLUTIONS is referred to as SeaStar Solutions throughout this publication. Don’t compromise performance... use genuine SeaStar parts only! •...
-
Page 3: Safety Information
(including helm pumps, hoses and fitting kits). 2. DO NOT modify or substitute any component in any way without written consent from SeaStar Solutions. 3. Comply with all system ratings/regulations (boat/engine, U.S.C.G.). - Cylinder MUST be compatible with engine(s) installed. - Page 4 WARNING The safety information provided below is intended to inform you of the dangers that may be present before, during and after use. It is critical that you read and understand ALL the points noted. 1. Check Fluid level in highest helm pump (see page 15 for proper Prior to every use fluid level setting).
-
Page 5: Table Of Contents
Before proceeding with the installation, read these instructions thoroughly to familiarize yourself with the workings of the SeaStar Autopilot pump. SeaStar Solutions cannot accept responsibility for installations where instructions have not been followed, where substitute parts have been used, or, where modifications have been made to our products. -
Page 6: Before Operating Your Boat
YOUR BOAT Ensure that the following check list is carried out. 1. With the Autopilot pump turned OFF (ignition OFF) perform a system pressure test by turning the wheel all the way to hard over and then forcing the wheel another one quarter to one half turn past the stop point. -
Page 7: Things You Need To Know
CAUTION DO NOT use SeaStar nylon tubing with the Autopilot pump, other than for the compensating line. Use of SeaStar/ SeaStar PRO steering hose is the ONLY hose recommended for use in these systems. -
Page 8: Seastar Autopilot Pump Compatibility
It is offered in 12 and 24 volt configurations, as well as two different pump outputs (type 1 and type 2). It can be used as a standalone Autopilot pump or can be mounted to a previously installed SeaStar Power Assist unit avoiding the need to install additional hydraulic lines. -
Page 9: Specifications
SPECIFICATIONS WARNING 12V SEASTAR 24V SEASTAR DO NOT exceed peak operating AUTOPILOT PUMP AUTOPILOT PUMP pressure. 1000psi. • 12 Volts • 24 Volts • 1000psi MAX system • 1000psi MAX system pressure pressure • Flow Rate (No-Load): • Flow Rate (No-Load):... -
Page 10: System Installation
These instructions have been made as complete as possible, and as brief as practical. If you have any questions, please contact your Distributor or SeaStar Solutions for assistance. WARNING Failure to follow these and ALL other installation instructions may cause loss of steering control leading to property damage, personal injury and/or death. -
Page 11: Overview
• Install steering cylinder(s) into boat using the installation manual instructions provided with your steering cylinder. • Install Autopilot pump as per instructions on page 8. CYLINDER • Install steering hoses as outlined on page 9 to page 11 of this manual. -
Page 12: Step 1 Mounting And Plumbing
25. • Mount the autopilot pump as close to the cylinder as possible, in a cool and dry location, away from excessive heat sources such as engine manifolds. Avoid any areas that seem to collect water. - Page 13 AUTOPILOT PUMP Plumbing the SeaStar Autopilot Pump Hose connection is as follows. Outboard Front Mount • Helm to AP = S (helm) to H1 (AP), P (helm) to H2 (AP), lower R port Cylinders: (helm) to R (AP). HC5345-3, HC5347-3 •...
- Page 14 AUTOPILOT PUMP Side Mount Cylinder: Hose connection is as follows. HC5370 • Helm to AP = S (helm) to H1 (AP), P (helm) to H2 (AP), lower R port (helm) to R (AP). Splashwell Cylinder: • AP to cylinder = C1 (AP) to starboard side (cylinder). C2 (AP) to port HC5380 side (cylinder).
- Page 15 AUTOPILOT PUMP All Inboard & Sterndrive Hose connection is as follows. Except: HC5332-2 • Helm pump to AP = S (helm) to H1 (AP), P (helm) to H2 (AP), lower R port (helm) to R (AP). • AP to cylinder = C1 (AP) to starboard side (cylinder), C2 (AP) to port side (cylinder).
-
Page 16: Step 2 Autopilot Electrical Connections
AUTOPILOT PUMP Step 2 Autopilot Electrical Connections Connect the Red (+) and Black (-) wires of the Autopilot pump to the controller as per the Autopilot manufacturers recommendations. The polarity may need to be reversed on some controllers in order to operate correctly. -
Page 17: Step 3 Filling & Purging The System
These instructions show how to fill and purge a SeaStar steering Read First system with the SeaStar Autopilot pump installed. The same steps apply to ALL cylinders with the exception of which bleed fitting to open and close and the direction the cylinder rod moves. These variations are shown in inset diagrams at each step. - Page 18 AUTOPILOT PUMP In an emergency, SeaStar EPS Fluid, any MD-3/4 rated ATF or MIL- PRF-5606H equivalent fluid that is filtered through a fine mesh screen can be used. The system MUST be thoroughly flushed as soon as possible with genuine SeaStar Steering Fluid after using an emergency fluid.
-
Page 19: Step 3.1 Fill & Purge Manually
AUTOPILOT PUMP Step 3.1 Fill & Purge Manually NOTICE The following procedure applies to a single helm and single cylinder installation. If using the SeaStar Power Purge JR/SR please refer to page 18. Other configurations will require this procedure plus the additional steps outlined on page 19. - Page 20 Do not use anything other than your hands to restrain the cylinder body/rod. • Run SeaStar Autopilot pump continuously in the same direction you have been turning for a minimum of 2 minutes. • While continuing to turn the wheel close the bleed fitting for your installation and let go of the cylinder body/rod.
- Page 21 Outboard Front Mount & HC5332-2 Cylinder Side Mount / Splashwell Mount Cylinder All Balanced Cylinder. Inboard & Sterndrive Cylinders • Open Autopilot pump reservoir bleed fitting. Refer to figure 9. 3.1.6 • Wait approximately 30 seconds while reservoir purges. Fluid may or may not exit bleeder at this time depending on individual configuration.
-
Page 22: Step 3.2 Fill & Purge Using Power Purge
• Connect one of the fluid return hoses (cylinder lines) from the Power Purge unit to the reservoir bleed fitting on the SeaStar Autopilot pump (see figure 9 on page 17 for bleed fitting location). • Open reservoir bleed fitting 1 turn. -
Page 23: Step 3.3 Additional Purge Instructions
AUTOPILOT PUMP Step 3.3 Additional Purge Instructions 3.3.1 STATION NO.2 Twin Station Single Cylinder Perform Steps 3.1.1 – 3.1.6 at STATION NO.1 station no. 1. Then repeat Steps 3.1.2 – 3.1.5 at station no. 2. AP UNIT Note: Refer to Oil Level & System Check on page 20. -
Page 24: Step 4 System Check
At this time the steering system must be checked for proper hose and fitting connections, possible leaks, and air removal. Please complete the following steps with the Autopilot pump OFF. • Turn steering wheel to hard over, then force the wheel another one quarter to one half turn past the stop point. -
Page 25: Maintenance
WARNING Failure to comply with maintenance checks may result in loss of steering, causing property damage and/or personal injury. Maintenance requirements will vary depending on usage and climate. Bi-annual inspection by a qualified marine mechanic is required. Autopilot Pump... -
Page 26: Troubleshooting Guide
4. Autopilot pump steering Motor polarity reversed Reverse motor leads at Autopilot controller in wrong direction 5. Autopilot pump will not Blown Fuse Check for blown fuses and bad connections in Autopilot wiring. Refer to page 12. turn on... -
Page 27: Statement Of Limited Warranty
In such a case SeaStar Solutions products found to be defective and covered by this warranty, will be replaced at SeaStar Solutions option, and returned to the customer. - Page 28 This page left intentionally blank. SEASTAR Hydraulics...
-
Page 29: Mounting Template
MOUNTING TEMPLATE 4.20" 2.50" 4 x Ø .22 NOTICE If this mounting template is photocopied, ALL measurements must be checked using a measuring device prior to use. Autopilot Pump... - Page 30 This page left intentionally blank. SEASTAR Hydraulics...
- Page 32 SEASTAR SOLUTIONS 3831 NO.6 ROAD RICHMOND, B.C. CANADA V6V 1P6 FAX 604-270-7172 www.seastarsolutions.com ISO 10592 © 2007 MARINE CANADA ACQUISITION INC. DBA SEASTAR SOLUTIONS PRINTED IN CANADA FORM NO. 798320 REV. D 100–03/16...
Need help?
Do you have a question about the Autopilot Pump and is the answer not in the manual?
Questions and answers