Table of Contents
Advertisement
Quick Links
TABLE OF CONTENTS
.............................................................................................. 1
......................................................................................................... 2
2.1 Specifications ............................................................................................ 2
2.2 THERMOLINK Controller ............................................................................ 5
2.2.1 Main Menu ....................................................................................... 7
2.2.2 Take a Reading Screen ...................................................................... 7
2.2.3 Measurement Configuration Screen ................................................. 8
2.2.4 Stored Readings Menu ................................................................... 10
2.2.5 Unattended Mode Screen ............................................................... 12
2.2.6 Device Configuration Screen .......................................................... 14
2.2.7 About Screen .................................................................................. 14
2.3 Selecting a Sensor ................................................................................... 15
2.3.1 KS-3 Sensor ................................................................................... 15
2.3.2 TR-3 Sensor .................................................................................... 16
2.3.3 SH-3 Sensor ................................................................................... 16
2.3.4 RK-3 Sensor ................................................................................... 17
................................................................................................. 18
3.1 Controller Configuration .......................................................................... 18
3.2 Measurement Configuration .................................................................... 19
3.3 Sensor Installation .................................................................................. 22
3.3.1 Rock or Cured Concrete (RK-3) ....................................................... 23
3.3.2 Wet Cement .................................................................................... 23
3.3.3 Solid Material (TR-3) ...................................................................... 24
i
18215-00
1.26.2018
Advertisement
Table of Contents

Related Manuals for METER THERMOLINK


Summary of Contents for METER THERMOLINK
-
Page 1: Table Of Contents
1. Introduction ....................1 2. System ......................2 2.1 Specifications .................... 2 2.2 THERMOLINK Controller ................5 2.2.1 Main Menu ..................7 2.2.2 Take a Reading Screen ..............7 2.2.3 Measurement Configuration Screen ..........8 2.2.4 Stored Readings Menu ..............10 2.2.5 Unattended Mode Screen ............... - Page 2 THERMOLINK 3.4 Take a Reading ..................24 3.5 Saving and Viewing a Reading ..............26 3.6 Interfacing with THERMOLINK Utility ............27 3.7 Install THERMOLINK Utility ..............27 3.7.1 Download Data ................27 3.7.2 Update Firmware Version ............... 29 4. Theory ......................
- Page 3 TR-3 sensor 3 volumetric specific heat capacity 4 NOTE: Not all sensors are included in the THERMOLINK Thermal Properties Analyzer kit shown above. Custom sensor kits are available separately (i.e., RK-3 sensor). Contact Customer Support for more information.
-
Page 4: Introduction
1. INTRODUCTION INDEX Thank you for purchasing the THERMOLINK Thermal Properties Analyzer from METER Group. This manual will help the user understand and use the THERMOLINK controller to the best email address 38 about screen 7, 14 of its capability. Upon receipt, please verify that all components were shipped and appear in equilibration 24, 28, 35 accuracy 3–4... -
Page 5: System
REFERENCES 2. SYSTEM This section describes the specifications and components of the THERMOLINK system. Abramowitz M, Stegun IA. 1972. Handbook of mathematical functions. New York (NY). Dover The system comprises the handheld device (Section 2.2) and as many as four sensors Publications, Inc. - Page 6 THERMOLINK SERVICE SENSORS SEVERABILITY. If any of the Terms and Conditions set out in this contact are declared to be invalid by a court, agency, commission, or other entity having jurisdiction over the KS- 3 (6 cm [small] single needle)
- Page 7 THERMOLINK SYSTEM SHIPMENT. In the absence of specific shipping instructions, the Seller, if and as requested SH- 3 (3 cm dual-needle) by the Buyer, will ship the goods by the method the Seller deems most advantageous. Where the Seller ships the goods, the Buyer will pay all transportation charges that are payable on...
-
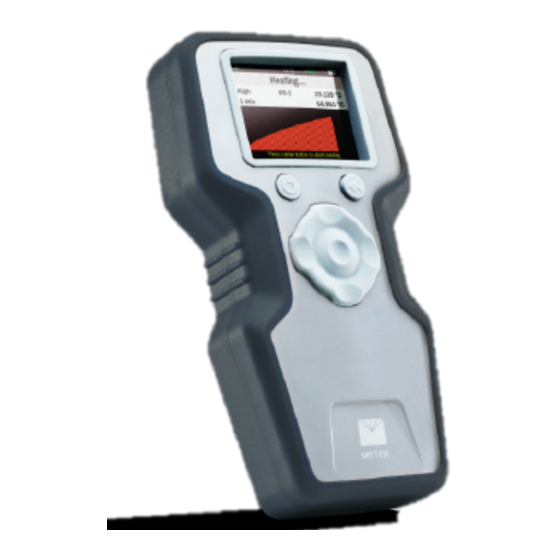
Page 8: Thermolink Controller
PRICES AND PAYMENT. Invoice prices will be based upon METER prices as quoted or at it is pressed multiple times, the cursor moves back to the Main menu. Changes are METER list price in effect at the time an order is received by the Seller. Prices do not include automatically saved. - Page 9 Replace the cover and return the screws. Turn on the THERMOLINK controller. POWER button BACK button Update the time and date as prompted. UP button D-pad If the THERMOLINK controller should ever require servicing, please contact Customer Support. LEFT button RIGHT button 5.3 TROUBLESHOOTING DOWN button...
-
Page 10: Main Menu
13. Compare the reading of the value recorded on the Certifi cate of Quality Assurance (included in the THERMOLINK kit) to the results from the verifi cation reading. For the The Main menu is the starting point for all of the firmware applications within the device. -
Page 11: Measurement Configuration Screen
Figure 22 Verifi cation holder for single-needle sensors NOTE: After repeated use, the septum may begin to leak. METER provides replacement septums with the instrument. To replace, simply remove the cap, press the old septum out, and replace with a new one. - Page 12 Figure 5 for examples of the use of the (default) and THERMOLINK kit ships with two standard materials that can be used to verify that the (only) labels on the Sensor, Power, and Read Time measurement categories. sensors are operating according to specifications: NOTE: Changing between the SI and Imperial units also changes the units on all previous readings saved in the memory.
-
Page 13: Stored Readings Menu
Figure 6 Stored Readings menu VIEW From the Stored Readings screen (Figure 6), select the View option. This allows a user to view all the data currently stored in the THERMOLINK controller (Figure 7). Measurements are stored in the order they are taken. - Page 14 . At long times the temperature hardly changes, so noise in data stored on the THERMOLINK controller and the data is not recoverable. the measurements can strongly affect the measurement. Part of the problem with shorter...
-
Page 15: Unattended Mode Screen
Unattended Mode (Figure 9) allows the user to automatically make multiple readings at specified intervals. To reach the Unattended Mode screen, select the Unattended Mode icon on the The THERMOLINK collects data for at least 30 s to determine the temperature drift. If the Main menu. - Page 16 Reading2, Reading3, etc. The THERMOLINK design attempts to optimize thermal properties measurements relative to these issues. METER sensors are relatively large and robust making them easy to use. The THERMOLINK keeps heating times as short as possible to minimize thermally induced water movement and lower the time required for a measurement.
-
Page 17: Device Configuration Screen
Once connected, the controller serial number will appear in the THERMOLINK Utility dropdown (Figure 20). If more than one THERMOLINK is connected via USB, each will show in the dropdown. Click on the correct THERMOLINK from those listed in the dropdown list. -
Page 18: Selecting A Sensor
In low-viscosity liquids operate in low-power mode to avoid free convection and avoid any vibration of the sample. Some users have found good results by placing the THERMOLINK in unattended mode, reading every 15–30 min, and leaving it to read overnight. The lowest readings obtained are those without convection. -
Page 19: Sensor
Additionally, the dimensions of the download data from the THERMOLINK controller and enables the user to analyze data in a TR-3 sensor conform to the specifications for the Lab Probe called out by the IEEE 442-1981, Microsoft ®... -
Page 20: Sensor
THERMOLINK OPERATION 2.3.4 RK-3 SENSOR 3.5 SAVING AND VIEWING A READING The thick (60-mm long, 3.9-mm diameter), single-needle RK-3 sensor measures thermal At the end of a test, the MAKE SELECTION BELOW screen will appear. On the bottom of this conductivity and thermal resistivity and was designed specifically for use in hard screen are four save options (Figure 18). -
Page 21: Operation
METER sensors are built to the highest standards, but misuse, improper protection, or improper installation may damage the sensor and possibly void the manufacturer’s warranty. Before integrating THERMOLINK or other METER sensors into a system, make sure to follow the recommended installation instructions and have the proper protections in place to safeguard sensors from damage. -
Page 22: Measurement Configuration
Hour format Switch between the 12-h and 24-h clock 3.4 TAKE A READING Set the brightness Before taking a reading, plug the sensor into the THERMOLINK controller using the Brightness DB-15 connector. Brightness can be set between 0% and 100% NOTE: For information on using Unattended Mode to take readings in go to Section 2.2.5. - Page 23 For measurements made in intermediate conductivity porous materials such as soils. Insert the pilot pin into the wet cement. Compatible with all THERMOLINK sensors except SH-3. Ensure enough of the pin is showing to be able to grip it for removal. Soil Uses only high- power mode.
-
Page 24: Sensor Installation
• Insert the sensor needle all the way into the sample material. capacity of a sample. Compatible with SH-3 sensors. • Use the thermal grease included in the THERMOLINK kit to improve contact in hard or Diffusivity/ grainy samples. Uses high-power mode.
Need help?
Do you have a question about the THERMOLINK and is the answer not in the manual?
Questions and answers