
Related Manuals for Magic Chef HQPZO13ST


Summary of Contents for Magic Chef HQPZO13ST
- Page 1 12-Inch Pizza Oven User’s Manual Model HQPZO13ST, HQPZO13B, HQPZO13R PLEASE READ THIS MANUAL CAREFULLY BEFORE USING YOUR PIZZA OVEN AND KEEP IT FOR FUTURE REFERENCE.
-
Page 2: Product Registration
PRODUCT REGISTRATION Thank you for purchasing a Magic Chef® product. The first step to protect your new product is to complete the product registration on our website: www.mcappliance.com/register. The benefits of registering your product include the following: Registering your product will allow us to contact you regarding a safety notification or product update. -
Page 3: Table Of Contents
CONTENTS PRODUCT REGISTRATION ........... . . 2 PRECAUTIONS . -
Page 4: Precautions
PRECAUTIONS EXPLANATION OF SYMBOLS WARNING Hazards or unsafe practices which COULD result in severe personal injury or death. CAUTION Hazards or unsafe practices which COULD result in minor personal injury. THIS PRODUCT IS INTENDED FOR HOUSEHOLD USE ONLY WARNING: Read and understand all safety precautions. Failure to follow all instructions described in this user manual may result in electric shock, fire and/or serious personal injury. -
Page 5: Important Safety Instructions
IMPORTANT SAFETY INSTRUCTIONS WARNING: To reduce the risk of fire, electric shock, or serious personal injury, please read and save all instructions before using the Pizza Oven. When using this or any other electrical appliance, basic safety precautions should be observed, including the following: READ ALL INSTRUCTIONS BEFORE USE. -
Page 6: Save These Instructions
Ensure that nothing touches the top and bottom heating elements of the oven. 22. Extreme caution must be used when moving the drip pan containing hot oil or other hot liquids. Use extreme caution when removing the crumb tray, baking rack or disposing of hot grease and other hot liquids. -
Page 7: Specifications
SPECIFICATIONS Figure 1 6.6” 14.0” 19.3” Product Dimensions 19.3” x 6.6” x 14.0” [W x H x D] Net Weight 4.5 Lbs. Capacity Up to 12 Inches Voltage Rating 120V AC, 60 Hz Power Rating 1300 Watts... -
Page 8: Parts And Features
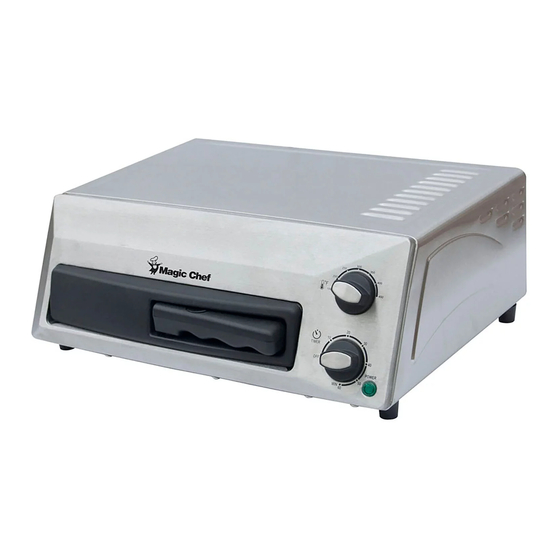
PRODUCT COMPONENTS Figure 2 Power indicator light (1) Removable baking rack with chrome wire rack (1) Stainless steel heating element (4) Baking rack face panel (1) Skid-resistant foot (4) Handle release button (1) Hinged crumb tray (1) Folding baking rack handle (1) Crumb tray knob (1) Heating element control knob (1) Timer control knob (1) -
Page 9: Assembly
ASSEMBLY Remove the product from its packaging materials. No assembly is required as the unit is preassembled. The baking rack handle folds into the baking rack face panel when not in use for convenient storage. To unfold the handle for use, pull the right end of the handle out and away from the pizza oven until it is perpendicular with the oven and locked in place. -
Page 10: Operation Instructions
OPERATION INSTRUCTIONS CONTROL PANEL Figure 3 Heating element controls: OFF, TOP ( ), BOTTOM ( DUAL ( Timer controls: 0-60 min. timer with 10 min. increments Power indicator light BEFORE USE Before the first use, it is recommended to run the pizza oven without a pizza at its highest temperature setting to allow any manufacturing residue to burn off. - Page 11 Remove the pizza from its packaging, including the cardboard disk. If necessary, place the pizza on an ovenproof cookware or bakeware. NOTE: The pizza oven can accommodate pizzas up to 12 inches in diameter. Ensure proper fitment when using an ovenproof cookware or bakeware. DO NOT cover any part of the pizza oven with metal foil, including the crumb tray;...
- Page 12 NOTE: During first use with each type of pizza, start with the Type of Pizza Approximate Cooking Time shorter baking time in the indicated range. Then open the oven Regular Crust 18 to 26 minutes and check the pizza. Extend the time as needed to bake the pizza Rising Crust 25 to 35 minutes the way you like it.
-
Page 13: Care And Maintenance
CARE AND MAINTENANCE CLEANING WARNING: To avoid the risk of electric shock, ALWAYS ensure the pizza oven is unplugged from the electrical outlet before assembling, relocating, cleaning or storing. The pizza oven should be cleaned regularly for optimal performance. Regular cleaning will also reduce the risk of fire hazard and electric shock. -
Page 14: Troubleshooting
TROUBLESHOOTING Problem Possible Causes Solutions Will not operate or - No power - Check if the pizza oven is plugged in. turn on. - Check the fuse/circuit breaker in the home. - Timer control knob - Turn the timer control knob past the 10 minute marker. For cooking activation times less than 10 minutes, first turn the timer knob past the 10 minute marker, and then counterclock wise to the desired time. -
Page 15: Limited Warranty
Some states prohibit the exclusion or limitation of incidental or consequential damages, or limitations on implied warranties. This warranty gives you specific legal rights, and you may also have other rights which vary from state to state. Model Parts Labor Type of Service HQPZO13ST One Year One Year Carry In HQPZO13B One Year... - Page 16 CNA International, Inc. d/b/a MC Appliance Corporation. All rights reserved. Magic Chef® logo is a registered trademark of CNA International, Inc. www.mcappliance.com Printed in China...
- Page 17 Horno para pizza de 12 pulgadas Manual del usuario Modelo HQPZO13ST, HQPZO13B, HQPZO13R LEA ESTE MANUAL ANTES DE UTILIZAR SU HORNO PARA PIZZA Y GUÁRDELO PARA FUTURA REFERENCIA.
-
Page 18: Registración Del Producto
REGISTRACIÓN DEL PRODUCTO Gracias por comprar el producto Magic Chef®. El primer paso para proteger su nuevo producto es completar la forma de registración en nuestra pagina web: www.mcappliance.com/register. Los beneficios de registrar su producto incluyen lo siguiente: Al registrar su producto nos permite contactarle para notificarle de un cambio de seguridad o actualización del producto. - Page 19 ÍNDICE REGISTRACIÓN DEL PRODUCTO ..........18 PRECAUCIONES .
-
Page 20: Precauciones
PRECAUCIONES SIGNIFICADO DE LOS SÍMBOLOS ADVERTENCIA Peligros o prácticas inseguras que PODRÍAN provocar lesiones graves o la muerte. PRECAUCIÓN Peligros o prácticas inseguras que PODRÍAN provocar lesiones menores. ESTE PRODUCTO ESTÁ DESTINADO EXCLUSIVAMENTE PARA USO DOMÉSTICO ADVERTENCIA: Lea con atención todas las advertencias de seguridad. Si no se siguen las instrucciones descritas en este manual del usuario se pueden producir choques eléctricos, incendios y/o lesiones graves. -
Page 21: Instrucciones De Seguridad Importantes
INSTRUCCIONES DE SEGURIDAD IMPORTANTES ADVERTENCIA: Para reducir el riesgo de incendio, choque eléctrico o lesiones graves, lea y guarde todas las instrucciones antes de usar el Horno para pizza de acero inoxidable. Al usar este o cualquier otro electrodoméstico, se deben tener en cuenta precauciones de seguridad básicas, incluidas las siguientes: LEA TODAS LAS INSTRUCCIONES ANTES DEL USO. - Page 22 20. Se debe tener cuidado al usar elementos de cocina o de horneado que estén hechos de cualquier material que no sea metal o vidrio para hornos. NO coloque ninguno de los siguientes materiales en el horno: cartón, plástico, papel o similares. Asegúrese de que nada toque los elementos de calefacción superior e inferior del horno.
-
Page 23: Especificaciones
ESPECIFICACIONES Figura 1 168 mm 356 mm 490 mm Dimensiones del producto 490 mm x 168 mm x 356 mm [W x H x D] Peso neto 2.0 kg Capacidad De hasta 12 pulgadas Tensión nominal 120 V CA, 60 Hz Potencia nominal 1300 Vatios... -
Page 24: Piezas Del Producto
PIEZAS DEL PRODUCTO Figura 2 Luz indicadora de alimentación (1) Bandeja de horneado extraible con entretejido Elemento de calefacción de acero de cromo (1) inoxidable (4) Panel frontal de la bandeja de horneado (1) Soporte antideslizante (4) Botón de liberación del asa (1) Bandeja para migas con bisagras (1) Plegado del asa de la bandeja de horneado (1) Perilla de la bandeja de migas (1) -
Page 25: Armado
ARMADO Extraiga el producto del material de embalaje. No necesita realizar ningún ensamble ya que la unidad viene ensamblada. El asa de la bandeja de horneado se pliega sobre el panel frontal de la bandeja de horneado cuando no la está... -
Page 26: Instrucciones De Funcionamiento
INSTRUCCIONES DE FUNCIONAMIENTO PANEL DE CONTROL Figure 3 Controles del elemento de calefacción: OFF (Apagado), TOP ( (Superior), BOTTOM ( ) (Inferior), DUAL ( ) (Doble) Controles del temporizador: temporizador entre 0-60 min en múltiplos de 10 Luz indicadora de alimentación ANTES DE USAR Antes del primer uso, se recomienda encender el horno para pizza sin una pizza dentro en la temperatura más alta para permitir que se queme... - Page 27 NOTA: Recuerde activar el horno para pizza girando la perilla de control del temporizador hasta pasada la marca de 10 minutos. Para tiempos de cocción inferiores a 10 minutos, primero gire la perilla del temporizador hasta pasada la marca de 10 minutos, y luego gire en sentido contrario a las agujas del reloj hasta el tiempo deseado.
- Page 28 TABLA DE COCCIÓN DE PIZZA Los siguientes tiempos de cocción son para hornear pizzas de 12 pulgadas (35 cm). Los tiempos son aproximados. Use los tiempos de cocción más cortos para pizzas con un solo ingrediente y los tiempos más largos al recalentar pizzas con varios ingredientes o ingredientes vegetales.
-
Page 29: Cuidado Y Mantenimiento
CUIDADO Y MANTENIMIENTO LIMPIEZA ADVERTENCIA: Para evitar el riesgo de choque eléctrico, SIEMPRE asegúrese de que el horno para pizza esté desconectado del tomacorrientes antes de armarlo, reubicarlo, repararlo limpiarlo o, guardarlo. Se debe limpiar el horno para pizza regularmente para un rendimiento óptimo. Una limpieza regular también reducirá... -
Page 30: Solución De Problemas
SOLUCIÓN DE PROBLEMAS Problema Causas posibles Soluciones No funciona o no se - No hay energía - Verifique que el horno para pizza esté enchufado. enciende. - Verifique el fusible/disyuntor eléctrico del hogar. - Activación de la perilla - Gire la perilla de control del temporizador hasta pasada la marca de de control del 10 minutos. -
Page 31: Garantía Limitada
Esta garantía le otorga a usted derechos legales específicos, y usted puede también tener otros derechos que varían según la entidad federa!va donde se encuentre. Modelo Piezas Trabajo Tipo de servicio HQPZO13ST Uno año Uno año Lleve adentro HQPZO13ST Uno año Uno año... - Page 32 CNA International, Inc. realiza negocios bajo el nombre de MC Appliance Corporation. Derechos reservados. El logotipo Magic Chef® es una marca registrada de CNA International, Inc. www.mcappliance.com Impreso en China...
Need help?
Do you have a question about the HQPZO13ST and is the answer not in the manual?
Questions and answers